**[Prometheus](https://prometheus.io/):** Scrapes Metrics Server API and application metrics and stores the data in a time-series database for insights into application health and performance.
**[Grafana](https://grafana.com/grafana/):** Provides visualization and alerting capabilities based on Prometheus's time-series database of metrics. | | **Logging** | **[Vector](https://vector.dev/):** A companion agent that efficiently gathers and sends container logs to Loki and other storage locations (S3, SIEM tools, etc), simplifying log monitoring, troubleshooting, and compliance auditing, enhancing the overall observability of the mission environment.
**[Loki](https://grafana.com/docs/loki/latest/):** A log aggregation system that allows users to store, search, and analyze logs across their applications. | | **Security and Compliance** | **[Falco](https://falco.org/):** Provides real-time threat detection and security monitoring for cloud-native environments.
**[Pepr](https://pepr.dev/):** UDS policy engine and operator for enhanced security and compliance.| | **Identity and Access Management** | **[Keycloak](https://www.keycloak.org/):** A robust open-source Identity and Access Management solution, providing centralized authentication, authorization, and user management for enhanced security and control over access to mission-critical resources.| | **Backup and Restore** | **[Velero](https://velero.io/):** Provides backup and restore capabilities for Kubernetes clusters, ensuring data protection and disaster recovery.| | **Authorization** | **[AuthService](https://github.com/istio-ecosystem/authservice):** Offers centralized authorization services, managing access control and permissions within the Istio mesh. AuthService plays a supporting role to Keycloak as it handles part of the OIDC redirect flow.| ----- # Why UDS? UDS creates, supports, and maintains a secure runtime platform that simplifies software delivery and deployment for both application development teams and platform teams. UDS deploys mission applications into any environment while providing documentation and evidence to facilitate obtaining an Authority to Operate (ATO). By leveraging the power of open source projects like Zarf, Pepr, Lula, and more, UDS enables the creation of portable and compliant software artifacts. With UDS, mission teams can: - Deploy a new authorizable software environment swiftly and seamlessly. - Update mission application bundles and packages on-demand in minutes. - Deploy mission applications to classified and unclassified cloud, on-premises, and edge environments. - Use open and extensible architectures. - Avoid data and vendor lock-in. ## Security and Compliance UDS places a strong emphasis on security and compliance, enabling Mission Heroes to meet stringent requirements for obtaining an Authority to Operate (ATO). It binds compliance to specific software features, ensuring that controls required for authorization are met efficiently. By integrating security and compliance into the software development and deployment lifecycle, UDS helps your team proactively address potential vulnerabilities, reduce risk, and maintain a secure software ecosystem. ## Enhanced Portability and Cross-Platform Support UDS offers enhanced portability, allowing teams to deploy their software artifacts across diverse environments regardless of underlying infrastructure. Whether it's cloud-based, on-premises, or edge environments, UDS ensures that mission applications can be easily migrated and executed on different platforms. This seamless deployment across domains reduces the need for platform-specific modifications, accelerating the ATO process through the incorporation of compliance documentation directly into the software delivery pipeline. UDS's portability enables Mission Heroes to adapt quickly to changing infrastructure needs and expand their reach to various environments. ## Open Source and Avoiding Vendor Lock UDS is built on a foundation of open-source technologies, providing Mission Heroes with the freedom to access and modify the underlying code. By leveraging open-source projects like Zarf, Pepr, Keycloak, Istio, and more, UDS ensures that users can avoid vendor lock-in and maintain control over their data. This open approach allows Mission Heroes to customize and optimize their software delivery processes. ## Leverage UDS Core UDS Core offers a foundational suite of applications designed to establish a secure and efficient mission environment. It encompasses critical functionalities such as collaboration, monitoring, logging, security, compliance, and data protection. By utilizing these integrated applications, Mission Heroes can confidently deploy and operate source packages that adhere to rigorous security and performance standards. ----- # UDS Bundles A UDS Bundle is a collection of [UDS Packages](/structure/packages) designed to facilitate the delivery of software solutions for specific missions or software delivery processes. With UDS Bundles, teams can efficiently adapt to the unique requirements of each mission without sacrificing the reliability and security of the software delivery process. UDS Bundles enable: - A structured and repeatable approach for delivering software solutions tailored to diverse mission needs. Each bundle serves as a collection of capabilities, facilitating the delivery of software solutions for specific mission objectives. - Efficient adaptability to the unique requirements of each mission without compromising the reliability and security of the software delivery process. - Secure and consistent software delivery by bundling tools and configurations required for specific mission capabilities, ensuring a standardized and reusable approach. ## Benefits of UDS Bundles **Consistency:** UDS Bundles provide a standardized approach to software delivery, ensuring consistency across different missions and environments. **Reusability:** The modular nature of UDS Bundles allows for the reuse of capabilities, saving time and effort in software delivery. **Security and Compliance:** By incorporating controls and documented configurations, UDS Bundles promote secure and compliant software deployments. **Scalability:** UDS Bundles can be adapted and extended to accommodate different mission requirements and environments. ## Key Features ### Modularity and Reusability UDS Bundles are designed to be modular and reusable, allowing teams to combine different bundles as needed to meet the specific requirements of their missions or projects. By leveraging pre-defined capabilities and tools, UDS Bundles provide a standardized and consistent approach to software delivery. ### Composition of UDS Bundles Each UDS Bundle is composed of a set of capabilities, where each capability is achieved by selecting specific tools or functional components to perform the required functions. This composition ensures that essential functionalities and configurations are encapsulated within the bundle, making it easier to deploy and operate the software solutions. ### UDS Core Bundle The UDS Core Bundle holds a significant role within the UDS architecture. It serves as the foundational bundle that must be delivered before deploying any other optional bundles or mission capabilities. The UDS Core Bundle establishes the basic architecture and secure runtime environment needed for successful software delivery using UDS. ### Versatility of UDS Bundles UDS Bundles are versatile and can be shared and deployed across different environments, enabling consistent and reliable results in various scenarios. This adaptability makes UDS Bundles suitable for diverse mission needs and environments. ### Security and Compliance UDS Bundles include SBOMs for all included packages, including anything that [Zarf](https://docs.zarf.dev/ref/sboms/) has pulled and packaged. When using and integrating your bundle with UDS Core, you also benefit from compliance and security standards that are automatically handled for you during deployment, such as network policies and pod security policies. For additional details on the security protection provided by UDS see the [Security Overview section](/security/overview/). ----- # UDS Packages > UDS Package Reference A UDS Package is a [Zarf Package](https://docs.zarf.dev/ref/packages/) with two additions: 1. It is meant to be deployed on top of [UDS Core](/reference/uds-core/overview/). 2. It contains the [UDS Package Kubernetes custom resource](/reference/configuration/custom-resources/packages-v1alpha1-cr/). These packages include all the [OCI images](https://opencontainers.org/) (docker containers), [Helm charts](https://circleci.com/blog/what-is-helm/#:~:text=A%20Helm%20chart%20is%20a,up%20your%20application%20as%20needed.), and supplemental Kubernetes manifests required for the app to communicate with UDS Core. The UDS Operator in turn auto-applies appropriate security and network policies to assure a secure and compliant running environment. A UDS package _does not_ include dependencies like databases or object storage*. These external dependencies are deployed next to a UDS Package inside a [UDS Bundle](/structure/bundles/). To move from the theoretical to the concrete, see the next section on the anatomy of a UDS Package repo. ## Anatomy of a UDS Package Repo _Disclaimer: the exact file structure of UDS Packages is subject to change. This document will fall out of date but should retain conceptual accuracy. After understanding this point-in-time snapshot of how a UDS package is built, it should be fairly trivial to extend that knowledge to grasp UDS packages as improved in the interim. To aid in it's utility as a teaching tool, links to source code are pinned to a specific GitLab Package release._ For an in-depth developer-focused treatment of UDS Packages, see [the documentation in GitHub](https://github.com/defenseunicorns/uds-common/blob/main/docs/uds-packages/guide.md). You can also view the UDS package template [in GitHub here](https://github.com/uds-packages/template/tree/main). This document will go over the main components of a UDS package and their functions at an overview level, and then show specifically how these components are tied together in the case of GitLab. ### Anatomy Overview | Directory / Top-level file | Role | Function | | :--- | :------------------------- | :------- | | `.github/` | CI/CD | Directives to GitHub, primarily it contains the build, test, and release pipeline(s). | | `adr/` | Docs | "ADR" stands for Architectural Decision Records. These documents record key architectural decisions and their reasoning. | | `bundle/` | Testing & Development | When you're testing a UDS Package, you need to be able to deploy it with other applications such as databases in order to test your configuration. The `bundle/` directories in UDS Package repos are for just that. They deploy light-weight databases, key-value stores, and object stores as needed alongside the application to permit testing. They also serve as an example of how to use the UDS Package in a bundle. Nothing in the `bundle/` directory ever becomes part of the UDS Application Package. | | `charts/` | UDS Package Component | This is for helm charts which are created supplementally to the application's helm chart. This includes at minimum the UDS Package manifest and the SAML/OIDC configuration for automatic integration with our Keycloak SSO application (which is part of UDS Core). Not infrequently it will also include another resource or two as needed to fully integrate into the UDS ecosystem on an app-specific basis. | `common/` | UDS Package Component | This directory holds a single `zarf.yaml` file which is the base Zarf package definition. It is imported by the root-level `zarf.yaml`. You can think of it like the parent-class object in an object-oriented-programming model. This generally pulls the charts from the `charts/` directory and the main application's helm chart into the Zarf package but leaves [flavor](/overview/acronyms-and-terms/#flavor-as-in-uds-package-or-bundle-flavor) specific details out. | | `docs/` | Docs | Documentation about the UDS Package. | | `src/` | Testing & Development | This contains additional zarf package source code in each leaf-directory. These are never made into a part of the UDS Package. Rather, they are included in the test bundle to help glue the application to the larger ecosystem. This often includes a zarf package that contains only the application's namespace resource. By putting this in a separate zarf package and deploying it ahead of time, secrets deployed to the application's namespace by other packages (such as authentication secrets) do not get deleted when you run `zarf package remove
uds.
## uds
CLI for UDS Bundles
```
uds COMMAND [flags]
```
### Options
```
-a, --architecture string Architecture for UDS bundles and Zarf packages
-h, --help help for uds
--insecure Allow access to insecure registries and disable other recommended security enforcements such as package checksum and signature validation. This flag should only be used if you have a specific reason and accept the reduced security posture.
-l, --log-level string Log level when running UDS-CLI. Valid options are: warn, info, debug, trace (default "info")
--no-color Disable color output
--no-log-file Disable log file creation
--no-progress Disable fancy UI progress bars, spinners, logos, etc
--oci-concurrency int Number of concurrent layer operations to perform when interacting with a remote bundle. (default 3)
--skip-signature-validation Skip signature validation for packages
--tmpdir string Specify the temporary directory to use for intermediate files
--uds-cache string Specify the location of the UDS cache directory (default "~/.uds-cache")
```
### SEE ALSO
* [uds completion](/reference/cli/commands/uds_completion/) - Generate the autocompletion script for the specified shell
* [uds create](/reference/cli/commands/uds_create/) - Create a bundle from a given directory or the current directory
* [uds deploy](/reference/cli/commands/uds_deploy/) - Deploy a bundle from a local tarball or oci:// URL
* [uds dev](/reference/cli/commands/uds_dev/) - [beta] Commands useful for developing bundles
* [uds inspect](/reference/cli/commands/uds_inspect/) - Display the metadata of a bundle
* [uds list](/reference/cli/commands/uds_list/) - [alpha] List deployed bundles in the cluster
* [uds logs](/reference/cli/commands/uds_logs/) - View most recent UDS CLI logs
* [uds monitor](/reference/cli/commands/uds_monitor/) - Monitor a UDS Cluster
* [uds publish](/reference/cli/commands/uds_publish/) - Publish a bundle from the local file system to a remote registry
* [uds pull](/reference/cli/commands/uds_pull/) - Pull a bundle from a remote registry and save to the local file system
* [uds remove](/reference/cli/commands/uds_remove/) - Remove a bundle that has been deployed already
* [uds run](/reference/cli/commands/uds_run/) - Run a task using maru-runner
* [uds version](/reference/cli/commands/uds_version/) - Shows the version of the running UDS-CLI binary
-----
# uds completion
> UDS CLI command reference for uds completion.
## uds completion
Generate the autocompletion script for the specified shell
### Synopsis
Generate the autocompletion script for uds for the specified shell.
See each sub-command's help for details on how to use the generated script.
### Options
```
-h, --help help for completion
```
### Options inherited from parent commands
```
-a, --architecture string Architecture for UDS bundles and Zarf packages
--insecure Allow access to insecure registries and disable other recommended security enforcements such as package checksum and signature validation. This flag should only be used if you have a specific reason and accept the reduced security posture.
-l, --log-level string Log level when running UDS-CLI. Valid options are: warn, info, debug, trace (default "info")
--no-color Disable color output
--no-log-file Disable log file creation
--no-progress Disable fancy UI progress bars, spinners, logos, etc
--oci-concurrency int Number of concurrent layer operations to perform when interacting with a remote bundle. (default 3)
--skip-signature-validation Skip signature validation for packages
--tmpdir string Specify the temporary directory to use for intermediate files
--uds-cache string Specify the location of the UDS cache directory (default "~/.uds-cache")
```
### SEE ALSO
* [uds](/reference/cli/commands/uds/) - CLI for UDS Bundles
* [uds completion bash](/reference/cli/commands/uds_completion_bash/) - Generate the autocompletion script for bash
* [uds completion fish](/reference/cli/commands/uds_completion_fish/) - Generate the autocompletion script for fish
* [uds completion zsh](/reference/cli/commands/uds_completion_zsh/) - Generate the autocompletion script for zsh
-----
# uds completion bash
> UDS CLI command reference for uds completion bash.
## uds completion bash
Generate the autocompletion script for bash
### Synopsis
Generate the autocompletion script for the bash shell.
This script depends on the 'bash-completion' package.
If it is not installed already, you can install it via your OS's package manager.
To load completions in your current shell session:
source <(uds completion bash)
To load completions for every new session, execute once:
#### Linux:
uds completion bash > /etc/bash_completion.d/uds
#### macOS:
uds completion bash > $(brew --prefix)/etc/bash_completion.d/uds
You will need to start a new shell for this setup to take effect.
```
uds completion bash
```
### Options
```
-h, --help help for bash
--no-descriptions disable completion descriptions
```
### Options inherited from parent commands
```
-a, --architecture string Architecture for UDS bundles and Zarf packages
--insecure Allow access to insecure registries and disable other recommended security enforcements such as package checksum and signature validation. This flag should only be used if you have a specific reason and accept the reduced security posture.
-l, --log-level string Log level when running UDS-CLI. Valid options are: warn, info, debug, trace (default "info")
--no-color Disable color output
--no-log-file Disable log file creation
--no-progress Disable fancy UI progress bars, spinners, logos, etc
--oci-concurrency int Number of concurrent layer operations to perform when interacting with a remote bundle. (default 3)
--skip-signature-validation Skip signature validation for packages
--tmpdir string Specify the temporary directory to use for intermediate files
--uds-cache string Specify the location of the UDS cache directory (default "~/.uds-cache")
```
### SEE ALSO
* [uds completion](/reference/cli/commands/uds_completion/) - Generate the autocompletion script for the specified shell
-----
# uds completion fish
> UDS CLI command reference for uds completion fish.
## uds completion fish
Generate the autocompletion script for fish
### Synopsis
Generate the autocompletion script for the fish shell.
To load completions in your current shell session:
uds completion fish | source
To load completions for every new session, execute once:
uds completion fish > ~/.config/fish/completions/uds.fish
You will need to start a new shell for this setup to take effect.
```
uds completion fish [flags]
```
### Options
```
-h, --help help for fish
--no-descriptions disable completion descriptions
```
### Options inherited from parent commands
```
-a, --architecture string Architecture for UDS bundles and Zarf packages
--insecure Allow access to insecure registries and disable other recommended security enforcements such as package checksum and signature validation. This flag should only be used if you have a specific reason and accept the reduced security posture.
-l, --log-level string Log level when running UDS-CLI. Valid options are: warn, info, debug, trace (default "info")
--no-color Disable color output
--no-log-file Disable log file creation
--no-progress Disable fancy UI progress bars, spinners, logos, etc
--oci-concurrency int Number of concurrent layer operations to perform when interacting with a remote bundle. (default 3)
--skip-signature-validation Skip signature validation for packages
--tmpdir string Specify the temporary directory to use for intermediate files
--uds-cache string Specify the location of the UDS cache directory (default "~/.uds-cache")
```
### SEE ALSO
* [uds completion](/reference/cli/commands/uds_completion/) - Generate the autocompletion script for the specified shell
-----
# uds completion zsh
> UDS CLI command reference for uds completion zsh.
## uds completion zsh
Generate the autocompletion script for zsh
### Synopsis
Generate the autocompletion script for the zsh shell.
If shell completion is not already enabled in your environment you will need
to enable it. You can execute the following once:
echo "autoload -U compinit; compinit" >> ~/.zshrc
To load completions in your current shell session:
source <(uds completion zsh)
To load completions for every new session, execute once:
#### Linux:
uds completion zsh > "${fpath[1]}/_uds"
#### macOS:
uds completion zsh > $(brew --prefix)/share/zsh/site-functions/_uds
You will need to start a new shell for this setup to take effect.
```
uds completion zsh [flags]
```
### Options
```
-h, --help help for zsh
--no-descriptions disable completion descriptions
```
### Options inherited from parent commands
```
-a, --architecture string Architecture for UDS bundles and Zarf packages
--insecure Allow access to insecure registries and disable other recommended security enforcements such as package checksum and signature validation. This flag should only be used if you have a specific reason and accept the reduced security posture.
-l, --log-level string Log level when running UDS-CLI. Valid options are: warn, info, debug, trace (default "info")
--no-color Disable color output
--no-log-file Disable log file creation
--no-progress Disable fancy UI progress bars, spinners, logos, etc
--oci-concurrency int Number of concurrent layer operations to perform when interacting with a remote bundle. (default 3)
--skip-signature-validation Skip signature validation for packages
--tmpdir string Specify the temporary directory to use for intermediate files
--uds-cache string Specify the location of the UDS cache directory (default "~/.uds-cache")
```
### SEE ALSO
* [uds completion](/reference/cli/commands/uds_completion/) - Generate the autocompletion script for the specified shell
-----
# uds create
> UDS CLI command reference for uds create.
## uds create
Create a bundle from a given directory or the current directory
```
uds create [DIRECTORY] [flags]
```
### Options
```
-c, --confirm Confirm bundle creation without prompting
-h, --help help for create
-n, --name string Specify the name of the bundle
-o, --output string Specify the output directory or oci:// URL for the created bundle
-k, --signing-key string Path to private key file for signing bundles
-p, --signing-key-password string Password to the private key file used for signing bundles
-v, --version string Specify the version of the bundle
```
### Options inherited from parent commands
```
-a, --architecture string Architecture for UDS bundles and Zarf packages
--insecure Allow access to insecure registries and disable other recommended security enforcements such as package checksum and signature validation. This flag should only be used if you have a specific reason and accept the reduced security posture.
-l, --log-level string Log level when running UDS-CLI. Valid options are: warn, info, debug, trace (default "info")
--no-color Disable color output
--no-log-file Disable log file creation
--no-progress Disable fancy UI progress bars, spinners, logos, etc
--oci-concurrency int Number of concurrent layer operations to perform when interacting with a remote bundle. (default 3)
--skip-signature-validation Skip signature validation for packages
--tmpdir string Specify the temporary directory to use for intermediate files
--uds-cache string Specify the location of the UDS cache directory (default "~/.uds-cache")
```
### SEE ALSO
* [uds](/reference/cli/commands/uds/) - CLI for UDS Bundles
-----
# uds deploy
> UDS CLI command reference for uds deploy.
## uds deploy
Deploy a bundle from a local tarball or oci:// URL
```
uds deploy [BUNDLE_TARBALL|OCI_REF] [flags]
```
### Options
```
-c, --confirm Confirms bundle deployment without prompting. ONLY use with bundles you trust
-h, --help help for deploy
-p, --packages stringArray Specify which zarf packages you would like to deploy from the bundle. By default all zarf packages in the bundle are deployed.
-r, --resume Only deploys packages from the bundle which haven't already been deployed
--retries int Specify the number of retries for package deployments (applies to all pkgs in a bundle) (default 3)
--set stringToString Specify deployment variables to set on the command line (KEY=value) (default [])
```
### Options inherited from parent commands
```
-a, --architecture string Architecture for UDS bundles and Zarf packages
--insecure Allow access to insecure registries and disable other recommended security enforcements such as package checksum and signature validation. This flag should only be used if you have a specific reason and accept the reduced security posture.
-l, --log-level string Log level when running UDS-CLI. Valid options are: warn, info, debug, trace (default "info")
--no-color Disable color output
--no-log-file Disable log file creation
--no-progress Disable fancy UI progress bars, spinners, logos, etc
--oci-concurrency int Number of concurrent layer operations to perform when interacting with a remote bundle. (default 3)
--skip-signature-validation Skip signature validation for packages
--tmpdir string Specify the temporary directory to use for intermediate files
--uds-cache string Specify the location of the UDS cache directory (default "~/.uds-cache")
```
### SEE ALSO
* [uds](/reference/cli/commands/uds/) - CLI for UDS Bundles
-----
# uds dev
> UDS CLI command reference for uds dev.
## uds dev
[beta] Commands useful for developing bundles
### Options
```
-h, --help help for dev
```
### Options inherited from parent commands
```
-a, --architecture string Architecture for UDS bundles and Zarf packages
--insecure Allow access to insecure registries and disable other recommended security enforcements such as package checksum and signature validation. This flag should only be used if you have a specific reason and accept the reduced security posture.
-l, --log-level string Log level when running UDS-CLI. Valid options are: warn, info, debug, trace (default "info")
--no-color Disable color output
--no-log-file Disable log file creation
--no-progress Disable fancy UI progress bars, spinners, logos, etc
--oci-concurrency int Number of concurrent layer operations to perform when interacting with a remote bundle. (default 3)
--skip-signature-validation Skip signature validation for packages
--tmpdir string Specify the temporary directory to use for intermediate files
--uds-cache string Specify the location of the UDS cache directory (default "~/.uds-cache")
```
### SEE ALSO
* [uds](/reference/cli/commands/uds/) - CLI for UDS Bundles
* [uds dev deploy](/reference/cli/commands/uds_dev_deploy/) - [beta] Creates and deploys a UDS bundle in dev mode
-----
# uds dev deploy
> UDS CLI command reference for uds dev deploy.
## uds dev deploy
[beta] Creates and deploys a UDS bundle in dev mode
### Synopsis
[beta] Creates and deploys a UDS bundle from a given directory or OCI repository in dev mode, setting package options like YOLO mode for faster iteration.
```
uds dev deploy [BUNDLE_DIR|OCI_REF] [flags]
```
### Options
```
-f, --flavor string [beta] Specify which zarf package flavor you want to use.
--force-create [beta] For local bundles with local packages, specify whether to create a zarf package even if it already exists.
-h, --help help for deploy
-p, --packages stringArray Specify which zarf packages you would like to deploy from the bundle. By default all zarf packages in the bundle are deployed.
-r, --ref stringToString Specify which zarf package ref you want to deploy. By default the ref set in the bundle yaml is used. (default [])
--set stringToString Specify deployment variables to set on the command line (KEY=value) (default [])
```
### Options inherited from parent commands
```
-a, --architecture string Architecture for UDS bundles and Zarf packages
--insecure Allow access to insecure registries and disable other recommended security enforcements such as package checksum and signature validation. This flag should only be used if you have a specific reason and accept the reduced security posture.
-l, --log-level string Log level when running UDS-CLI. Valid options are: warn, info, debug, trace (default "info")
--no-color Disable color output
--no-log-file Disable log file creation
--no-progress Disable fancy UI progress bars, spinners, logos, etc
--oci-concurrency int Number of concurrent layer operations to perform when interacting with a remote bundle. (default 3)
--skip-signature-validation Skip signature validation for packages
--tmpdir string Specify the temporary directory to use for intermediate files
--uds-cache string Specify the location of the UDS cache directory (default "~/.uds-cache")
```
### SEE ALSO
* [uds dev](/reference/cli/commands/uds_dev/) - [beta] Commands useful for developing bundles
-----
# uds inspect
> UDS CLI command reference for uds inspect.
## uds inspect
Display the metadata of a bundle
```
uds inspect [BUNDLE_TARBALL|OCI_REF|BUNDLE_YAML_FILE] [flags]
```
### Options
```
-e, --extract Create a folder of SBOMs contained in the bundle
-h, --help help for inspect
-k, --key string Path to a public key file that will be used to validate a signed bundle
-i, --list-images Derive images from a uds-bundle.yaml file and list them
-v, --list-variables List all configurable variables in a bundle (including zarf variables)
-s, --sbom Create a tarball of SBOMs contained in the bundle
```
### Options inherited from parent commands
```
-a, --architecture string Architecture for UDS bundles and Zarf packages
--insecure Allow access to insecure registries and disable other recommended security enforcements such as package checksum and signature validation. This flag should only be used if you have a specific reason and accept the reduced security posture.
-l, --log-level string Log level when running UDS-CLI. Valid options are: warn, info, debug, trace (default "info")
--no-color Disable color output
--no-log-file Disable log file creation
--no-progress Disable fancy UI progress bars, spinners, logos, etc
--oci-concurrency int Number of concurrent layer operations to perform when interacting with a remote bundle. (default 3)
--skip-signature-validation Skip signature validation for packages
--tmpdir string Specify the temporary directory to use for intermediate files
--uds-cache string Specify the location of the UDS cache directory (default "~/.uds-cache")
```
### SEE ALSO
* [uds](/reference/cli/commands/uds/) - CLI for UDS Bundles
-----
# uds list
> UDS CLI command reference for uds list.
## uds list
[alpha] List deployed bundles in the cluster
```
uds list [flags]
```
### Options
```
-h, --help help for list
```
### Options inherited from parent commands
```
-a, --architecture string Architecture for UDS bundles and Zarf packages
--insecure Allow access to insecure registries and disable other recommended security enforcements such as package checksum and signature validation. This flag should only be used if you have a specific reason and accept the reduced security posture.
-l, --log-level string Log level when running UDS-CLI. Valid options are: warn, info, debug, trace (default "info")
--no-color Disable color output
--no-log-file Disable log file creation
--no-progress Disable fancy UI progress bars, spinners, logos, etc
--oci-concurrency int Number of concurrent layer operations to perform when interacting with a remote bundle. (default 3)
--skip-signature-validation Skip signature validation for packages
--tmpdir string Specify the temporary directory to use for intermediate files
--uds-cache string Specify the location of the UDS cache directory (default "~/.uds-cache")
```
### SEE ALSO
* [uds](/reference/cli/commands/uds/) - CLI for UDS Bundles
-----
# uds logs
> UDS CLI command reference for uds logs.
## uds logs
View most recent UDS CLI logs
```
uds logs [flags]
```
### Options
```
-h, --help help for logs
```
### Options inherited from parent commands
```
-a, --architecture string Architecture for UDS bundles and Zarf packages
--insecure Allow access to insecure registries and disable other recommended security enforcements such as package checksum and signature validation. This flag should only be used if you have a specific reason and accept the reduced security posture.
-l, --log-level string Log level when running UDS-CLI. Valid options are: warn, info, debug, trace (default "info")
--no-color Disable color output
--no-log-file Disable log file creation
--no-progress Disable fancy UI progress bars, spinners, logos, etc
--oci-concurrency int Number of concurrent layer operations to perform when interacting with a remote bundle. (default 3)
--skip-signature-validation Skip signature validation for packages
--tmpdir string Specify the temporary directory to use for intermediate files
--uds-cache string Specify the location of the UDS cache directory (default "~/.uds-cache")
```
### SEE ALSO
* [uds](/reference/cli/commands/uds/) - CLI for UDS Bundles
-----
# uds monitor
> UDS CLI command reference for uds monitor.
## uds monitor
Monitor a UDS Cluster
### Synopsis
Tools for monitoring a UDS Cluster and connecting to the UDS Engine for advanced troubleshooting
### Options
```
-h, --help help for monitor
-n, --namespace string Limit monitoring to a specific namespace
```
### Options inherited from parent commands
```
-a, --architecture string Architecture for UDS bundles and Zarf packages
--insecure Allow access to insecure registries and disable other recommended security enforcements such as package checksum and signature validation. This flag should only be used if you have a specific reason and accept the reduced security posture.
-l, --log-level string Log level when running UDS-CLI. Valid options are: warn, info, debug, trace (default "info")
--no-color Disable color output
--no-log-file Disable log file creation
--no-progress Disable fancy UI progress bars, spinners, logos, etc
--oci-concurrency int Number of concurrent layer operations to perform when interacting with a remote bundle. (default 3)
--skip-signature-validation Skip signature validation for packages
--tmpdir string Specify the temporary directory to use for intermediate files
--uds-cache string Specify the location of the UDS cache directory (default "~/.uds-cache")
```
### SEE ALSO
* [uds](/reference/cli/commands/uds/) - CLI for UDS Bundles
* [uds monitor pepr](/reference/cli/commands/uds_monitor_pepr/) - Observe Pepr operations in a UDS Cluster
-----
# uds monitor pepr
> UDS CLI command reference for uds monitor pepr.
## uds monitor pepr
Observe Pepr operations in a UDS Cluster
### Synopsis
View UDS Policy enforcements, UDS Operator events and additional Pepr operations
```
uds monitor pepr [policies | operator | allowed | denied | failed | mutated] [flags]
```
### Examples
```
# Aggregates all admission and operator logs into a single stream
uds monitor pepr
# Stream UDS Operator actions (Package processing, status updates, and errors)
uds monitor pepr operator
# Stream UDS Policy logs (Allow, Deny, Mutate)
uds monitor pepr policies
# Stream UDS Policy allow logs
uds monitor pepr allowed
# Stream UDS Policy deny logs
uds monitor pepr denied
# Stream UDS Policy mutation logs
uds monitor pepr mutated
# Stream UDS Policy deny logs and UDS Operator error logs
uds monitor pepr failed
```
### Options
```
-f, --follow Continuously stream Pepr logs
-h, --help help for pepr
--json Return the raw JSON output of the logs
--since duration Only return logs newer than a relative duration like 5s, 2m, or 3h. Defaults to all logs.
-t, --timestamps Show timestamps in Pepr logs
```
### Options inherited from parent commands
```
-a, --architecture string Architecture for UDS bundles and Zarf packages
--insecure Allow access to insecure registries and disable other recommended security enforcements such as package checksum and signature validation. This flag should only be used if you have a specific reason and accept the reduced security posture.
-l, --log-level string Log level when running UDS-CLI. Valid options are: warn, info, debug, trace (default "info")
-n, --namespace string Limit monitoring to a specific namespace
--no-color Disable color output
--no-log-file Disable log file creation
--no-progress Disable fancy UI progress bars, spinners, logos, etc
--oci-concurrency int Number of concurrent layer operations to perform when interacting with a remote bundle. (default 3)
--skip-signature-validation Skip signature validation for packages
--tmpdir string Specify the temporary directory to use for intermediate files
--uds-cache string Specify the location of the UDS cache directory (default "~/.uds-cache")
```
### SEE ALSO
* [uds monitor](/reference/cli/commands/uds_monitor/) - Monitor a UDS Cluster
-----
# uds publish
> UDS CLI command reference for uds publish.
## uds publish
Publish a bundle from the local file system to a remote registry
```
uds publish [BUNDLE_TARBALL] [OCI_REF] [flags]
```
### Options
```
-h, --help help for publish
-v, --version string [Deprecated] Specify the version of the bundle to be published. This flag will be removed in a future version. Users should use the --version flag during creation to override the version defined in uds-bundle.yaml
```
### Options inherited from parent commands
```
-a, --architecture string Architecture for UDS bundles and Zarf packages
--insecure Allow access to insecure registries and disable other recommended security enforcements such as package checksum and signature validation. This flag should only be used if you have a specific reason and accept the reduced security posture.
-l, --log-level string Log level when running UDS-CLI. Valid options are: warn, info, debug, trace (default "info")
--no-color Disable color output
--no-log-file Disable log file creation
--no-progress Disable fancy UI progress bars, spinners, logos, etc
--oci-concurrency int Number of concurrent layer operations to perform when interacting with a remote bundle. (default 3)
--skip-signature-validation Skip signature validation for packages
--tmpdir string Specify the temporary directory to use for intermediate files
--uds-cache string Specify the location of the UDS cache directory (default "~/.uds-cache")
```
### SEE ALSO
* [uds](/reference/cli/commands/uds/) - CLI for UDS Bundles
-----
# uds pull
> UDS CLI command reference for uds pull.
## uds pull
Pull a bundle from a remote registry and save to the local file system
```
uds pull [OCI_REF] [flags]
```
### Options
```
-h, --help help for pull
-k, --key string Path to a public key file that will be used to validate a signed bundle
-o, --output string Specify the output directory for the pulled bundle
```
### Options inherited from parent commands
```
-a, --architecture string Architecture for UDS bundles and Zarf packages
--insecure Allow access to insecure registries and disable other recommended security enforcements such as package checksum and signature validation. This flag should only be used if you have a specific reason and accept the reduced security posture.
-l, --log-level string Log level when running UDS-CLI. Valid options are: warn, info, debug, trace (default "info")
--no-color Disable color output
--no-log-file Disable log file creation
--no-progress Disable fancy UI progress bars, spinners, logos, etc
--oci-concurrency int Number of concurrent layer operations to perform when interacting with a remote bundle. (default 3)
--skip-signature-validation Skip signature validation for packages
--tmpdir string Specify the temporary directory to use for intermediate files
--uds-cache string Specify the location of the UDS cache directory (default "~/.uds-cache")
```
### SEE ALSO
* [uds](/reference/cli/commands/uds/) - CLI for UDS Bundles
-----
# uds remove
> UDS CLI command reference for uds remove.
## uds remove
Remove a bundle that has been deployed already
```
uds remove [BUNDLE_TARBALL|OCI_REF] [flags]
```
### Options
```
-c, --confirm REQUIRED. Confirm the removal action to prevent accidental deletions
-h, --help help for remove
-p, --packages stringArray Specify which zarf packages you would like to remove from the bundle. By default all zarf packages in the bundle are removed.
```
### Options inherited from parent commands
```
-a, --architecture string Architecture for UDS bundles and Zarf packages
--insecure Allow access to insecure registries and disable other recommended security enforcements such as package checksum and signature validation. This flag should only be used if you have a specific reason and accept the reduced security posture.
-l, --log-level string Log level when running UDS-CLI. Valid options are: warn, info, debug, trace (default "info")
--no-color Disable color output
--no-log-file Disable log file creation
--no-progress Disable fancy UI progress bars, spinners, logos, etc
--oci-concurrency int Number of concurrent layer operations to perform when interacting with a remote bundle. (default 3)
--skip-signature-validation Skip signature validation for packages
--tmpdir string Specify the temporary directory to use for intermediate files
--uds-cache string Specify the location of the UDS cache directory (default "~/.uds-cache")
```
### SEE ALSO
* [uds](/reference/cli/commands/uds/) - CLI for UDS Bundles
-----
# uds run
> UDS CLI command reference for uds run.
## uds run
Run a task using maru-runner
```
uds run [flags]
```
### Options
```
-h, --help help for run
```
### Options inherited from parent commands
```
-a, --architecture string Architecture for UDS bundles and Zarf packages
--insecure Allow access to insecure registries and disable other recommended security enforcements such as package checksum and signature validation. This flag should only be used if you have a specific reason and accept the reduced security posture.
-l, --log-level string Log level when running UDS-CLI. Valid options are: warn, info, debug, trace (default "info")
--no-color Disable color output
--no-log-file Disable log file creation
--no-progress Disable fancy UI progress bars, spinners, logos, etc
--oci-concurrency int Number of concurrent layer operations to perform when interacting with a remote bundle. (default 3)
--skip-signature-validation Skip signature validation for packages
--tmpdir string Specify the temporary directory to use for intermediate files
--uds-cache string Specify the location of the UDS cache directory (default "~/.uds-cache")
```
### SEE ALSO
* [uds](/reference/cli/commands/uds/) - CLI for UDS Bundles
-----
# uds version
> UDS CLI command reference for uds version.
## uds version
Shows the version of the running UDS-CLI binary
### Synopsis
Displays the version of the UDS-CLI release that the current binary was built from.
```
uds version [flags]
```
### Options
```
-h, --help help for version
```
### Options inherited from parent commands
```
-a, --architecture string Architecture for UDS bundles and Zarf packages
--insecure Allow access to insecure registries and disable other recommended security enforcements such as package checksum and signature validation. This flag should only be used if you have a specific reason and accept the reduced security posture.
-l, --log-level string Log level when running UDS-CLI. Valid options are: warn, info, debug, trace (default "info")
--no-color Disable color output
--no-log-file Disable log file creation
--no-progress Disable fancy UI progress bars, spinners, logos, etc
--oci-concurrency int Number of concurrent layer operations to perform when interacting with a remote bundle. (default 3)
--skip-signature-validation Skip signature validation for packages
--tmpdir string Specify the temporary directory to use for intermediate files
--uds-cache string Specify the location of the UDS cache directory (default "~/.uds-cache")
```
### SEE ALSO
* [uds](/reference/cli/commands/uds/) - CLI for UDS Bundles
-----
# Overview
The [UDS CLI](https://github.com/defenseunicorns/uds-cli) is the primary interface for users to interact with various components within the UDS landscape. It streamlines the deployment process of mission applications and secure infrastructure, simplifying tasks involved in running mission applications while maintaining regulatory compliance in a unified and efficient manner.
The UDS CLI simplifies deployment by bundling multiple Zarf Packages into a single deployable artifact. This process ensures that UDS Bundles, which encompass infrastructure, platform, and mission applications, can be efficiently deployed within any Mission Hero's system environment. Additionally, the UDS CLI extends its capabilities to Pepr, where multiple Pepr applications are bundled and deployed as a single Pepr Module to support UDS Bundles during runtime.
-----
# Quickstart and Usage
## Install
Recommended installation method is with Brew:
```bash
brew tap defenseunicorns/tap && brew install uds
```
UDS CLI Binaries are also included with each [Github Release](https://github.com/defenseunicorns/uds-cli/releases)
## Contributing
Build instructions and contributing docs are located in [CONTRIBUTING.md](https://github.com/defenseunicorns/uds-cli/blob/main/CONTRIBUTING.md).
## Quickstart
The UDS-CLI's flagship feature is deploying multiple, independent Zarf packages. To create a `UDSBundle` of Zarf packages, create a `uds-bundle.yaml` file like so:
```yaml
kind: UDSBundle
metadata:
name: example
description: an example UDS bundle
version: 0.0.1
packages:
- name: init
repository: ghcr.io/defenseunicorns/packages/init
ref: v0.33.0
optionalComponents:
- git-server
- name: podinfo
repository: ghcr.io/defenseunicorns/uds-cli/podinfo
ref: 0.0.1
```
The above `UDSBundle` deploys the Zarf init package and podinfo.
The packages referenced in `packages` can exist either locally or in an OCI registry. See [here](https://github.com/defenseunicorns/uds-cli/tree/main/src/test/bundles/03-local-and-remote) for an example that deploys both local and remote Zarf packages. More `UDSBundle` examples can be found in the [src/test/bundles](https://github.com/defenseunicorns/uds-cli/tree/main/src/test/bundles) folder.
### Declarative Syntax
The syntax of a `uds-bundle.yaml` is entirely declarative. As a result, the UDS CLI will not prompt users to deploy optional components in a Zarf package. If you want to deploy an optional Zarf component, it must be specified in the `optionalComponents` key of a particular `package`.
### First-class UDS Support
When running `deploy`,`inspect`,`remove`, and `pull` commands, UDS CLI contains shorthand for interacting with the Defense Unicorns org on GHCR. Specifically, unless otherwise specified, paths will automatically be expanded to the Defense Unicorns org on GHCR. For example:
- `uds deploy unicorn-bundle:v0.1.0` is equivalent to `uds deploy ghcr.io/defenseunicorns/packages/uds/bundles/unicorn-bundle:v0.1.0`
The bundle matching and expansion is ordered as follows:
1. Local with a `tar.zst` extension
2. Remote path: `oci://ghcr.io/defenseunicorns/packages/uds/bundles/**Container Registry:** It provides a centralized location for storing and managing container images, facilitating seamless deployment and version control.
**Secret Storage:** Securely manage and access sensitive data like credentials and configurations. | | **GitLab Runner** | **Continuous Integration:** GitLab Runner is a Continuous Integration runner that integrates with GitLab, facilitating automated builds, testing, and deployment of your applications. | | **Mattermost** | **Online Chat Service:** Mattermost is an open-source, self-hostable online chat service, providing a platform for real-time communication and collaboration within teams. | | **SonarQube** | **Code Quality:** SonarQube continuously evaluates code quality and identifies issues, helping maintain code integrity and reduce technical debt. | :::note If you are interested in learning more about Software Factory or would like to receive a demo, please [contact us](https://www.defenseunicorns.com/contactus)! ::: ----- # Software Factory Bundles :::note The following UDS Bundles are designed specifically for development and testing environments and are *not intended for production use*. ::: ## [swf-dev](https://github.com/defenseunicorns/uds-software-factory/tree/main/bundles/dev) **Bundle Overview** This bundle is primarily for development purposes and requires an existing K3d cluster to deploy. **System Requirements** This bundle requires `9 CPUs and 28GB of memory` available to run effectively. **Bundle Applications** | Application | Description | | ----------------- | ----------------------------------------------------------------------------------------------------------------------------------------------------------------------------------------- | | Minio | In-cluster S3 Object Storage solution. | | Postgres Operator | In-cluster PostgreSQL Database management tool. | | GitLab | A comprehensive DevOps software package facilitating software development, security, and operational tasks. | | GitLab Runner | A Continuous Integration (CI) runner tightly integrated with GitLab, streamlining automation of build, test, and deployment workflows. | | Mattermost | An open-source, self-hostable online chat service empowering real-time communication for teams and organizations. | | SonarQube | An open-source platform developed by SonarSource, dedicated to the continuous inspection of code quality, ensuring adherence to high standards across the software development lifecycle. | ## [k3d-swf-demo](https://github.com/defenseunicorns/uds-software-factory/tree/main/bundles/k3d-demo) **Bundle Overview** Demo bundle of Software Factory deployed on top of [UDS Core](https://github.com/defenseunicorns/uds-core) that includes the deployment of an underlying K3d cluster. **System Requirements** - This bundle requires a minimum of `11 CPUs and 32GB of memory` available to run effectively. - This bundle is best deployed on an adequately sized Linux machine with Docker or equivalent installed. **Bundle Applications** | Application | Description | | ----------------- | ----------------------------------------------------------------------------------------------------------------------------------------------------------------------------------------- | | UDS-K3d | Containerized K3s with opinionated deployment for UDS development. | | Minio | In-cluster S3 Object Storage solution. | | Postgres Operator | In-cluster PostgreSQL Database management tool. | | UDS Core | Comprehensive suite including Service Mesh, IdAM, Monitoring, Logging, Metrics, UDS Policy Engine and Operator, Container Security, Backup and Restore functionalities. | | GitLab | A comprehensive DevOps software package facilitating software development, security, and operational tasks. | | GitLab Runner | A Continuous Integration (CI) runner tightly integrated with GitLab, streamlining automation of build, test, and deployment workflows. | | Mattermost | An open-source, self-hostable online chat service empowering real-time communication for teams and organizations. | | SonarQube | An open-source platform developed by SonarSource, dedicated to the continuous inspection of code quality, ensuring adherence to high standards across the software development lifecycle. | ----- # Your App Your Environment Your App Your Environment revolutionizes application deployment for Mission Heroes, providing a seamless process for selecting, deploying, and managing mission-critical software on a Kubernetes cluster. Leveraging UDS and an array of open-source projects, Your App Your Environment is engineered to handle complex challenges, including egress-limited or air-gapped software delivery, ensuring robust and efficient deployment solutions. Offering flexibility, Your App Your Environment delivers cloud-native applications tailored to the unique needs of mission teams, empowering them to succeed in any environment, whether in the cloud, on-premises, or at the tactical edge. By integrating with Defense Unicorns' recommended DevSecOps Reference Guide compliant architecture, Your App Your Environment ensures compliance and security by default, providing a secure baseline with documented NIST 800-53 controls. Your App Your Environment meets 70% of technical security controls out of the box, significantly accelerating application delivery timelines towards achieving Authority to Operate (ATO). With Your App Your Environment, teams maintain ownership and independence over their applications, avoiding reliance on vendor-locked solutions, and can package and deploy applications across various environments, guaranteeing compatibility and adaptability to diverse operational scenarios. ## Key Features **Accelerate Authorization:** Leverage Defense Unicorns' recommended DevSecOps Reference Guide compliant architecture to integrate your app with a secure baseline that comes with documented NIST 800-53 controls. **Mission Ownership:** Your App Your Environment enables teams to maintain ownership of their application, preventing reliance on vendor-locked solutions. **Deploy Anywhere:** Your App Your Environment packages and delivers your mission application across multiple environments, including cloud, on-premises, and tactical edge. :::note If you are interested in learning more about Your App Your Environment, please [contact us](https://www.defenseunicorns.com/contactus)! ::: ----- # Bundle Overrides Bundle overrides provide a mechanism to customize Helm charts inside of Zarf packages. ## Quickstart Consider the following `zarf.yaml` and `values.yaml` which deploys [podinfo](https://github.com/stefanprodan/podinfo) with a couple of custom values: ```yaml # zarf.yaml kind: ZarfPackageConfig metadata: name: helm-overrides-package version: 0.0.1 components: - name: helm-overrides-component required: true charts: - name: podinfo version: 6.4.0 namespace: podinfo url: https://github.com/stefanprodan/podinfo.git gitPath: charts/podinfo valuesFiles: - values.yaml images: - ghcr.io/stefanprodan/podinfo:6.4.0 --- # values.yaml replicaCount: 1 ui: color: blue ``` The bundle overrides feature allows users to override the values specified in Zarf packages. For example: ```yaml kind: UDSBundle metadata: name: helm-overrides description: testing a bundle with Helm overrides version: 0.0.1 packages: - name: helm-overrides-package path: "path/to/pkg" ref: 0.0.1 overrides: helm-overrides-component: podinfo: valuesFiles: - values.yaml values: - path: "replicaCount" value: 2 variables: - name: UI_COLOR path: "ui.color" description: "Set the color for podinfo's UI" default: "purple" ``` ```yaml #values.yaml podAnnotations: customAnnotation: "customValue" ``` This bundle will deploy the `helm-overrides-package` Zarf package and override the `replicaCount`, `ui.color`, and `podAnnotations` values in the `podinfo` chart. The `values` can't be modified after the bundle has been created. However, at deploy time, users can override the `UI_COLOR` and other `variables` using a environment variable called `UDS_UI_COLOR` or by specifying it in a `uds-config.yaml` like so: ```yaml variables: helm-overrides-package: UI_COLOR: green ``` ## Overrides ### Syntax Consider the following bundle `overrides`: ```yaml packages: - name: helm-overrides-package path: "path/to/pkg" ref: 0.0.1 overrides: helm-overrides-component: # component name inside of the helm-overrides-package Zarf pkg podinfo: # chart name from the helm-overrides-component component valuesFiles: - values.yaml values: - path: "replicaCount" value: 2 variables: - name: UI_COLOR path: "ui.color" description: "Set the color for podinfo's UI" default: "purple" ``` ```yaml #values.yaml podAnnotations: customAnnotation: "customValue" ``` In this example, the `helm-overrides-package` Zarf package has a component called `helm-overrides-component` which contains a Helm chart called `podinfo`; note how these names are keys in the `overrides` block. The `podinfo` chart has a `replicaCount` value that is overridden to `2`, a `podAnnotations` value that is overridden to include `customAnnotation: "customValue"` and a variable called `UI_COLOR` that is overridden to `purple`. ### Values Files The `valuesFiles` in an `overrides` block are a list of `file`'s. It allows users to override multiple values in a Zarf package component's underlying Helm chart, by providing a file with those values instead of having to include them all individually in the `overrides` block. ### Values The `values` in an `overrides` block are a list of `path` and `value` pairs. They allow users to override values in a Zarf package component's underlying Helm chart. Note that values are specified by bundle authors and **cannot be modified** after the bundle has been created. #### Path The `path` uses dot notation to specify the location of a value to override in the underlying Helm chart. For example, the `replicaCount` path in the `podinfo` chart is located at the top-level of the [podinfo values.yaml](https://github.com/stefanprodan/podinfo/blob/master/charts/podinfo/values.yaml), so the path is simply `replicaCount`, while the `ui.color` path is located under the `ui` key, so the path is `ui.color`. #### Value The `value` is the value to set at the `path`. Values can be simple values such as numbers and strings, as well as, complex lists and objects, for example: ```yaml --- overrides: helm-overrides-component: podinfo: values: - path: "podinfo.tolerations" value: - key: "unicorn" operator: "Equal" value: "defense" effect: "NoSchedule" - path: podinfo.podAnnotations value: customAnnotation: "customValue" ``` #### Bundle Variables as Values Bundle and Zarf variables can be used to set override values by using the syntax `${...}`. For example: ```yaml # uds-config.yaml variables: helm-overrides-package: replica_count: 2 ``` ```yaml kind: UDSBundle metadata: name: example-bundle description: Example for using an imported variable to set an overrides value version: 0.0.1 packages: - name: output-var repository: localhost:888/output-var ref: 0.0.1 exports: - name: COLOR - name: helm-overrides-package path: "../../packages/helm" ref: 0.0.1 overrides: podinfo-component: unicorn-podinfo: values: - path: "podinfo.replicaCount" value: ${REPLICA_COUNT} - path: "podinfo.ui.color" value: ${COLOR} ``` In the example above `${REPLICA_COUNT}` is set in the `uds-config.yaml` file and `${COLOR}` is set as an export from the `output-var` package. Note that you could also set these values with the `shared` key in a `uds-config.yaml`, environment variables prefixed with `UDS_` or with the `--set` flag during deployment. #### Value Precedence Value precedence is as follows: 1. The `values` in an `overrides` block 1. `values` set in the last `valuesFile` (if more than one specified) 1. `values` set in the previous `valuesFile` (if more than one specified) ### Variables Variables are similar to [values](#values) in that they allow users to override values in a Zarf package component's underlying Helm chart; they also share a similar syntax. However, unlike `values`, `variables` can be overridden at deploy time. For example, consider the `variables` key in the following `uds-bundle.yaml`: ```yaml kind: UDSBundle metadata: name: example-bundle version: 0.0.1 packages: - name: helm-overrides-package path: "../../packages/helm" ref: 0.0.1" overrides: podinfo-component: unicorn-podinfo: variables: - name: UI_COLOR path: "ui.color" description: "Set the color for podinfo's UI" default: "purple" ``` There are 3 ways to override the `UI_COLOR` variable: 1. **UDS config**: you can create a `uds-config.yaml` file in the same directory as the bundle and specify the variable to override. For example, to override the `UI_COLOR` variable, you can create a `uds-config.yaml`: ```yaml variables: helm-overrides-package: ui_color: green # Note that the variable for `UI_COLOR` can be upper or lowercase ``` 1. **Environment variables**: you can create an environment variable prefixed with `UDS_` and the name of the variable. For example, to override the `UI_COLOR` variable, you can create an environment variable called `UDS_UI_COLOR` and set it to the desired value. Note that environment variables take precedence over `uds-config.yaml` variables. 1. **--set Flag**: you can also override the variable using the CLI's `--set` flag. For example, to override the `UI_COLOR` variable, you can run one of the following commands: ```bash # by default ui_color will apply to all packages in the bundle uds deploy example-bundle --set ui_color=green # to specify a specific package that the variable should apply to you can prepend the package name to the variable uds deploy example-bundle --set helm-overrides-package.ui_color=green ``` :::caution Because Helm override variables and Zarf variables share the same --set syntax, be careful with variable names to avoid conflicts. ::: :::note A variable that is not overridden by any of the methods above and has no default will be ignored. ::: #### Variable Precedence Variable precedence is as follows: 1. The `--set` flag 1. Environment variables 1. `uds-config.yaml` variables 1. Variables `default` in the`uds-bundle.yaml` #### Variable Types Variables can be of either type `raw` or `file`. The type will default to raw if not set explicitly. :::caution If a variable is set to accept a file as its value, but is missing the `file` type, then the file will not be processed. ::: ```yaml kind: UDSBundle metadata: name: example-bundle version: 0.0.1 packages: - name: helm-overrides-package path: "../../packages/helm" ref: 0.0.1 overrides: podinfo-component: unicorn-podinfo: variables: - name: UI_COLOR path: "ui.color" description: "variable UI_COLOR accepts a raw value (e.g. a string, int, map) like "purple", which is passed to the ui.color helm path" type: raw - name: test_secret path: "testSecret" description: "variable TEST_SECRET will resolve to the contents of a file (e.g. test.cert), which gets passed to the testSecret helm path" type: file ``` **File Paths** If a file path is not absolute, it will be set as relative to the `uds-config.yaml` directory. e.g. the following `uds-config.yaml` is in [`src/test/bundles/07-helm-overrides/variable-files/`](https://github.com/defenseunicorns/uds-cli/blob/main/src/test/bundles/07-helm-overrides/uds-config.yaml) ```yaml variables: helm-overrides: test_secret: test.cert ``` This means when `test.cert` is evaluated it will first be appended to the config path like so `src/test/bundles/07-helm-overrides/variable-files/test.cert`. If the file path is already set to the same relative path as the config, then no merging will take place. :::note UDS CLI does not encrypt or base64 encode any file contents before passing said data to Zarf or Helm. For example, if the file contains a key to be used in a Kubernetes secret, it must be base64 encoded before being ingested by UDS CLI. ::: ### Sensitive Variables can be specified as sensitive, which means their values, regardless of how they're set, will be masked in output. ```yaml kind: UDSBundle metadata: name: example-bundle version: 0.0.1 packages: - name: helm-overrides-package path: "../../packages/helm" ref: 0.0.1 overrides: podinfo-component: unicorn-podinfo: variables: - name: SECRET_VAL path: "testSecret" description: "should be masked in output" sensitive: true ``` ### Namespace It's also possible to specify a namespace for a packaged Helm chart to be installed in. For example, to deploy the a chart in the `custom-podinfo` namespace, you can specify the `namespace` in the `overrides` block: ```yaml kind: UDSBundle metadata: name: example-bundle version: 0.0.1 packages: - name: helm-overrides-package path: "../../packages/helm" ref: 0.0.1 overrides: podinfo-component: unicorn-podinfo: namespace: custom-podinfo # custom namespace! values: - path: "podinfo.replicaCount" value: 1 ``` ### View All Variables When working with a local or remote bundle you can view all overrides and zarf variables by running `uds inspect --list-variables BUNDLE_TARBALL|OCI_REF]` ----- # Overview ## Bundle Anatomy A UDS Bundle is an OCI artifact with the following form:  ----- # Velero Cloud Provider Snapshot Support This document describes how to enable volume snapshot support in Velero for cloud-provider-specific infrastructure in `uds-core`. This allows backup and restoration of persistent volumes via native snapshot mechanisms provided by each cloud provider. Velero can create snapshots of Persistent Volumes using the underlying cloud provider's native storage features: ## AWS (EBS) Snapshot Support ### Enable Snapshots in UDS-Core To enable snapshotting of EBS volumes by Velero, add the following Helm overrides to your UDS bundle: ```yaml velero: velero: values: - path: snapshotsEnabled value: true - path: schedules.udsbackup.template.snapshotVolumes value: true ``` These values ensure that volume snapshots are included in the default `udsbackup` schedule. ### IAM Permissions for EBS Snapshotting The Velero service account must have an IRSA role with the necessary permissions to manage EBS snapshots. Add the following IAM policy statements to your Velero IRSA role definition: ```hcl # Example IAM policy for Velero AWS plugin # velero aws plugin policy scope from here: https://github.com/vmware-tanzu/velero-plugin-for-aws?tab=readme-ov-file#set-permissions-for-velero # ref policy for scoping based on tags: https://cloudonaut.io/restricting-access-to-ec2-instances-based-on-tags/ data "aws_iam_policy_document" "velero_policy" { statement { effect = "Allow" actions = [ "kms:ReEncryptFrom", "kms:ReEncryptTo" ] # Replace
## Metadata
| Field | Type | Description |
|---|---|---|
| name | string (enum):
|
## Spec
| Field | Type | Description |
|---|---|---|
| attributes | Attributes | |
| networking | Networking | |
| caBundle | CaBundle | |
| expose | Expose | |
| policy | Policy |
### Attributes
| Field | Type | Description |
|---|---|---|
| clusterName | string | Friendly name to associate with your UDS cluster |
| tags | string[] | Tags to apply to your UDS cluster |
### Networking
| Field | Type | Description |
|---|---|---|
| kubeApiCIDR | string | CIDR range for your Kubernetes control plane nodes. This is a manual override that can be used instead of relying on Pepr to automatically watch and update the values |
| kubeNodeCIDRs | string[] | CIDR(s) for all Kubernetes nodes (not just control plane). Similar reason to above,annual override instead of relying on watch |
### CaBundle
| Field | Type | Description |
|---|---|---|
| certs | string | Contents of user provided CA bundle certificates |
| includeDoDCerts | boolean | Include DoD CA certificates in the bundle |
| includePublicCerts | boolean | Include public CA certificates in the bundle |
### Expose
| Field | Type | Description |
|---|---|---|
| domain | string | Domain all cluster services will be exposed on |
| adminDomain | string | Domain all cluster services on the admin gateway will be exposed on |
| caCert | string | The trusted CA that signed your domain certificates if using Private PKI |
### Policy
-----
# Exemptions CR (v1alpha1)
| Field | Type | Description |
|---|---|---|
| allowAllNsExemptions | boolean | Allow UDS Exemption custom resources to live in any namespace (default false) |
# Exemptions
| Field | Type | Description |
|---|---|---|
| spec | Spec |
## Spec
| Field | Type | Description |
|---|---|---|
| exemptions | Exemptions[] | Policy exemptions |
### Exemptions
| Field | Type | Description |
|---|---|---|
| title | string | title to give the exemption for reporting purposes |
| description | string | Reasons as to why this exemption is needed |
| policies | Policies[] (enum):
| A list of policies to override |
| matcher | Matcher | Resource to exempt (Regex allowed for name) |
#### Matcher
-----
# Packages CR (v1alpha1)
| Field | Type | Description |
|---|---|---|
| namespace | string | |
| name | string | |
| kind | string (enum):
|
# Packages
| Field | Type | Description |
|---|---|---|
| spec | Spec |
## Spec
| Field | Type | Description |
|---|---|---|
| network | Network | Network configuration for the package |
| monitor | Monitor[] | Create Service or Pod Monitor configurations |
| sso | Sso[] | Create SSO client configurations |
| caBundle | CaBundle | CA bundle configuration for the package |
### Network
| Field | Type | Description |
|---|---|---|
| expose | Expose[] | Expose a service on an Istio Gateway |
| allow | Allow[] | Allow specific traffic (namespace will have a default-deny policy) |
| serviceMesh | ServiceMesh | Service Mesh configuration for the package |
#### Expose
| Field | Type | Description |
|---|---|---|
| description | string | A description of this expose entry, this will become part of the VirtualService name |
| host | string | The hostname to expose the service on |
| gateway | string | The name of the gateway to expose the service on (default: tenant) |
| domain | string | The domain to expose the service on, only valid for additional gateways (not tenant, admin, or passthrough) |
| service | string | The name of the service to expose |
| port | number | The port number to expose |
| selector | Selector for Pods targeted by the selected Services (so the NetworkPolicy can be generated correctly). | |
| targetPort | number | The service targetPort. This defaults to port and is only required if the service port is different from the target port (so the NetworkPolicy can be generated correctly). |
| advancedHTTP | AdvancedHTTP | Advanced HTTP settings for the route. |
| match | Match[] | Match the incoming request based on custom rules. Not permitted when using the passthrough gateway. |
| podLabels | Deprecated: use selector | |
| uptime | Uptime | Uptime monitoring configuration for this exposed service. Presence of checks.paths enables monitoring. |
##### AdvancedHTTP
| Field | Type | Description |
|---|---|---|
| corsPolicy | CorsPolicy | Cross-Origin Resource Sharing policy (CORS). |
| directResponse | DirectResponse | A HTTP rule can either return a direct_response, redirect or forward (default) traffic. |
| headers | Headers | |
| match | Match[] | Match the incoming request based on custom rules. Not permitted when using the passthrough gateway. |
| rewrite | Rewrite | Rewrite HTTP URIs and Authority headers. |
| redirect | Redirect | A HTTP rule can either return a direct_response, redirect or forward (default) traffic. |
| retries | Retries | Retry policy for HTTP requests. |
| weight | integer | Weight specifies the relative proportion of traffic to be forwarded to the destination. |
| timeout | string | Timeout for HTTP requests, default is disabled. |
###### CorsPolicy
| Field | Type | Description |
|---|---|---|
| allowCredentials | boolean | Indicates whether the caller is allowed to send the actual request (not the preflight) using credentials. |
| allowHeaders | string[] | List of HTTP headers that can be used when requesting the resource. |
| allowMethods | string[] | List of HTTP methods allowed to access the resource. |
| allowOrigin | string[] | |
| allowOrigins | AllowOrigins[] | String patterns that match allowed origins. |
| exposeHeaders | string[] | A list of HTTP headers that the browsers are allowed to access. |
| maxAge | string | Specifies how long the results of a preflight request can be cached. |
###### AllowOrigins
| Field | Type | Description |
|---|---|---|
| exact | string | |
| prefix | string | |
| regex | string | RE2 style regex-based match (https://github.com/google/re2/wiki/Syntax). |
###### DirectResponse
| Field | Type | Description |
|---|---|---|
| body | Body | Specifies the content of the response body. |
###### Body
| Field | Type | Description |
|---|---|---|
| bytes | string | response body as base64 encoded bytes. |
| string | string |
###### Request
| Field | Type | Description |
|---|---|---|
| add | ||
| remove | string[] | |
| set |
###### Response
| Field | Type | Description |
|---|---|---|
| add | ||
| remove | string[] | |
| set |
###### Match
| Field | Type | Description |
|---|---|---|
| ignoreUriCase | boolean | Flag to specify whether the URI matching should be case-insensitive. |
| method | Method | |
| name | string | The name assigned to a match. |
| queryParams | Query parameters for matching. | |
| uri | Uri |
###### Method
| Field | Type | Description |
|---|---|---|
| exact | string | |
| prefix | string | |
| regex | string | RE2 style regex-based match (https://github.com/google/re2/wiki/Syntax). |
###### Uri
| Field | Type | Description |
|---|---|---|
| exact | string | |
| prefix | string | |
| regex | string | RE2 style regex-based match (https://github.com/google/re2/wiki/Syntax). |
###### Rewrite
| Field | Type | Description |
|---|---|---|
| authority | string | rewrite the Authority/Host header with this value. |
| uri | string | rewrite the path (or the prefix) portion of the URI with this value. |
| uriRegexRewrite | UriRegexRewrite | rewrite the path portion of the URI with the specified regex. |
###### UriRegexRewrite
| Field | Type | Description |
|---|---|---|
| match | string | RE2 style regex-based match (https://github.com/google/re2/wiki/Syntax). |
| rewrite | string | The string that should replace into matching portions of original URI. |
###### Redirect
| Field | Type | Description |
|---|---|---|
| authority | string | On a redirect, overwrite the Authority/Host portion of the URL with this value. |
| port | integer | On a redirect, overwrite the port portion of the URL with this value. |
| derivePort | string (enum):
| On a redirect, dynamically set the port: * FROM_PROTOCOL_DEFAULT: automatically set to 80 for HTTP and 443 for HTTPS. Valid Options: FROM_PROTOCOL_DEFAULT, FROM_REQUEST_PORT |
| redirectCode | integer | On a redirect, Specifies the HTTP status code to use in the redirect response. |
| scheme | string | On a redirect, overwrite the scheme portion of the URL with this value. |
| uri | string | On a redirect, overwrite the Path portion of the URL with this value. |
###### Retries
| Field | Type | Description |
|---|---|---|
| attempts | integer | Number of retries to be allowed for a given request. |
| perTryTimeout | string | Timeout per attempt for a given request, including the initial call and any retries. |
| retryOn | string | Specifies the conditions under which retry takes place. |
| retryRemoteLocalities | boolean | Flag to specify whether the retries should retry to other localities. |
##### Match
| Field | Type | Description |
|---|---|---|
| ignoreUriCase | boolean | Flag to specify whether the URI matching should be case-insensitive. |
| method | Method | |
| name | string | The name assigned to a match. |
| queryParams | Query parameters for matching. | |
| uri | Uri |
###### Method
| Field | Type | Description |
|---|---|---|
| exact | string | |
| prefix | string | |
| regex | string | RE2 style regex-based match (https://github.com/google/re2/wiki/Syntax). |
###### Uri
| Field | Type | Description |
|---|---|---|
| exact | string | |
| prefix | string | |
| regex | string | RE2 style regex-based match (https://github.com/google/re2/wiki/Syntax). |
##### Uptime
| Field | Type | Description |
|---|---|---|
| checks | Checks | HTTP probe checks configuration for blackbox-exporter. Defining paths enables uptime monitoring. |
###### Checks
| Field | Type | Description |
|---|---|---|
| paths | string[] | List of paths to check for uptime monitoring, appended to the host. |
#### Allow
| Field | Type | Description |
|---|---|---|
| labels | The labels to apply to the policy | |
| description | string | A description of the policy, this will become part of the policy name |
| direction | string (enum):
| The direction of the traffic |
| selector | Labels to match pods in the namespace to apply the policy to. Leave empty to apply to all pods in the namespace | |
| remoteNamespace | string | The remote namespace to allow traffic to/from. Use * or empty string to allow all namespaces |
| remoteSelector | The remote pod selector labels to allow traffic to/from | |
| remoteGenerated | string (enum):
| Custom generated remote selector for the policy |
| remoteCidr | string | Custom generated policy CIDR |
| remoteHost | string | Remote host to allow traffic out to |
| remoteProtocol | string (enum):
| Protocol used for external connection |
| port | number | The port to allow (protocol is always TCP) |
| ports | number[] | A list of ports to allow (protocol is always TCP) |
| remoteServiceAccount | string | The remote service account to restrict incoming traffic from within the remote namespace. Only valid for Ingress rules. |
| serviceAccount | string | The service account to restrict outgoing traffic from within the package namespace. Only valid for Egress rules. |
| podLabels | Deprecated: use selector | |
| remotePodLabels | Deprecated: use remoteSelector |
#### ServiceMesh
| Field | Type | Description |
|---|---|---|
| mode | string (enum):
| Set the service mesh mode for this package (namespace), defaults to ambient |
### Monitor
| Field | Type | Description |
|---|---|---|
| description | string | A description of this monitor entry, this will become part of the ServiceMonitor name |
| portName | string | The port name for the serviceMonitor |
| targetPort | number | The service targetPort. This is required so the NetworkPolicy can be generated correctly. |
| selector | Selector for Services that expose metrics to scrape | |
| podSelector | Selector for Pods targeted by the selected Services (so the NetworkPolicy can be generated correctly). Defaults to `selector` when not specified. | |
| path | string | HTTP path from which to scrape for metrics, defaults to `/metrics` |
| kind | string (enum):
| The type of monitor to create; PodMonitor or ServiceMonitor. ServiceMonitor is the default. |
| fallbackScrapeProtocol | string (enum):
| The protocol for Prometheus to use if a scrape returns a blank, unparsable, or otherwise invalid Content-Type |
| authorization | Authorization | Authorization settings. |
#### Authorization
| Field | Type | Description |
|---|---|---|
| credentials | Credentials | Selects a key of a Secret in the namespace that contains the credentials for authentication. |
| type | string | Defines the authentication type. The value is case-insensitive. "Basic" is not a supported value. Default: "Bearer" |
##### Credentials
| Field | Type | Description |
|---|---|---|
| key | string | The key of the secret to select from. Must be a valid secret key. |
| name | string | Name of the referent. More info: https://kubernetes.io/docs/concepts/overview/working-with-objects/names/#names |
| optional | boolean | Specify whether the Secret or its key must be defined |
### Sso
| Field | Type | Description |
|---|---|---|
| enableAuthserviceSelector | Labels to match pods to automatically protect with authservice. Leave empty to disable authservice protection | |
| secretConfig | SecretConfig | Configuration for the generated Kubernetes Secret |
| clientId | string | The client identifier registered with the identity provider. |
| secret | string | The OAuth/OIDC client secret value sent to Keycloak. Typically left blank and auto-generated by Keycloak. Not to be confused with secretConfig, which configures the Kubernetes Secret resource. |
| secretName | string | Deprecated: use secretConfig.name |
| secretLabels | Deprecated: use secretConfig.labels | |
| secretAnnotations | Deprecated: use secretConfig.annotations | |
| secretTemplate | Deprecated: use secretConfig.template | |
| name | string | Specifies display name of the client |
| description | string | A description for the client, can be a URL to an image to replace the login logo |
| baseUrl | string | Default URL to use when the auth server needs to redirect or link back to the client. |
| adminUrl | string | This URL will be used for every binding to both the SP's Assertion Consumer and Single Logout Services. |
| protocol | string (enum):
| Specifies the protocol of the client, either 'openid-connect' or 'saml' |
| attributes | Specifies attributes for the client. | |
| protocolMappers | ProtocolMappers[] | Protocol Mappers to configure on the client |
| rootUrl | string | Root URL appended to relative URLs |
| redirectUris | string[] | Valid URI pattern a browser can redirect to after a successful login. Simple wildcards are allowed such as 'https://unicorns.uds.dev/*' |
| webOrigins | string[] | Allowed CORS origins. To permit all origins of Valid Redirect URIs, add '+'. This does not include the '*' wildcard though. To permit all origins, explicitly add '*'. |
| enabled | boolean | Whether the SSO client is enabled |
| alwaysDisplayInConsole | boolean | Always list this client in the Account UI, even if the user does not have an active session. |
| standardFlowEnabled | boolean | Enables the standard OpenID Connect redirect based authentication with authorization code. |
| serviceAccountsEnabled | boolean | Enables the client credentials grant based authentication via OpenID Connect protocol. |
| publicClient | boolean | Defines whether the client requires a client secret for authentication |
| clientAuthenticatorType | string (enum):
| The client authenticator type |
| defaultClientScopes | string[] | Default client scopes |
| groups | Groups | The client SSO group type |
#### SecretConfig
| Field | Type | Description |
|---|---|---|
| name | string | The name of the secret to store the client secret |
| labels | Additional labels to apply to the generated secret, can be used for pod reloading | |
| annotations | Additional annotations to apply to the generated secret, can be used for pod reloading with a selector | |
| template | A template for the generated secret |
#### ProtocolMappers
| Field | Type | Description |
|---|---|---|
| name | string | Name of the mapper |
| protocol | string (enum):
| Protocol of the mapper |
| protocolMapper | string | Protocol Mapper type of the mapper |
| consentRequired | boolean | Whether user consent is required for this mapper |
| config | Configuration options for the mapper. |
#### Groups
| Field | Type | Description |
|---|---|---|
| anyOf | string[] | List of groups allowed to access the client |
### CaBundle
| Field | Type | Description |
|---|---|---|
| configMap | ConfigMap | ConfigMap configuration for CA bundle |
#### ConfigMap
-----
# IRSA Support
Several applications within UDS Core can be configured to utilize resources that are external to your Kubernetes cluster, such as object storage and databases. If you are running in AWS, you can leverage [IRSA](https://docs.aws.amazon.com/eks/latest/userguide/iam-roles-for-service-accounts.html) to provide applications within UDS Core with a secure means of accessing external resources.
The following applications in UDS Core that support IRSA are:
- [Loki](#loki)
- [Velero](#velero)
:::note
There may be additional applications in UDS Core that are not mentioned in this list that support IRSA. Only the applications listed above have been validated for IRSA support within UDS Core.
:::
This guide will cover how to configure IRSA for each application.
## Prerequisites
Configuring IRSA requires that you have configured an IAM OIDC provider for your cluster. Refer to the IRSA [documentation](https://docs.aws.amazon.com/eks/latest/userguide/enable-iam-roles-for-service-accounts.html) for more information.
You must also create IAM Roles and Policies for each application. Refer to the IRSA [documentation](https://docs.aws.amazon.com/eks/latest/userguide/associate-service-account-role.html) for more information.
## Bundle Configuration
Configuring applications within UDS Core to use IRSA requires that you declare overrides in UDS Bundle configuration. Below are the necessary overrides for each application.
:::note
The examples below are not exhaustive representations of all of the values you will need to supply to configure external storage.
The examples below declare new `variables` for IRSA Role ARN annotations, allowing for these values to be passed in dynamically via `uds-config.yaml` as opposed to being hardcoded as `overrides`.
:::
### Loki
Loki can be configured to use IRSA by setting the following overrides in your `uds-bundle.yaml`:
```yaml
packages:
- name: core
repository: oci://ghcr.io/defenseunicorns/packages/uds/core
ref: x.x.x
overrides:
loki:
loki:
# Override default values set in uds-core-loki package
values:
- path: loki.storage.s3.endpoint
value: ""
- path: loki.storage.s3.secretAccessKey
value: ""
- path: loki.storage.s3.accessKeyId
value: ""
# Declare new variable for IRSA Role ARN
variables:
- name: LOKI_IRSA_ROLE_ARN
description: "ARN of Loki IAM Role to annotate Loki ServiceAccount with."
# Maps to Loki's helm values for ServiceAccount annotations:
# See https://github.com/grafana/loki/blob/0dc9d677b6ed5c4440346ab54e9776185900be38/production/helm/loki/values.yaml#L733
path: serviceAccount.annotations.eks\.amazonaws\.com/role-arn
```
Next, in your `uds-config.yaml`, supply a value for `LOKI_IRSA_ROLE_ARN`:
```yaml
variables:
core:
loki_irsa_role_arn: "| Field | Type | Description |
|---|---|---|
| name | string | The name of the ConfigMap to create (default: uds-trust-bundle) |
| key | string | The key name inside the ConfigMap (default: ca-bundle.pem) |
| labels | Additional labels to apply to the generated ConfigMap (default: {}) | |
| annotations | Additional annotations to apply to the generated ConfigMap (default: {}) |
`securityContext.runAsGroup`,
`securityContext.fsGroup`,
`securityContext.runAsNonRoot` | Pods are mutated to ensure workloads do not run as root, mutating `runAsNonRoot: true`. Users can define user, group, and fsGroup IDs to run the pod as by using the `uds/user`, `uds/group`, `uds/fsgroup` pod labels. If not provided these default to `runAsUser: 1000` and `runAsGroup: 1000`. | | [Drop All Capabilities](https://github.com/defenseunicorns/uds-core/blob/v0.27.0/src/pepr/policies/security.ts#L329-L376) | `containers[].securityContext.capabilities.drop` | Ensures all capabilities are dropped by setting `capabilities.drop` to `["ALL"]` for all containers. | ### Pepr Policy Validations | Policy Name🔗 | Exemption Reference🔗 | Policy Description | | ------------- | :-------------------: | ------------------ | | [Disallow Host Namespaces](https://repo1.dso.mil/big-bang/product/packages/kyverno-policies/-/blob/main/chart/templates/disallow-host-namespaces.yaml) | [`DisallowHostNamespaces`](https://github.com/defenseunicorns/uds-core/blob/v0.27.0/src/pepr/policies/networking.ts#L7-L35) | Implemented: ✅
Subject: **Pod**
Severity: **high**
Host namespaces (Process ID namespace, Inter-Process Communication namespace, and network namespace) allow access to shared information and can be used to elevate privileges. Pods should not be allowed access to host namespaces. This policy ensures fields which make use of these host namespaces are set to `false`. | |[Disallow NodePort Services](https://repo1.dso.mil/big-bang/product/packages/kyverno-policies/-/blob/main/chart/templates/disallow-nodeport-services.yaml) | [`DisallowNodePortServices`](https://github.com/defenseunicorns/uds-core/blob/v0.27.0/src/pepr/policies/networking.ts#L88-L110) | Implemented: ✅
Subject: **Service**
Severity: **medium**
A Kubernetes Service of type NodePort uses a host port to receive traffic from any source. A NetworkPolicy cannot be used to control traffic to host ports. Although NodePort Services can be useful, their use must be limited to Services with additional upstream security checks. This policy validates that any new Services do not use the `NodePort` type. | |Disallow Privileged [Escalation](https://repo1.dso.mil/big-bang/product/packages/kyverno-policies/-/blob/main/chart/templates/disallow-privilege-escalation.yaml) and [Pods](https://repo1.dso.mil/big-bang/product/packages/kyverno-policies/-/blob/main/chart/templates/disallow-privileged-containers.yaml) | [`DisallowPrivileged`](https://github.com/defenseunicorns/uds-core/blob/v0.27.0/src/pepr/policies/security.ts#L14-L75) | Implemented: ✅
Subject: **Pod**
Severity: **high**
Privilege escalation, such as via set-user-ID or set-group-ID file mode, should not be allowed. Privileged mode also disables most security mechanisms and must not be allowed. This policy ensures the `allowPrivilegeEscalation` field is set to false and `privileged` is set to false or undefined. | |[Disallow SELinux Options](https://repo1.dso.mil/big-bang/product/packages/kyverno-policies/-/blob/main/chart/templates/disallow-selinux-options.yaml) | [`DisallowSELinuxOptions`](https://github.com/defenseunicorns/uds-core/blob/v0.27.0/src/pepr/policies/security.ts#L244-L285) | Implemented: ✅
Subject: **Pod**
Severity: **high**
SELinux options can be used to escalate privileges. This policy ensures that the `seLinuxOptions` specified are not used. | |[Drop All Capabilities](https://repo1.dso.mil/big-bang/product/packages/kyverno-policies/-/blob/main/chart/templates/require-drop-all-capabilities.yaml) | [`DropAllCapabilities`](https://github.com/defenseunicorns/uds-core/blob/v0.27.0/src/pepr/policies/security.ts#L329-L376) | Implemented: ✅
Subject: **Pod**
Severity: **medium**
Capabilities permit privileged actions without giving full root access. All capabilities should be dropped from a Pod, with only those required added back. This policy ensures that all containers explicitly specify `drop: ["ALL"]`. | |[Require Non-root User](https://repo1.dso.mil/big-bang/product/packages/kyverno-policies/-/blob/main/chart/templates/require-non-root-user.yaml) | [`RequireNonRootUser`](https://github.com/defenseunicorns/uds-core/blob/v0.27.0/src/pepr/policies/security.ts#L77-L167) | Implemented: ✅
Subject: **Pod**
Severity: **high**
Following the least privilege principle, containers should not be run as root. This policy ensures containers either have `runAsNonRoot` set to `true` or `runAsUser` > 0. | |[Restrict Capabilities](https://repo1.dso.mil/big-bang/product/packages/kyverno-policies/-/blob/main/chart/templates/restrict-capabilities.yaml) | [`RestrictCapabilities`](https://github.com/defenseunicorns/uds-core/blob/v0.27.0/src/pepr/policies/security.ts#L378-L413) | Implemented: ✅
Subject: **Pod**
Severity: **high**
Capabilities permit privileged actions without giving full root access. Adding capabilities beyond the default set must not be allowed. This policy ensures users cannot add additional capabilities beyond the allowed list to a Pod. | |[Restrict External Names (CVE-2020-8554)](https://repo1.dso.mil/big-bang/product/packages/kyverno-policies/-/blob/main/chart/templates/restrict-external-names.yaml) | [`RestrictExternalNames`](https://github.com/defenseunicorns/uds-core/blob/v0.27.0/src/pepr/policies/networking.ts#L67-L86) | Implemented: ✅
Subject: **Service**
Severity: **medium**
Service external names can be used for a MITM attack (CVE-2020-8554). External names can be used by an attacker to point back to localhost or internal IP addresses for exploitation. This policy restricts services using external names to a specified list. | |[Restrict hostPath Volume Writable Paths](https://repo1.dso.mil/big-bang/product/packages/kyverno-policies/-/blob/main/chart/templates/restrict-host-path-write.yaml) | [`RestrictHostPathWrite`](https://github.com/defenseunicorns/uds-core/blob/v0.27.0/src/pepr/policies/storage.ts#L54-L92) | Implemented: ✅
Subject: **Pod**
Severity: **medium**
hostPath volumes consume the underlying node's file system. If hostPath volumes are not universally disabled, they should be required to be read-only. Pods which are allowed to mount hostPath volumes in read/write mode pose a security risk even if confined to a "safe" file system on the host and may escape those confines. This policy checks containers for hostPath volumes and validates they are explicitly mounted in readOnly mode. | |[Restrict Host Ports](https://repo1.dso.mil/big-bang/product/packages/kyverno-policies/-/blob/main/chart/templates/restrict-host-ports.yaml) | [`RestrictHostPorts`](https://github.com/defenseunicorns/uds-core/blob/v0.27.0/src/pepr/policies/networking.ts#L37-L65) | Implemented: ✅
Subject: **Pod**
Severity: **high**
Access to host ports allows potential snooping of network traffic and should not be allowed, or at minimum restricted to a known list. This policy ensures only approved ports are defined in container's `hostPort` field. | |[Restrict Proc Mount](https://repo1.dso.mil/big-bang/product/packages/kyverno-policies/-/blob/main/chart/templates/restrict-proc-mount.yaml) | [`RestrictProcMount`](https://github.com/defenseunicorns/uds-core/blob/v0.27.0/src/pepr/policies/security.ts#L169-L198) | Implemented: ✅
Subject: **Pod**
Severity: **high**
The default /proc masks are set up to reduce the attack surface. This policy ensures nothing but the specified procMount can be used. By default only "Default" is allowed. | |[Restrict Seccomp](https://repo1.dso.mil/big-bang/product/packages/kyverno-policies/-/blob/main/chart/templates/restrict-seccomp.yaml) | [`RestrictSeccomp`](https://github.com/defenseunicorns/uds-core/blob/v0.27.0/src/pepr/policies/security.ts#L200-L242) | Implemented: ✅
Subject: **Pod**
Severity: **high**
The SecComp profile should not be explicitly set to Unconfined. This policy, requiring Kubernetes v1.19 or later, ensures that the `seccompProfile.Type` is undefined or restricted to the values in the allowed list. By default, this is `RuntimeDefault` or `Localhost`. | |[Restrict SELinux Type](https://repo1.dso.mil/big-bang/product/packages/kyverno-policies/-/blob/main/chart/templates/restrict-selinux-type.yaml) | [`RestrictSELinuxType`](https://github.com/defenseunicorns/uds-core/blob/v0.27.0/src/pepr/policies/security.ts#L287-L327) | Implemented: ✅
Subject: **Pod**
Severity: **high**
SELinux options can be used to escalate privileges. This policy ensures that the `seLinuxOptions` type field is undefined or restricted to the allowed list. | |[Restrict Istio User](https://istio.io/latest/docs/ops/deployment/application-requirements/#pod-requirements) | [`RestrictIstioUser`](https://github.com/defenseunicorns/uds-core/blob/main/src/pepr/policies/istio.ts) | Implemented: ✅
Subject: **Pod**
Severity: **high**
The Istio proxy user/group (1337) should only be used by trusted Istio components. This policy enforces that only Istio waypoint pods, Istio gateways, or Istio proxies (sidecars) can run as UID/GID 1337. This prevents unauthorized pods from running with elevated privileges that could be used to bypass security controls. | |[Restrict Istio Sidecar Configuration Overrides](https://istio.io/latest/docs/reference/config/annotations/) | [`RestrictIstioSidecarOverrides`](https://github.com/defenseunicorns/uds-core/blob/main/src/pepr/policies/istio.ts) | Implemented: ✅
Subject: **Pod**
Severity: **high**
Certain Istio sidecar configuration annotations can be used to override secure defaults, potentially introducing security risks. This policy prevents the usage of dangerous Istio annotations that can modify secure sidecar configuration, such as custom proxy images or bootstrap configurations.
**Blocked annotations:**
- `sidecar.istio.io/bootstrapOverride` - Overrides entire Envoy bootstrap config
- `sidecar.istio.io/discoveryAddress` - Can redirect sidecar to an untrusted control plane
- `sidecar.istio.io/proxyImage` - Allows use of arbitrary proxy images
- `proxy.istio.io/config` - Fully overrides proxy configuration
- `sidecar.istio.io/userVolume` - Adds custom volumes to the sidecar container
- `sidecar.istio.io/userVolumeMount` - Adds custom volume mounts to the sidecar container | |[Restrict Istio Traffic Interception Overrides](https://istio.io/latest/docs/reference/config/annotations/) | [`RestrictIstioTrafficOverrides`](https://github.com/defenseunicorns/uds-core/blob/main/src/pepr/policies/istio.ts) | Implemented: ✅
Subject: **Pod**
Severity: **high**
Istio traffic annotations or labels can be used to modify how traffic is intercepted and routed, which can lead to security bypasses or unintended network paths. This policy prevents the usage of annotations or labels that can potentially bypass secure networking controls, including disabling sidecar injection via label or annotation.
**Blocked annotations:**
- `sidecar.istio.io/inject` - Can disable sidecar injection
- `traffic.sidecar.istio.io/excludeInboundPorts` - Can bypass inbound port interception
- `traffic.sidecar.istio.io/excludeInterfaces` - Can exclude network interfaces from interception
- `traffic.sidecar.istio.io/excludeOutboundIPRanges` - Can bypass outbound IP range interception
- `traffic.sidecar.istio.io/excludeOutboundPorts` - Can bypass outbound port interception
- `traffic.sidecar.istio.io/includeInboundPorts` - Can modify inbound port interception
- `traffic.sidecar.istio.io/includeOutboundIPRanges` - Can modify outbound IP range interception
- `traffic.sidecar.istio.io/includeOutboundPorts` - Can modify outbound port interception
- `sidecar.istio.io/interceptionMode` - Can change interception mode (REDIRECT/TPROXY)
- `traffic.sidecar.istio.io/kubevirtInterfaces` - Can modify kubevirt interface handling
- `istio.io/redirect-virtual-interfaces` - Can modify virtual interface traffic handling
**Blocked labels:**
- `sidecar.istio.io/inject` - Can disable sidecar injection | |[Restrict Istio Ambient Mesh Overrides](https://istio.io/latest/docs/reference/config/annotations/) | [`RestrictIstioAmbientOverrides`](https://github.com/defenseunicorns/uds-core/blob/main/src/pepr/policies/istio.ts) | Implemented: ✅
Subject: **Pod**
Severity: **high**
Istio ambient mesh annotations can be used to modify secure mesh behavior. This policy prevents the usage of annotations that could potentially bypass secure ambient mesh controls.
**Blocked annotations:**
- `ambient.istio.io/bypass-inbound-capture` - Bypasses inbound traffic capture in ambient mesh mode | |[Restrict Volume Types](https://repo1.dso.mil/big-bang/product/packages/kyverno-policies/-/blob/main/chart/templates/restrict-volume-types.yaml) | [`RestrictVolumeTypes`](https://github.com/defenseunicorns/uds-core/blob/v0.27.0/src/pepr/policies/storage.ts#L7-L52) | Implemented: ✅
Subject: **Pod**
Severity: **medium**
Volume types, beyond the core set, should be restricted to limit exposure to potential vulnerabilities in Container Storage Interface (CSI) drivers. In addition, HostPath volumes should not be. | |[Restrict Sysctls](https://repo1.dso.mil/big-bang/product/packages/kyverno-policies/-/blob/main/chart/templates/restrict-sysctls.yaml) | Not Implemented | Implemented: ❌
Subject: **Pod**
Severity: **high**
Sysctl can disable security mechanisms or affect all containers on a host, and should be restricted to an allowed "safe" subset. A sysctl is considered safe if it is namespaced and is isolated from other Pods and processes on the same Node. This policy ensures that all sysctls are in the allowed list. |[Restrict Image Registries](https://repo1.dso.mil/big-bang/product/packages/kyverno-policies/-/blob/main/chart/templates/restrict-image-registries.yaml) | Not Implemented | Implemented: ❌
Subject: **Pod**
Severity: **high**
Images from unknown, public registries can be of dubious quality and may not be scanned and secured, representing a high degree of risk. Requiring use of known, approved registries helps reduce threat exposure by ensuring image pulls only come from them. This policy validates that all images originate from a registry in the approved list.| |[Restrict hostPath Volume PV Paths](https://repo1.dso.mil/big-bang/product/packages/kyverno-policies/-/blob/main/chart/templates/restrict-host-path-mount-pv.yaml) | Not Implemented | Implemented: ❌
Subject: **PersistentVolume**
Severity: **medium**
PersistentVolume using hostPath consume the underlying node's file system. If not universally disabled, they should be restricted to specific host paths to prevent access to sensitive information. This policy ensures that PV hostPath is in the allowed list. | |[Restrict hostPath Volume Mountable Paths](https://repo1.dso.mil/big-bang/product/packages/kyverno-policies/-/blob/main/chart/templates/restrict-host-path-mount.yaml) | Not Implemented | Implemented: ❌
Subject: **Pod**
Severity: **medium**
hostPath volumes consume the underlying node's file system. If hostPath volumes are not universally disabled, they should be restricted to specific host paths to prevent access to sensitive information. This policy ensures that hostPath volume paths are in the allowed list. | |[Restrict External IPs (CVE-2020-8554)](https://repo1.dso.mil/big-bang/product/packages/kyverno-policies/-/blob/main/chart/templates/restrict-external-ips.yaml) | Not Implemented | Implemented: ❌
Subject: **Service**
Severity: **medium**
Service externalIPs can be used for a MITM attack (CVE-2020-8554). This policy restricts externalIPs to a specified list. | |[Restrict AppArmor Profile](https://repo1.dso.mil/big-bang/product/packages/kyverno-policies/-/blob/main/chart/templates/restrict-apparmor.yaml) | Not Implemented | Implemented: ❌
Subject: **Pod**
Severity: **high**
On hosts using Debian Linux distros, AppArmor is used as an access control framework. AppArmor uses the 'runtime/default' profile by default. This policy ensures Pods do not override the AppArmor profile with values outside of the allowed list. | |[Require Image Signature](https://repo1.dso.mil/big-bang/product/packages/kyverno-policies/-/blob/main/chart/templates/require-image-signature.yaml) | Not Implemented | Implemented: ❌
Subject: **Pod**
Severity: **high**
Using the Cosign project, OCI images may be signed to ensure supply chain security is maintained. Those signatures can be verified before pulling into a cluster. This policy checks the signature to ensure it has been signed by verifying its signature against the public key. | |[Require Non-root Group](https://repo1.dso.mil/big-bang/product/packages/kyverno-policies/-/blob/main/chart/templates/require-non-root-group.yaml) | Not Implemented | Implemented: ❌
Subject: **Pod**
Severity: **high**
Following the least privilege principle, access to the root group ID should be forbidden in containers. This policy ensures containers are running with groups > 0. | |[Disallow AutoMount Service Account Tokens](https://repo1.dso.mil/big-bang/product/packages/kyverno-policies/-/blob/main/chart/templates/disallow-auto-mount-service-account-token.yaml) | Not Implemented | Implemented: ❌
Subject: **Pod, ServiceAccount**
Severity: **high**
Auto-mounting of Kubernetes API credentials is not ideal in all circumstances. This policy finds Pods and Service Accounts that automount kubernetes api credentials. | ----- # Resource Configuration and High Availability Depending on your environment and the scale of your cluster, you might need to adjust UDS Core components for high availability or to optimize resources. Below are common areas where resource overrides can be useful when deploying UDS Core. When modifying resources and replica counts it can be useful to observe pod resource metrics in Grafana to make an informed choice on what may be necessary for your environment. Where available HPA ([Horizontal Pod Autoscalers](https://kubernetes.io/docs/tasks/run-application/horizontal-pod-autoscale/)) are beneficial to dynamically scale up/down based on usage. ## Monitoring ### Prometheus Stack Prometheus is a common place to customize when scaling to larger cluster sizes (more nodes and/or workloads). To scale prometheus beyond a single replica its TSDB must be externalized using one of the [supported options](https://prometheus.io/docs/operating/integrations/#remote-endpoints-and-storage). UDS Core has not yet done extensive testing on this setup. It is also helpful to modify resources for Prometheus using a helm override for the `prometheus.prometheusSpec.resources` value: ```yaml packages: - name: core repository: oci://ghcr.io/defenseunicorns/packages/uds/core ref: x.x.x overrides: kube-prometheus-stack: kube-prometheus-stack: values: - path: prometheus.prometheusSpec.resources value: # Example values only requests: cpu: 200m memory: 1Gi limits: cpu: 500m memory: 4Gi ``` ### Grafana Grafana can be configured in a high availability (HA) setup by utilizing an external PostgreSQL database. See the example values below for configuring Grafana in HA mode: ```yaml # Example HA Bundle Configuration packages: - name: core repository: oci://ghcr.io/defenseunicorns/packages/uds/core ref: x.x.x overrides: grafana: grafana: variables: - name: GRAFANA_HA description: Enable HA Grafana path: autoscaling.enabled uds-grafana-config: variables: - name: GRAFANA_PG_HOST description: Grafana postgresql host path: postgresql.host - name: GRAFANA_PG_PORT description: Grafana postgresql port path: postgresql.port - name: GRAFANA_PG_PORT description: Grafana postgresql port path: postgresql.port - name: GRAFANA_PG_DATABASE description: Grafana postgresql database path: postgresql.database - name: GRAFANA_PG_PASSWORD description: Grafana postgresql password path: postgresql.password - name: GRAFANA_PG_USER description: Grafana postgresql username path: postgresql.user ``` ## Logging ### Vector By default Vector runs as a daemonset, automatically scaling across all nodes to ensure logs are captured from each host. Typically Vector does not need any other modifications, but you can customize its resource configuration by overriding the `resources` helm value (using the component and chart name of `vector`). Vector recommends the below resourcing when running in production: ```yaml resources: requests: memory: "64Mi" cpu: "500m" limits: memory: "1024Mi" cpu: "6000m" ``` ### Loki By default Loki will deploy in a multi-replica setup. See the below example for modifying replica counts of the read/write/backend pods: ```yaml packages: - name: core repository: oci://ghcr.io/defenseunicorns/packages/uds/core ref: x.x.x overrides: loki: loki: values: - name: LOKI_WRITE_REPLICAS path: write.replicas default: "3" - name: LOKI_READ_REPLICAS path: read.replicas default: "3" - name: LOKI_BACKEND_REPLICAS path: backend.replicas default: "3" ``` You will also want to connect Loki to an [external storage provider](https://grafana.com/docs/loki/latest/configure/storage/#chunk-storage) such as AWS S3, which can be done by overriding the `loki.storage` values. ## Identity & Authorization ### Keycloak Keycloak can be configured in an HA setup provided all Keycloak instances share the same database instance (PostgreSQL). Below are key points to consider when planning and operating Keycloak in HA mode: - All Keycloak instances must connect to the same PostgreSQL database. - HA works with two or more Keycloak instances; start with at least 2 replicas for redundancy and scale out as needed. - For non-airgap installations, deploying across multiple availability zones is recommended to improve resilience and reduce the blast radius of zonal failures. - Multi-Region (bridging multiple clusters/regions) is not supported by UDS. - For additional guidance, see the Keycloak Horizontal Scaling documentation: https://www.keycloak.org/getting-started/getting-started-scaling-and-tuning#_horizontal_scaling See the below example values for configuring HA Keycloak: ```yaml packages: - name: core repository: oci://ghcr.io/defenseunicorns/packages/uds/core ref: x.x.x overrides: keycloak: keycloak: values: - path: devMode value: false # Enable HPA to autoscale Keycloak - path: autoscaling.enabled value: true variables: - name: KEYCLOAK_DB_HOST path: postgresql.host - name: KEYCLOAK_DB_USERNAME path: postgresql.username - name: KEYCLOAK_DB_DATABASE path: postgresql.database - name: KEYCLOAK_DB_PASSWORD path: postgresql.password ``` :::caution Scaling Keycloak down rapidly by modifying the replica count directly in the StatefulSet is not recommended and may result in data loss. This is a [known Keycloak limitation](https://github.com/keycloak/keycloak/issues/44620). ::: Alternatively, you can configure the postgres `username`, `password`, and `host` using references to pre-existing secrets. This is useful if you are using shared secrets for the database credentials or external secrets from another source. ```yaml packages: - name: core repository: oci://ghcr.io/defenseunicorns/packages/uds/core ref: x.x.x overrides: keycloak: keycloak: values: - path: devMode value: false # Enable HPA to autoscale Keycloak - path: autoscaling.enabled value: true variables: - name: KEYCLOAK_DB_HOST_SECRETREF_NAME path: postgresql.secretRef.host.name - name: KEYCLOAK_DB_HOST_SECRETREF_KEY path: postgresql.secretRef.host.key - name: KEYCLOAK_DB_USERNAME_SECRETREF_NAME path: postgresql.secretRef.username.name - name: KEYCLOAK_DB_USERNAME_SECRETREF_KEY path: postgresql.secretRef.username.key - name: KEYCLOAK_DB_DATABASE path: postgresql.database - name: KEYCLOAK_DB_PASSWORD_SECRETREF_NAME path: postgresql.secretRef.password.name - name: KEYCLOAK_DB_PASSWORD_SECRETREF_KEY path: postgresql.secretRef.password.key ``` :::note When using secret references, you may use a mixture of both secret references and direct values for `username`, `password`, and `host`. The `database` and `port` values are configured using direct values. ::: When running Keycloak on new Kernels 6.12+, it may be necessary to override Keycloak Environment Variables and set `JAVA_OPTS_KC_HEAP` to `-XX:MaxRAMPercentage=70 -XX:MinRAMPercentage=70 -XX:InitialRAMPercentage=50 -XX:MaxRAM=1G`. This happens due to a fact that Java doesn't properly recognize the amount of memory allocated by the CGroups. By specifying `-XX:MaxRAM` equal to the memory limits, this setting gets overridden. Here's an example: ```yaml packages: - name: core repository: oci://ghcr.io/defenseunicorns/packages/uds/core ref: x.x.x overrides: keycloak: keycloak: values: # Override Java memory settings - path: env[0] value: - name: JAVA_OPTS_KC_HEAP value: "-XX:MaxRAMPercentage=70 -XX:MinRAMPercentage=70 -XX:InitialRAMPercentage=50 -XX:MaxRAM=2G" # Override limits - both figures need to match! - path: resources.limits.memory value: "2Gi" ``` You can also configure autoscaling for the Keycloak [waypoint](https://istio.io/latest/docs/ambient/usage/waypoint/) (its Istio Layer7 proxy). The independent scalability of the waypoint proxy ensures that you never encounter a bottleneck due to service mesh integration. An HPA is enabled by default for the waypoint, with access to the configuration parameters via values. The below provides an override example that can be changed based on your needs: ```yaml packages: - name: core repository: oci://ghcr.io/defenseunicorns/packages/uds/core ref: x.x.x overrides: keycloak: keycloak: values: - path: waypoint.horizontalPodAutoscaler.minReplicas value: 2 - path: waypoint.horizontalPodAutoscaler.maxReplicas value: 5 - path: waypoint.horizontalPodAutoscaler.metrics value: - type: Resource resource: name: cpu target: type: Utilization averageUtilization: 90 - path: waypoint.deployment.requests.cpu value: 250m - path: waypoint.deployment.requests.memory value: 256Mi ``` :::tip For HA Keycloak deployments running on multiple nodes, it is recommended to set `waypoint.horizontalPodAutoscaler.minReplicas` to at least 2 and use proper Affinity settings (to distribute Keycloak Waypoint Pods across the Kubernetes Nodes). This ensures there is no downtime when waypoint pods are restarted or rescheduled. ::: ### AuthService AuthService can be configured in a HA setup if an [external session store](https://github.com/istio-ecosystem/authservice/blob/f8193e22db11183d0d3a9da58da39267f15c3ae0/config/README.md#authservice-config-v1-oidc-RedisConfig) is provided (key value store like Redis/Valkey). For configuring an external session store you can set the `UDS_AUTHSERVICE_REDIS_URI` env when deploying or via your `uds-config.yaml`: ```yaml variables: core: AUTHSERVICE_REDIS_URI: redis://redis.redis.svc.cluster.local:6379 ``` To scale up replicas or modify resource requests/limits you can use UDS bundle overrides for the helm values of `replicaCount` and `resources` (using the component and chart name of `authservice`). ## Runtime Security ### Falco Falco's FalcoSidekick component runs with 2 replicas by default for high availability. This ensures alert processing continues if one replica fails. You can adjust the replica count based on your environment needs: ```yaml packages: - name: core repository: oci://ghcr.io/defenseunicorns/packages/uds/core ref: x.x.x overrides: falco: falco: values: - path: falcosidekick.replicaCount value: 3 # Set replicas to 3 (default is 2) ``` For production environments, keeping the default of 2 or more replicas is recommended to ensure continuous alert processing and delivery to your logging/monitoring systems. ----- # Runtime Security Alerting Runtime security alerting enables real-time notifications when potentially malicious activity is detected in your environment. ## Falco Alerting ### Default Rules and Events UDS Core ships Falco with [stable default rules](https://github.com/falcosecurity/rules/blob/main/rules/falco_rules.yaml) that detect common security threats such as: - Privilege escalation attempts - Unauthorized file access - Suspicious network activity - Container breakout attempts See more about default rules in the [Falco documentation](https://falco.org/docs/reference/rules/default-rules/). #### Additional Rulesets :::note UDS Core ships with **sandbox** and **incubating** rulesets from the Falco community, but they are **disabled by default**. More information from Falco about these rulesets can be found [here](https://falco.org/docs/reference/rules/default-rules/). ::: #### Enabling and Configuring Rulesets To enable the [sandbox and incubating](https://falco.org/docs/reference/rules/default-rules/) rulesets and exclude specific rules, override the `sandBoxRulesEnabled`, `incubatingRulesEnabled`, `disabledRules` values in the `uds-falco-config` helm chart in your UDS Core bundle: ```yaml overrides: falco: uds-falco-config: values: - path: "sandboxRulesEnabled" value: true - path: "incubatingRulesEnabled" value: true - path: "disabledRules" value: ["Write below root", "Read environment variable from /proc files"] ``` This configuration: 1. Enables the sandbox ruleset while excluding the "Write below root" rule. 2. Enables the incubating ruleset while excluding the "Read environment variable from /proc files" rule. #### Disable Rules You can explicitly disable any Falco rule by name using the `disabledRules` value. This is useful for reducing noise or suppressing rules that are not relevant to your environment. The rules you list here will be disabled across all enabled rulesets (stable, sandbox, and incubating). To use this feature, provide an array of rule names under the `disabledRules` value in your configuration. The names must match the `rule` field in the Falco rules files. #### How to find rule names **Falco Official Documentation:** - [List of Falco Rules](https://falco.org/docs/reference/rules/default-rules/) **UDS Core rule files:** - Stable rules: [`src/falco/chart/rules/stable-rules.yaml`](https://github.com/defenseunicorns/uds-core/blob/main/src/falco/chart/rules/stable-rules.yaml) - Sandbox rules: [`src/falco/chart/rules/sandbox-rules.yaml`](https://github.com/defenseunicorns/uds-core/blob/main/src/falco/chart/rules/sandbox-rules.yaml) - Incubating rules: [`src/falco/chart/rules/incubating-rules.yaml`](https://github.com/defenseunicorns/uds-core/blob/main/src/falco/chart/rules/incubating-rules.yaml) - Look for entries that start with `- rule:` to find the rule names. **Falco logs:** - When Falco detects an event, it logs the rule name in the output. You can find these logs by querying Loki with: ```txt {rule=~".+"} ``` ### Rule Overrides and Custom Rules In addition to enabling/disabling rulesets, you can customize Falco behavior with the following values: - `overrides.lists`: modify list items used by Falco rules. - `overrides.macros`: modify macro conditions used by rules. - `overrides.rules`: add rule exceptions for specific rules. - `extraRules`: define entirely new Falco rules. #### Override Values Example ```yaml overrides: falco: uds-falco-config: values: - path: overrides value: lists: trusted_images: action: replace items: - "registry.corp/*" - "gcr.io/distroless/*" macros: open_write: action: append condition: "or evt.type=openat" rules: "Unexpected UDP Traffic": exceptions: action: append items: - name: allow_udp_in_smoke_ns fields: ["proc.name", "fd.l4proto"] comps: ["=", "="] values: - ["iptables-restor", "udp"] - path: extraRules value: - rule: "My Local Rule" desc: "Example additional rule" condition: evt.type=open output: "opened file" priority: NOTICE tags: ["local"] ``` #### Value Reference - `overrides.lists.
*(install if resources allow and more advanced security is desired)* | | Monitoring†* | Provides frontend log / metrics monitoring and alerting
*(install if resources allow and more advanced debugging is desired)* | | Backup and Restore | Allows volumes and k8s objects to be backed up and restored
*(install if deployment provides critical data or must maintain state)* | | Identity and Authorization† | Provides authentication and authorization functionality
*(install if deployment requires an auth mechanism (i.e. direct user login))* | | Logging† | Provides backend log storage and log shipping capabilities
*(install if the deployment requires log aggregation and shipping)* | | Metrics Server†** | Provides metrics collection capabilities (req of UDS Runtime)
*(install if the cluster does not provide its own metrics server)* | | Base† | Provides the base for all other functional layers
*(required for all "UDS" deployments and all other functional layers)* | | CRDs | Provides standalone UDS Core CRDs (Package, Exemption, ClusterConfig)
*(deploy before base if you need to create exemptions for pre-existing cluster components)* | :::note *The Monitoring and Runtime Security layers provide user login and therefore require the Identity and Authorization layer. ::: :::note **The Metrics Server layer provides a metrics server if your cluster does not deploy metrics server itself. If your cluster does provide its own metrics server deployment ensure that you do NOT enable this layer. ::: | UDS Add-ons* | Selection Criteria | |------------|--------------------| | UDS UI | Provides a common operating picture for a Kubernetes cluster and UDS deployments
*(install if you would like to have an easy-to-use window into your cluster/deployments)* | | UDS Registry | Provides a storage location for UDS components and mission applications
*(install if you would like to be able to easily store and view the software available in your environment)* | | UDS Remote Agent | Allows for more advanced remote cluster management / deployment
*(install if you would like to manage UDS deployments from more advanced clients than UDS CLI)* | :::note *UDS Add-ons are not part of the open-source platform but are also not required to maintain / operate a UDS deployment. They provide additional functionality to streamline the deployment, monitoring, and management of the deployment for the given organization. ::: | UDS Core Pre-Requisites* | Selection Criteria | |--------------------------|--------------------| | UDS Package Minio Operator | Provides storage for the Logging and Backup and Restore layers
*(install after core base but before logging/backup and restore if selected)* | | UDS Package MetalLB | Provides a simple LoadBalancer implementation
*(install after Zarf init and before UDS Core Base)* | :::note *You may need to deploy pre-requisite packages that are not a part of UDS Core's layers if you are on prem or in an edge scenario - usually cloud deployments will have their own offerings to provide these services which we recommend to use instead. ::: :::tip If you deploy pre-requisite packages (such as MetalLB or other storage/load balancer controllers) that need UDS policy exemptions, deploy the **CRDs layer** first. This lets you create `Exemption` custom resources alongside those packages, before UDS Core Base and its policy engine are active — preventing policy violations during upgrades or reconciliation. ::: ----- # Account Lockout ## Lockout Behavior Options UDS Core exposes one configurable option related to brute‑force protection: ### **Max Temporary Lockouts** This controls whether your realm uses: 1. Permanent lockout only: `MAX_TEMPORARY_LOCKOUTS = 0` (default) 1. Temporary lockout followed by permanent lockout: `MAX_TEMPORARY_LOCKOUTS > 0` Use the following bundle override to configure this functionality: ```yaml overrides: keycloak: keycloak: values: - path: realmInitEnv value: MAX_TEMPORARY_LOCKOUTS: 3 ``` ### Example flows #### 1. Default UDS Core behavior: **permanent lockout** (`MAX_TEMPORARY_LOCKOUTS = 0`) 1. User fails login **3 times** within a 12 hour window. 1. Keycloak applies a **permanent lockout** once the threshold is hit. 1. The account remains locked until an administrator manually unlocks it. #### 1. Optional: temporary then permanent mode (`MAX_TEMPORARY_LOCKOUTS > 0`) 1. Configure `MAX_TEMPORARY_LOCKOUTS` to a non‑zero value. 1. User fails login **3 times within the 12 hour window** → Keycloak applies a **temporary lockout** for 15 minutes. 1. After the temporary lockout expires, the account unlocks. 1. If the user triggers more temporary lockouts than allowed by the configured `MAX_TEMPORARY_LOCKOUTS` value, Keycloak escalates the account to a **permanent lockout**. The user has **up to 12 hours** during which additional lockouts count toward this limit. For example: * `MAX_TEMPORARY_LOCKOUTS = 1` → the **second** lockout results in permanent lock * `MAX_TEMPORARY_LOCKOUTS = 2` → the **third** lockout results in permanent lock ## Manually Configure Temporary Lockouts ### Admin Console (Keycloak 24+) 1. Sign into the Keycloak Admin Console and select your realm. 2. Navigate to **Realm Settings → Security Defenses → Brute Force Detection**. 3. Configure the following values: * Brute Force Protected: `Lockout permanently after temporary lockout` Enables Keycloak’s brute-force detection mechanism for the realm. * Failure Factor: `3` The number of failed login attempts within the counting window that triggers a lockout. * Quick Login Check (ms): `1000` If repeated failed attempts occur faster than this interval, Keycloak treats them as rapid-attack behavior and applies the minimum quick-login wait. * Max Delta Time (s): `43200` A rolling 12-hour window during which failed login attempts count toward the failure threshold. * Wait Increment (s): `900` The duration of a temporary lockout (15 minutes) after the failure threshold is reached. * Minimum Quick Login Wait (s): `60` The minimum delay applied when rapid successive failures occur. * Max Failure Wait (s): `86400` The maximum temporary lockout wait (24 hours). This sets the upper bound for how long Keycloak can delay a user before escalation. * Failure Reset Time (s): `43200` Controls when Keycloak resets the failure and lockout counters. Must exceed the rolling window to allow temporary lockouts to accumulate toward permanent lockout. * Permanent Lockout: `ON` Enables escalation to a permanent lockout once the configured number of temporary lockouts is exceeded. * Max Temporary Lockouts: `3` Allows one temporary lockout before escalating to a permanent lock. * Brute Force Strategy: `MULTIPLE` Defines how Keycloak handles the progression of lockout waits when repeated failures occur. 4. Save and test with a non-production account. ## Compliance :::caution There may be compliance impacts when modifying lockout behavior, be aware of any environment specific requirements (NIST controls or STIG requirements) for brute-force protection. ::: ----- # Authentication Flow Customization ## Authentication Flow Options UDS Core comes equipped with a robust authentication framework that supports multiple authentication methods to meet diverse security requirements and user preferences. Here’s a breakdown of the authentication options available: --- 1. Username and Password The most traditional form of authentication involves users providing a username and password that must match the credentials stored in the system. This method is widely used due to its simplicity and direct control over access credentials. --- 2. SSO (Single Sign-On) Single Sign-On (SSO) allows users to authenticate with one set of credentials to access multiple applications. UDS Core can be configured to integrate with various SSO providers, such as Google SSO, Microsoft Entra, and others, streamlining the login process and reducing the burden of managing multiple usernames and passwords. --- 3. x509 Certificate x509 certificates provide a way to authenticate using digital certificates. It is commonly used in environments that require higher security, such as corporate or governmental networks. This method uses public key infrastructure (PKI) to verify the user's identity through a trusted certificate authority. > **Air-Gapped Note**: In environments without reliable internet access, **OCSP revocation checks** may fail if the designated OCSP responder cannot be reached. As a short-term workaround, you can configure “fail-open” or disable OCSP checks entirely. However, these approaches carry **security risks** (e.g., potentially allowing revoked certificates). ---  ## MFA Authentication UDS Core comes with two different options for MFA requirements. One time password (OTP) and WebAuthn options can be configured. These options are available for both `Username and Password` and `x509` authentication flows. They are controlled individually, to provide the most amount of configurability. ```yaml - path: realmAuthFlows value: USERNAME_PASSWORD_AUTH_ENABLED: true X509_AUTH_ENABLED: true SOCIAL_AUTH_ENABLED: true OTP_ENABLED: true WEBAUTHN_ENABLED: false X509_MFA_ENABLED: false ``` Above is the complete list of authentication configurations from a bundle override. Below is the description of what each of those do: | Name | Description | Default Value | | - | - | - | | `USERNAME_PASSWORD_AUTH_ENABLED` | Controls whether the `Username and Password` authentication flow is allowed and present on the login page. | `true`(default), `false` | | `X509_AUTH_ENABLED` | Controls whether the `X509` authentication is allowed and present (when a proper certificate is present) on the login page. | `true`(default), `false` | | `SOCIAL_AUTH_ENABLED` | Controls whether the `Social` authentication is allowed and present on the login page. This requires that an Identity Provider be configured as well. | `true`(default), `false` | | `OTP_ENABLED` | Control whether `OTP` MFA is enabled, making it required for `Username and Password` authentication. | `true`(default), `false` | | `WEBAUTHN_ENABLED` | Control whether `WebAuthn` MFA is enabled, making it required for `Username and Password` authentication. | `true`, `false`(default) | | `X509_MFA_ENABLED` | Control whether `X509` authentication flow should also include MFA. Enabling this requires `OTP_ENABLED` or `WEBAUTHN_ENABLED` as well. | `true`, `false`(default) | :::caution We shift all authn and authz responsibilies to the Identity Provider if choosing to use SSO, this means that MFA is not configurable for SSO options. ::: ## Authentication Flows in UDS Core UDS Core is shipped with a basic authentication flow that includes all three options out of the box. The following diagram shows the basic authentication flows that are deployed with standard UDS Core:  ### Customizing Authentication Flows Different operational environments may necessitate distinct authentication flows to comply with specific security policies, regulatory demands, or demographic requirements. UDS Core facilitates the customization of these flows, allowing for tailored security measures and user interfaces. The diagram below illustrates various combinations of the three authentication methods that can be adapted to meet unique operational needs:  These customizations not only ensure appropriate security configurations by enabling or disabling specific flows but also maintain a seamless user experience by adjusting the Keycloak theme accordingly. The following sections provide a step-by-step guide on how to customize UDS Core to deploy specific authentication flows, catering to the particular needs and guidelines of your environment. ## Authentication Flow Customization :::note Environment variables configured in the [uds-core Keycloak values.yaml file](https://github.com/defenseunicorns/uds-core/blob/main/src/keycloak/chart/values.yaml#L30-32) have `REALM_` appended to them during creation. See [Customization docs](/reference/uds-core/idam/customization/) for more information. ::: :::caution If upgrading uds-core, be aware that Keycloak Admin manual configuration will probably be required to set new Realm values. See the manual configuration section below for how to do this. ::: ### Bundle Overrides To simplify the configuration of the available authentication flows, the following three environment variables have been exposed. These variables default to `true` in UDS Core, override their values in a bundle to disable. :::note These settings allow for enabling/disabling one or more of the Auth flows. Be aware that disabling `USERNAME_PASSWORD_AUTH_ENABLED`, `X509_AUTH_ENABLED` and `SOCIAL_AUTH_ENABLED` will result in no options for registration and authentication (login). At the same time disabling both `USERNAME_PASSWORD_AUTH_ENABLED` and `X509_AUTH_ENABLED` also disables the User Registration feature. ::: | Setting | Description | Options | | - | - | - | | [USERNAME_PASSWORD_AUTH_ENABLED](https://github.com/defenseunicorns/uds-core/blob/main/src/keycloak/chart/values.yaml#L30) | Toggle on/off the Username and Password Authentication flow. When disabled there will be no username password login, password / password confirm registration fields, no credential reset, and no update password options available. | `true`(default), `false` | | [X509_AUTH_ENABLED](https://github.com/defenseunicorns/uds-core/blob/main/src/keycloak/chart/values.yaml#L31) | Toggle on/off X509 (CAC) Authentication flow. | `true`(default), `false` | | [SOCIAL_AUTH_ENABLED](https://github.com/defenseunicorns/uds-core/blob/main/src/keycloak/chart/values.yaml#L32) | Toggle on/off Social (Google SSO, Azure AD, etc. ) Authentication flows.| `true`(default), `false` | | [X509_MFA_ENABLED](https://github.com/defenseunicorns/uds-core/blob/main/src/keycloak/chart/values.yaml#L32) | Toggle on/off X509 to require additional MFA options (OTP, WebAuthn, etc).| `true`, `false`(default) | These three variables handle the complexities of configuring the following environment variables, which are responsible for both visual (theme) and security (realm). The following variables are not exposed for overriding. ### Manual Configuration #### Theme Configurations Theme's cannot be clickops'ed, for these changes to take affect an upgrade or fresh deployment will be required. Another option is exec-ing into the the keycloak pod and copying in the new themes to the `/opt/keycloak/theme/themes/login/` directory. After copying in the theme changes, the theme changes depend on environment variables being defined in the [theme.properties file](https://github.com/defenseunicorns/uds-identity-config/blob/main/src/theme/login/theme.properties). The above table demonstrates the different environment variables for the `theme.properties` file. #### Realm Configurations All Realm Configurations require access to the Keycloak admin portal. | Configuration | How to Configure | | - | - | | `DENY_USERNAME_PASSWORD_ENABLED` | 1. Realm Authentication tab
2. Select the `UDS Authentication` Authentication Flow
3. `DISABLE` the `Deny Access` step that is below the `Username Password Form` | | `RESET_CREDENTIAL_FLOW_ENABLED` | 1. Realm Authentication tab
2. Select the `UDS Reset Credentials` Authentication Flow
3. `DISABLE` the `Reset Password` step | | `REGISTRATION_FORM_ENABLED` | 1. Realm Authentication tab
2. Select the `UDS Registration` Authentication Flow
3. `DISABLE` the `UDS Registration form` step | | `OTP_ENABLED` | 1. Realm Authentication tab
2. Select the `Required Action` tab at the top of the Authentication view
3. Toggle off the `Configure OTP` | | `WEBAUTHN_ENABLED` | 1. Realm Authentication tab
2. Select the `Required Action` tab at the top of the Authentication view
3. Toggle on the `Webauthn Register Passwordless` `Enabled` column
4. Select the `Flows` tab at the top of the Authentication view
5. Select the `UDS Authentication` flow
6. Set the `MFA` sub-flow to `Required`
7. Set the `WebAuthn Passwordless Authenticator` in the `MFA` sub-flow to `Required` | ----- # Image Customizations ## Add additional jars Adding additional jars to Keycloak's deployment is as simple as adding that jar to the [src/extra-jars directory](https://github.com/defenseunicorns/uds-identity-config/tree/main/src/extra-jars). Adding new jars will require building a new identity-config image for [uds-core](https://github.com/defenseunicorns/uds-core). See [Testing custom image in UDS Core](/reference/uds-core/idam/testing-deployment-customizations/) for building, publishing, and using the new image with `uds-core`. Once `uds-core` has sucessfully deployed with your new image, viewing the Keycloak pod can provide insight into a successful deployment or not. Also describing the Keycloak pod, should display your new image being pulled instead of the default image defined [here](https://github.com/defenseunicorns/uds-core/blob/main/src/keycloak/chart/values.yaml#L10) in the events section. ## Customizing Theme **Official Theming Docs** * [Official Keycloak Theme Docs](https://www.keycloak.org/docs/latest/server_development/#_themes) * [Official Keycloak Theme Github](https://github.com/keycloak/keycloak/tree/b066c59a83c99d757d501d8f5e6061372706d24d/themes/src/main/resources/theme) For other changes beyond these images you will need to build a custom theme and identity-config image. Changes can be made to the [src/theme](https://github.com/defenseunicorns/uds-identity-config/tree/main/src/theme) directory. At this time only Account and Login themes are included, but email, admin, and welcome themes could be added as well. ### Branding Customizations The UDS Identity Config supports a limited and opinionated set of branding customizations. This includes: * Changing the logo * Changing the footer image * Changing the favicon * Changing the background image These customizations require overriding the Keycloak Helm Chart provided by the UDS Core. Here's an example: ```yaml packages: - name: core repository: oci://ghcr.io/defenseunicorns/packages/uds/core ref: x.x.x overrides: keycloak: keycloak: values: - path: themeCustomizations value: resources: images: - name: background.png configmap: name: keycloak-theme-overrides - name: logo.png configmap: name: keycloak-theme-overrides - name: footer.png configmap: name: keycloak-theme-overrides - name: favicon.png configmap: name: keycloak-theme-overrides ``` The configuration supports four keys for different images: `background.png`, `logo.png`, `footer.png`, and `favicon.png`. You can set any or all of these images (you do not have to override all of them), and the corresponding key(s) must exist in your designated ConfigMap(s). Note that you must pre-create this ConfigMap in the `keycloak` namespace before deploying/upgrading Core with these overrides. In the above example all images are in the same ConfigMap named `keycloak-theme-overrides`. An easy way to generate the ConfigMap manifest is using the following command (including whichever images you need and specifying the correct paths to your local images): ```bash kubectl create configmap keycloak-theme-overrides \ --from-file=background.png=path/to/local/directory/background.png \ --from-file=logo.png=path/to/local/directory/logo.png \ --from-file=footer.png=path/to/local/directory/footer.png \ --from-file=favicon.png=path/to/local/directory/favicon.png \ -n keycloak --dry-run=client -o=yaml > theme-image-cm.yaml ``` To deploy this it is easiest to make a small zarf package referencing the manifest you just created: ```yaml kind: ZarfPackageConfig metadata: name: keycloak-theme-overrides version: 0.1.0 components: - name: keycloak-theme-overrides required: true manifests: - name: configmap namespace: keycloak # Ensure this is in the Keycloak namespace files: - theme-image-cm.yaml # Update to the manifest you have locally ``` Then create and deploy this zarf package _prior_ to deploying/upgrading UDS Core/Keycloak. ### Terms and Conditions Customizations In a similar theme to Branding customizations, the UDS Identity Config supports adjusting the Terms and Conditions (if enabled). These customizations similarly require overriding the Keycloak Helm Chart provided by the UDS Core. Here's an example: ```yaml packages: - name: core repository: oci://ghcr.io/defenseunicorns/packages/uds/core ref: x.x.x overrides: keycloak: keycloak: values: - path: themeCustomizations value: termsAndConditions: text: configmap: key: text name: keycloak-theme-overrides ``` The configuration supports a single key (named however you want) which must exist in the corresponding ConfigMap(s). Note that you must pre-create this ConfigMap in the `keycloak` namespace before deploying/upgrading Core with these overrides. The contents of this key must be your custom Terms and Conditions content, formatted as a single line HTML string. As a basic example you might want some terms and conditions like the following HTML: ```html
By logging in you agree to the following:
- Terms
- And
- Conditions
By logging in you agree to the following:
\n- \n
- Terms \n
- And \n
- Conditions \n
Upgrade Details
Keycloak 26.5.0 introduced a logout confirmation capability (see [Keycloak #44463](https://github.com/keycloak/keycloak/pull/44463)) that is enabled by default in UDS Core. To update the default Keycloak clients to add this option, follow these steps: - Navigate to the `UDS` realm - Go to `Clients` > `account` - Find the `Logout confirmation` option and set it to `On` - Click `Save` - Repeat these steps for the `account-console` and `security-admin-console` clientsUpgrade Details
Keycloak 26.4.0 introduced a breaking change to the ServerInfo endpoint and does not render SystemInfo without additional permissions. This change will cause OpenTofu to fail with a "Malformed version" (see [Keycloak Terraform Provider #1342](https://github.com/keycloak/terraform-provider-keycloak/issues/1342#issuecomment-3398650912)). In order to resolve the issue, you need to perform the following steps: - Navigate to the `UDS` realm - Go to `Clients` > `realm-management` > `Client Roles` > `Roles` and click `Create Role` - Use `view-system` as the Role Name and `Enables displaying SystemInfo through the ServerInfo endpoint` for the Description and click `Save` - Go back to the `realm-management` Roles by clicking the `Client details` breadcrumb and find the `realm-admin` Role. Click on it - Go to `Associated roles` tab and click `Assign role` > `Client Roles` - Find the `view-system` role you created earlier, select it and click `Assign`Upgrade Details
UDS Identity Config introduced the OpenTofu client that can be used for managing Keycloak with OpenTofu. This new client is included in the realm.json, however if unable to re-initialize Keycloak in UDS Core you can find steps [here to manually configure the OpenTofu client](/reference/uds-core/idam/customization#configure-opentofu-client-via-keycloak-admin-ui). UDS Core v0.51.0 introduced a mechanism to limit the number of concurrent SSO sessions per user in the UDS Realm. To manually configure this: - Navigate to the `UDS` realm - Go to `Authentication` > `Flows` > `UDS Authentication` - Click `Add execution` - Select `User Session Count Limiter` : - Select the gear icon next to the new `User Session Count Limiter` to configure the following: - `Maximum concurrent sessions for each user within this realm`: Set to the desired maximum number of concurrent sessions per user. The value should be the same as the `SSO_SESSION_MAX_PER_USER` value in the `realmInitEnv`.Upgrade Details
UDS Core v0.42.0 switched Keycloak to run in Ambient Mode. In some cases, specifically in AWS environment that uses “Shared Address Space” (see RFC6598), this may result in HTTP 403 errors. In order to resolve this, uds-identity-config v0.14.1 requires setting "Require SSL" option to "None". To manually configure this: - Navigate to the `UDS` realm - Go to `Realm Settings` > `General` tab - Switch `Require SSL` to `None`Upgrade Details
In uds-identity-config versions v0.14.0+, the UDS Identity Config has removed `Dynamic Client Registration`. Part of this means that we need to remove a couple of the `Trusted Hosts` configured in uds-identity-config. To manually configure this: - Navigate to the `UDS` realm (be aware that in KC v26.2 the UI/UX of navigating realms has changed) - Go to `Clients` > `Client Registration` > `Trusted Hosts` - Remove the following Trusted Hosts: - `*.keycloak.svc.cluster.local` - `*.pepr-uds-core-watcher.pepr-system.svc.cluster.local` - `127.0.0.6` - Click the `Save` button - Go to `Clients` > `Client Registration` - Click `Create client policy` - Click the `max-clients` option - Name the `max-clients` policy `max number of clients` - Set `Max Clients Per Realm` to `0` - Click the `Save` button UDS Core v0.41.0+ resolves a critical issue with enabling FIPS mode in Keycloak. Previously, due to missing Bouncy Castle FIPS libraries, Keycloak would start in normal mode without FIPS restrictions. Enabling FIPS mode introduces two significant changes: * Passwords must be at least 14 characters long. Keycloak will reject shorter passwords, including database credentials and user passwords. * The `argon2` hashing algorithm is unavailable in FIPS mode. Existing systems must first migrate to the `pbkdf2-sha512` algorithm for hashing user credentials before enabling FIPS mode in the `master` realm. Failing to do so will lock the administrator password. To prevent locking the administrator password, follow these steps: - Log in to Keycloak with the administrator account (you may need to use `uds zarf connect keycloak`). - In the `master` Realm, navigate to `Authentication` > `Policies` > `Password Policy` and click `Add Policy`. - Select `Hashing Algorithm` and enter `pbkdf2-sha512`. - Click `Save`. - Go to `Users` and select your administrator account. - Open the `Credentials` tab and click `Reset Password`. - Enter a new password of at least 14 characters. You can reuse your existing password if desired. - Set `Temporary` to `Off` and click `Save`. - Return to your user's details, open the `Credentials` tab, and click `Show data`. Ensure the `algorithm` is set to `pbkdf2-sha512`. - You are now ready to enable FIPS mode in Keycloak. For more details on FIPS limitations, refer to the [Keycloak FIPS 140-2 support](https://www.keycloak.org/server/fips) page.Upgrade Details
In uds-identity-config versions v0.11.0+, the UDS Operator can automatically switch to Client Credentials Grant from using the Dynamic Client Registration. The new method works faster, is more reliable and doesn't require storing Registration Tokens in the Pepr Store. It is highly recommended to switch to it, which requires the following steps: - Create the `uds-operator` Client: - Go to `Clients` > `Create` - Client type: `openid-connect` - Client ID: `uds-operator` - Client Name: `uds-operator` - Click `Next` - Client authentication: on - Uncheck all Authentications flows except from `Service account roles` - Click `Next` - Click `Save` - Go to `Clients` > `uds-operator` > `Credentials` tab - Set `Client Authenticator` to `Client Id and Kubernetes Secret` - Click `Save` - Go to `Clients` > `uds-operator` > `Service accounts roles` tab - Should see the Role `default-roles-uds` > click the three dots on the right and `unassign` > `Remove` - Click `Assign role` - Make sure the filter is on `Filter by clients` - Check the box next to `realm-management: manage-clients` - Click `Assign` - Configure the UDS Client Policy - Go to `Realm Settings` > `Client Policies` > `Profiles` - Click `Create Client Profile` - Name: `uds-client-profile` - Description: `UDS Client Profile` - Click `Save` - Click `Add Executor` - Select `uds-operator-permissions` - Click `Add` - Go to `Realm Settings` > `Client Policies` > `Policies` - Click `Create client policy` - Name: `uds-client-policy` - Description: `UDS Client Policy` - Click `Save` - Click `Add condition` - Select `any-client` - Click `Add` - Click `Add client profile` - Select `uds-client-profile` - Click `Add` (there is a glitch in the UI where it seems all the profiles are selected, but only the selected one is actually chosen) - Configure the Client Credentials Authentication Flow - Go to `Authentication` > `Flows` - Click `clients` - Click `Actions` > `Duplicate` - Name: `UDS Client Credentials` - Description `UDS Client Credentials` - Click `Duplicate` - Go to `Authentication` > `UDS Client Credentials` - Click `Add Step` (pre uds-core v0.40.0) or `Add Execution` (uds-core v0.40.0+) - Select `Client Id and Kubernetes Secret` - Click `Add` - Select `Requirement` and set it to `Alternative` - Go to `Authentication`, select three dots on the right side of the panel for `UDS Client Credentials` and select `Bind flows` - Select `Client authentication flow` - Click `Save` - Verify that everything is configured correctly - Deploy a new uds package or update the existing ones - Check UDS Operator logs and verify if there are no errors - Use `uds zarf tools kubectl logs deploy/pepr-uds-core-watcher -n pepr-system | grep "Client Credentials Keycloak Client is available"` command to verify if the UDS Operator uses the Client Credentials flow. After introducing the changes above, ensure that all packages reconcile correctly and that no errors appear. If the UDS Operator displays the error `The client doesn’t have the created-by=uds-operator attribute. Rejecting request`, disable `UDS Client Policy` and give the system a bit more time to process every package. Some users have reported that they needed to disable `UDS Client Policy`, cycle the Pepr Watcher pod (this will force reconciliation of **all** Packages), wait for all Package CRs to be ready, and finally enable the `UDS Client Policy`. [Additional information if you need to add protocol mappers that UDS Core does not include out of the box.](/reference/uds-core/idam/plugin/#security-hardening) --- In uds-identity-config version 0.11.0 we incorporated some big changes around MFA. - Previous versions didn't allow for MFA on the X509 Authentication flow. Now that can be configured to required additional factors of authentication. By default this is disabled and will need to be enabled. - Additionally, we've added support of WebAuthn MFA. This can assume many different forms such as biometrics, passkeys, etc. This also is disabled by default and is only used as an MFA option. If wanting to configure the MFA everywhere with both OTP and WebAuthn options, the following steps will help to manually configure these options on an upgrade: 1. There is a [new theme for webauthn-authentication](https://github.com/defenseunicorns/uds-identity-config/blob/main/src/theme/login/webauthn-authenticate.ftl) that conditionally removes the register button. This is removed because we assume that since you are doing MFA you have already provided enough details to be identified by Keycloak and don't need to register. 2. The Authentication `Required Actions` have a few changes as well: - Click `Authentication` tab from left side menu - Click `Required Actions` tab from Authentication page menu - Enable the following `Required Actions`, only toggle the `Enabled` **DO NOT TOGGLE** `Set as default action`: - `Configure OTP` - `Webauthn Register` - `Delete Credential` - Disable the `WebAuthn Register Passwordless`, make sure this is **not** the `WebAuthn Register` option ( this one should be enabled ) 3. The `UDS Authentication` authentication flow has undergone significant changes. - Click `Authentication` tab from left side menu - Click `UDS Authentication` flow option - **This can be very dangerous to modify so make sure you know what you're doing before making changes here** - In the `Authentication` top level sub-flow of the `UDS Authentication` flow - Click the `+` icon and add a `sub-flow` - Name that sub-flow `X509 Authentication` - Drag that new sub-flow up and drop below the `Cookie` and the `IDP Redirector` step - Set the flow to `Alternative` - in the new `X509 Authentication` sub-flow select the `+` icon and add a sub-flow called `X509 Conditional OTP` - Set the `X509 Conditional OTP` to `Required` - Click the `+` and add the `Condition` called `Condition - user configured` - set this to be `Required` - Click the `+` and add the step called `OTP Form` - set this to be `Required` - Click the `+` and add the step called `WebAuthn Authenticator` - Drag the existing `X509/Validate Username Form` step into the `X509 Authentication` sub-flow, should be above the `X509 Conditional OTP` - May have to drag this twice, make sure this is `Required` --- To add an `IDP Redirector` option to the `UDS Authentication`, which enables bypassing the login page and jumping directly to the IDP login when using the `kc_idp_hint` URL parameter, do the following steps: - Click `Authentication` from the left sidebar under `Configure` - Select the `UDS Authentication` auth flow - Under the `Authentication` sub-flow in `UDS Authentication`, click the `+` and add a new `sub-flow` - Name that sub-flow `idp redirector` - click `Add` - Drag that new `idp redirector` sub-flow from the bottom of the `Authentication` sub-flow to be directly below the `Cookie` step - Set the `idp redirector` sub-flow to be `Alternative` - Click the `+` on the `idp redirector` sub-flow and add a new step - Select the `Identity Provider Redirector` - Click `Add` - Set that `Identity Provider Redirector` step to `Required`Upgrade Details
In uds-identity-config versions 0.10.0+, the version of Keycloak was upgraded to Keycloak 26.1.0. In this release of Keycloak an unmentioned breaking change that added case sensitivity to the Client SAML Mappers. This resulted in breaking SAML Auth flows due to users IDP data not being correctly mapped into applications ( ex. Sonarqube, Gitlab, etc ). Manual steps to fix this issue: - Click `Client scopes` - For each of the following mappers: - `mapper-saml-email-email` - `mapper-saml-firstname-first_name` - `mapper-saml-lastname-last_name` - `mapper-saml-username-login` - `mapper-saml-username-name` - Select the mapper, should now be on the `Client scope details` page - Select the `Mappers` tab - Select the available mapper - Manually change the `Property` field dropdown to match the designated mapper property - `mapper-saml-email-email` had a value of `Email`, that needs to be changed to select the `email` option from the drop down. - `mapper-saml-firstname-first_name` had a value of `FirstName`, that needs to be changed to select the `firstName` option from the drop down. - `mapper-saml-lastname-last_name` had a value of `LastName`, that needs to be changed to select the `lastName` option from the drop down. - `mapper-saml-username-login` had a value of `Username`, that needs to be changed to select the `username` option from the drop down. - `mapper-saml-username-name` had a value of `Username`, that needs to be changed to select the `username` option from the drop down. - Make sure and click `Save` after updating the property fieldUpgrade Details
* For running Istio with Ambient Mesh, it is required to add two new entries to the trusted hosts list: `*.pepr-uds-core-watcher.pepr-system.svc.cluster.local` and `*.keycloak.svc.cluster.local`. This is done automatically for new deployments but when upgrading it is required to perform these extra steps: - Click `Clients` > `Client registration` > `Client details` - Add `*.pepr-uds-core-watcher.pepr-system.svc.cluster.local` and `*.keycloak.svc.cluster.local` to the `Trusted Hosts` list - Click `Save` * Keycloak 26.1.1 introduces a new option to force re-login after resetting credentials ([Keycloak Release Notes](https://www.keycloak.org/docs/latest/release_notes/index.html#new-option-in-send-reset-email-to-force-a-login-after-reset-credentials)). This option has been enabled for new deployments but the existing ones, it needs to be turned on manually: - Click `Authentication` > `UDS Reset Credentials` and find `Send Reset Email` Step of the Authentication Flow. - Click `Settings`, enter a new alias name, for example `reset-credentials-email` and turn the `Force login after reset` option on. - Click `Save`Upgrade Details
* An custom Keycloak event logger that replaces the default event logger is [included in this release](https://github.com/defenseunicorns/uds-identity-config/blob/v0.5.2/src/realm.json#L1669), if you wish to enable manually as part of an upgrade do the following (in the `Unicorn Delivery Service` realm): - Click on the `Realm Settings` > `Events` and add `jsonlog-event-listener`. - Remove the built in `jboss-logging` event listener. - Click `Save` * The custom registration event listener was [renamed](https://github.com/defenseunicorns/uds-identity-config/blob/v0.5.2/src/realm.json#L1670) from `custom-registration-listener` to `registration-event-listener`. To manually update this event listener (in the `Unicorn Delivery Service` realm): - Click on the `Realm Settings` > `Events` and add `registration-event-listener`. - Remove `custom-registration-listener`. - Click `Save` * An additional scope (`bare-groups`) was included in the uds [realm.json](https://github.com/defenseunicorns/uds-identity-config/blob/v0.5.2/src/realm.json#L1608-L1636). To add this scope manually do the following (in the `Unicorn Delivery Service` realm): - Click on `Client Scopes` > `Create client scope`. - Name the scope `bare-groups`, and configure it to be - Type: `Optional` - Include in token scope: `On` - Click `Save` - Click `Mappers` > `Create a new mapper` - Select `Custom Group Path Mapper` and name it `bare groups` - To enable this scope to be added as a `defaultClientScope` for your clients, navigate to the top level `Clients` > `Client registration` tab. - Click `Allowed Client Scopes` - Add `bare-groups` to the list of `Allowed Client Scopes` - Click `Save`Upgrade Details
This version upgrade utilizes built in Keycloak functionality for User Managed Attributes. :::note User managed attributes are only available in Keycloak 24+ ::: If upgrading without a full redeploy of keycloak the following changes will be needed: 1. The `realm.json` will need to be updated to contain the correct User Managed Attributes definition, [User Managed Attributes Configuration](https://github.com/defenseunicorns/uds-identity-config/blob/v0.5.1/src/realm.json#L1884-L1895). The following steps can be used to do this with clickops: 1. In `Realm Settings` tab and on the `General` page 1. toggle off `User-managed access` 2. `Unmanaged Attributes` set to `Only administrators can write` 2. On `User profile` page 1. select the `JSON Editor` tab 2. Copy and Paste the value of [the User Attribute Definition from the realm.json](https://github.com/defenseunicorns/uds-identity-config/blob/v0.5.1/src/realm.json#L1891) 3. `Save` 2. Incorporate STIG password rules, in accordance with these two hardening guides: * [Elasticsearch 8.0 Application Server](https://github.com/user-attachments/files/16178987/Elasticsearch.8.0.Hardening.Guide.Application.Server.SRG.V3R1.pdf) * [Elasticsearch 8.0 Central Log Server](https://github.com/user-attachments/files/16178988/Elasticsearch.8.0.Hardening.Guide.Central.Log.Server.SRG.V2R1.pdf) * Changes: 1. Passwords expire in 60 days 2. Passwords complexity: 2 special characters, 1 digit, 1 lowercase, 1 uppercase, and 15 character minimum length 3. IDP session idle timeout is now 10 minutes 4. Maximum login attempts is now 3Upgrade Details
This version upgrade brings in a new Authentication Flow for group authorization. If upgrading without a full redeploy of keycloak the following steps will be necessary to create and use group authorization: 1. In keycloak admin portal, in `UDS` realm, navigate to `Authentication` sidebar tab 2. In `Authentication` tab add the `Authorization` flow to `UDS Authentication`, `UDS Registration`, `UDS Reset Credentials` 1. In each `Authentication` flow 1. `Add step` -> `UDS Operator Group Authentication Validation` * Make sure that the step is at the base level and bottom of the Authentication flow 3. Finally if using `SAML` IDP 1. In the `Authentication` tab 1. `Create Flow` 2. `Name` -> `Authorization` 3. `Description` -> `UDS Operator Group Authentication Validation` 4. `Basic Flow` 5. `Create` 6. `Add execution` 7. `Add` the `UDS Operator Group Authentication Validation` 2. In the `Identity Providers` tab, select the `SAML` Provider 1. Add the `Authorization` flow to the `Post login flow` in the `Advanced settings` section
### Basic Configuration [(example)](#basic-development-setup)
| Parameter | Default | Description |
|-----------|---------|-------------|
| `replicaCount` | `1` | Number of registry replicas to deploy |
### Image Configuration
| Parameter | Default | Description |
|-----------|---------|-------------|
| `image.repository` | `ghcr.io/defenseunicorns/uds-registry` | Container image repository |
| `image.tag` | `0.20.1` | Container image tag |
| `image.pullPolicy` | `IfNotPresent` | Image pull policy |
### Package Configuration
| Parameter | Default | Description |
|-----------|---------|-------------|
| `package.gateway` | `tenant` | Gateway configuration for the package |
| `package.host` | `registry` | Hostname for the registry service |
| `package.domain` | `###ZARF_VAR_DOMAIN###` | Domain name (uses Zarf variable) |
| `package.useRootDomain` | `false` | Use root domain instead of subdomain |
| `package.serviceMeshMode` | `ambient` | Service mesh mode configuration |
### Resource Configuration [(example)](#basic-development-setup)
:::Note
Default resource values are suitable for uds-core only. Increase for production workloads.
:::
| Parameter | Default | Description |
|-----------|---------|-------------|
| `resources.requests.memory` | `128Mi` | Memory request |
| `resources.requests.cpu` | `250m` | CPU request |
| `resources.limits.memory` | `1Gi` | Memory limit |
| `resources.limits.cpu` | `750m` | CPU limit |
### Storage Configuration [(example)](#basic-development-setup)
:::Note
Two storage backends are available:
- **filesystem** - Uses persistent volumes for storage
- **s3** - Uses S3-compatible object storage
:::
:::Important
When `haDatabase` is enabled:
- `ociStorage` must be set to `s3`
- Database PVC creation is disabled
- External database must be configured via `database.connectionString`
:::
| Parameter | Default | Options | Description |
|-----------|---------|---------|-------------|
| `ociStorage` | `filesystem` | `filesystem`, `s3` | Storage backend for OCI artifacts |
| `haDatabase` | `false` | - | Enable HA database (requires S3 storage) |
### Registry Configuration [(example)](#filesystem-storage-configuration)
| Parameter | Default | Options | Description |
|-----------|---------|---------|-------------|
| `registry.logging.level` | `INFO` | `DEBUG`, `INFO`, `WARN`, `ERROR` | Log level |
### Classification Banner [(example)](#classification-banner)
Use the classification banner to render a header and footer in the UI. The `classification` value sets the banner colors and, if no label is provided, the banner text. If you provide a `label`, it replaces the displayed text, so you _must_ include the classification in the label if you want it shown (for example: `CUI//EXERCISE USE ONLY`). Providing only `classification: CUI` and `label: EXERCISE USE ONLY` displays only `EXERCISE USE ONLY`.
| Parameter | Default | Options | Description |
|-----------|---------|---------|-------------|
| `registry.classificationBanner.classification` | `""` | `UNCLASSIFIED`, `CUI`, `CONFIDENTIAL`, `SECRET`, `TOP SECRET`, `TOP SECRET//SCI` | Required classification value used to set banner colors. |
| `registry.classificationBanner.label` | `""` | - | Optional label that overrides the displayed classification text. |
### Authentication Configuration [(example)](#authentication-and-session-configuration)
| Parameter | Default | Description |
|-----------|---------|-------------|
| `registry.auth.access.admins` | `["admin"]` | List of initial admin usernames |
| `registry.auth.publicOrgs.metadataAccess` | `["public"]` | Organizations with UI access (no OCI access) |
| `registry.auth.publicOrgs.readAccess` | `["library"]` | Organizations with UI access (auth required for OCI) |
| `registry.auth.webSession.duration` | `8h` | User session duration |
| `registry.auth.personalTokens.defaultExpiry` | `720h` | Default token expiry (30 days) |
| `registry.auth.personalTokens.maxExpiry` | `4320h` | Maximum token expiry (180 days) |
| `registry.auth.serviceTokens.defaultExpiry` | `1440h` | Default token expiry (60 days) |
| `registry.auth.serviceTokens.maxExpiry` | `8760h` | Maximum token expiry (365 days) |
### Scanner Configuration [(example)](#scanner-configuration)
| Parameter | Default | Description |
|-----------|---------|-------------|
| `registry.scanner.enabled` | `true` | Enable vulnerability scanning |
| `registry.scanner.updateInterval` | `12h` | Scanner database update interval |
| `registry.scanner.scanInterval` | `24h` | Image scanning interval |
### Feature Flags [(example)](#feature-flags-configuration)
| Parameter | Default | Description |
|-----------|---------|-------------|
| `registry.features.registryAnalytics` | `false` | Enable registry analytics |
| `registry.features.servePrivate` | `true` | Serve private repositories |
### Database Persistence
| Parameter | Default | Description |
|-----------|---------|-------------|
| `persistence.database.pv.storageClassName` | `""` | Storage class (empty = default) |
| `persistence.database.pv.accessModes` | `["ReadWriteOnce"]` | Access modes |
| `persistence.database.pv.size` | `256Mi` | Storage size |
| `persistence.database.pv.annotations` | `{}` | Persistent volume annotations |
| `persistence.database.pv.finalizers` | `["kubernetes.io/pvc-protection"]` | Persistent volume finalizers |
| `persistence.database.pv.existingClaim` | `""` | Use existing PVC |
| `persistence.database.pv.extraPvcLabels` | `{}` | Extra PVC labels |
### Registry Persistence
| Parameter | Default | Description |
|-----------|---------|-------------|
| `persistence.registry.pv.storageClassName` | `""` | Storage class (empty = default) |
| `persistence.registry.pv.accessModes` | `["ReadWriteOnce"]` | Access modes |
| `persistence.registry.pv.size` | `10Gi` | Storage size |
| `persistence.registry.pv.annotations` | `{}` | Persistent volume annotations |
| `persistence.registry.pv.finalizers` | `["kubernetes.io/pvc-protection"]` | Persistent volume finalizers |
| `persistence.registry.pv.existingClaim` | `""` | Use existing PVC |
| `persistence.registry.pv.extraPvcLabels` | `{}` | Extra PVC labels |
### Distribution Configuration [(example)](#filesystem-storage-configuration)
:::Important
Set a secure random string for production deployments to ensure consistency across replicas.
:::
| Parameter | Default | Description |
|-----------|---------|-------------|
| `distribution.http.secret` | `""` | HTTP secret for upload resumption |
| `distribution.storage.filesystem.rootDirectory` | `/app/data/registry` | Root directory for registry data |
### S3 Storage Configuration [(example)](#s3-storage-configuration)
| Parameter | Default | Required | Description |
|-----------|---------|----------|-------------|
| `distribution.storage.s3.region` | `us-west-1` | Yes | AWS region |
| `distribution.storage.s3.regionEndpoint` | `""` | No | Custom S3 endpoint |
| `distribution.storage.s3.bucket` | `uds-registry` | Yes | S3 bucket name |
| `distribution.storage.s3.rootDirectory` | `registry` | No | Root directory in bucket |
| `distribution.storage.s3.secure` | `false` | No | Use HTTPS |
| `distribution.storage.s3.v4Auth` | `true` | No | Use AWS Signature Version 4 |
| `distribution.storage.s3.chunkSize` | `5242880` | No | Chunk size for multipart uploads |
| `distribution.storage.s3.multipartCopyChunkSize` | `33554432` | No | Chunk size for multipart copy |
| `distribution.storage.s3.multipartCopyMaxConcurrency` | `100` | No | Max concurrency for multipart copy |
| `distribution.storage.s3.multipartCopyThresholdSize` | `33554432` | No | Threshold for multipart copy |
| `distribution.storage.s3.storageClass` | `STANDARD` | No | S3 storage class |
| `distribution.storage.s3.keyId` | `""` | No | AWS access key ID |
| `distribution.storage.s3.accessKey` | `""` | No | AWS secret access key |
| `distribution.storage.s3.sessionToken` | `""` | No | AWS session token |
### Database Configuration [(example)](#database-examples)
## Configuration Examples
### Basic Development Setup
```yaml
replicaCount: 1
ociStorage: "filesystem"
haDatabase: false
resources:
requests:
memory: "128Mi"
cpu: "250m"
limits:
memory: "1Gi"
cpu: "750m"
```
### Database Examples
**SQLite (Default):**
```yaml
database:
type: sqlite3
connectionString: "file:./db/registry.sqlite?_pragma=foreign_keys(1)"
```
**PostgreSQL for Production:**
```yaml
database:
type: postgres
connectionString: "postgres://user:password@host:5432/dbname?sslmode=require"
```
### Filesystem Storage Configuration
```yaml
# Basic filesystem storage with logging
distribution:
version: "0.1"
storage:
filesystem:
rootdirectory: "./data/registry"
http:
secret: "my-cool-secret"
logging:
level: "INFO"
```
### Classification Banner
```yaml
classificationBanner:
classification: "CUI"
label: "CUI//EXERCISE USE ONLY"
```
```yaml
classificationBanner:
classification: "SECRET"
label: ""
```
### S3 Storage Configuration
```yaml
# S3 storage with comprehensive settings
distribution:
version: "0.1"
storage:
s3:
region: "us-east-1"
bucket: "uds-registry"
accesskey: "${AWS_ACCESS_KEY}"
secretkey: "${AWS_SECRET_KEY}"
# Optional: Custom S3 endpoint for S3-compatible storage
# regionendpoint: "https://custom.s3.endpoint"
# forcepathstyle: true
# encrypt: true
# rootdirectory: "/registry"
# storageclass: "STANDARD"
# secure: true
cache:
blobdescriptor: "inmemory"
```
### Authentication with OpenID Connect
```yaml
# OIDC authentication configuration
auth:
sso:
issuer: "https://sso.uds.dev/realms/uds"
clientId: "uds-registry"
clientSecret: "your-client-secret"
callbackUrl: "https://registry.example.com/uds/auth/callback"
# Optional: Custom scopes and claims
# scopes:
# - "openid"
# - "profile"
# - "email"
# claims:
# username: "preferred_username"
# email: "email"
# name: "name"
# groups: "groups"
```
### Authentication and Session Configuration
```yaml
# Authentication, token management, and session settings
auth:
webSession:
duration: "8h"
cookieDomain: "example.com"
publicOrgs:
# Organizations with UI access (no OCI access)
metadataAccess:
- "public"
# Organizations with UI access (auth required for OCI)
readAccess:
- "defenseunicorns"
access:
admins:
- "admin@example.com"
personalTokens:
defaultExpiry: "168h" # 7 days
maxExpiry: "4320h" # 180 days
serviceTokens:
defaultExpiry: "168h" # 7 days
maxExpiry: "4320h" # 180 days
```
### Scanner Configuration
```yaml
# Vulnerability scanner settings
scanner:
enabled: true
updateInterval: "6h"
scanInterval: "1h" # More frequent for dev/test (default: 24h)
```
### Feature Flags Configuration
```yaml
# Enable/disable registry features
features:
servePrivate: true
registryAnalytics: false
strictPackageValidation: true
```
### Production Setup with S3 and HA
```yaml
replicaCount: 3
ociStorage: "s3"
haDatabase: true
resources:
requests:
memory: "512Mi"
cpu: "500m"
limits:
memory: "2Gi"
cpu: "1000m"
distribution:
http:
secret: "your-secure-random-string"
storage:
s3:
region: "us-east-1"
bucket: "my-registry-bucket"
accessKey: "your-access-key"
secretKey: "your-secret-key"
database:
type: "postgres"
connectionString: "postgres://user:password@db-host:5432/registry"
```
### Complete Configuration Example
```yaml
# Comprehensive configuration combining multiple aspects
distribution:
version: "0.1"
storage:
s3:
region: "us-east-1"
bucket: "production-registry"
accesskey: "${AWS_ACCESS_KEY}"
secretkey: "${AWS_SECRET_KEY}"
encrypt: true
storageclass: "STANDARD"
cache:
blobdescriptor: "inmemory"
http:
secret: "production-secret-key"
auth:
sso:
issuer: "https://sso.company.com/realms/production"
clientId: "uds-registry-prod"
clientSecret: "${OIDC_CLIENT_SECRET}"
callbackUrl: "https://registry.company.com/uds/auth/callback"
webSession:
duration: "8h"
cookieDomain: "company.com"
publicOrgs:
metadataAccess:
- "public"
readAccess:
- "shared"
access:
admins:
- "registry-admin@company.com"
personalTokens:
defaultExpiry: "720h" # 30 days
maxExpiry: "4320h" # 180 days
scanner:
enabled: true
updateInterval: "12h"
scanInterval: "24h"
features:
servePrivate: true
registryAnalytics: true
logging:
level: "INFO"
database:
type: "postgres"
connectionString: "postgres://registry:${DB_PASSWORD}@db.company.com:5432/registry?sslmode=require"
```
-----
# Getting Started
### Explore Our Public Registry
[registry.defenseunicorns.com](https://registry.defenseunicorns.com/) is a hosted instance of UDS Registry and is **free to try**. It is the easiest way to explore UDS packages and see how the registry works. There are two main organizations to explore, each serving different purposes for package distribution and evaluation.
- **[Airgap Store](https://registry.defenseunicorns.com/org/airgap-store/packages)** - lists all UDS Packages published by Defense Unicorns. All packages in this organization are view-only: you can access configuration, SBOM and vulnerability data, but you cannot pull or deploy a package directly from this organization.
- **[Public](https://registry.defenseunicorns.com/org/public/packages)** - contains public packages that can be pulled and deployed.
**Create a free account** at [registry.defenseunicorns.com/sign-in](https://registry.defenseunicorns.com/sign-in) for additional benefits:
- Gain access to our public organization and download related packages at no cost
- Create and manage tokens for automated package retrieval and CI/CD integration
### Deploy Your Own Registry
UDS Registry is Airgap native and can be self hosted! [Contact us](https://defenseunicorns.com/registry-inquiry) to get access to the UDS Registry package.
Deploy the UDS Registry package in your [UDS Bundle](https://uds.defenseunicorns.com/reference/bundles/overview/), see the [UDS Registry Configuration Guide](/registry/configuration) for more details.
```yaml
# Example: uds-bundle.yaml
kind: UDSBundle
metadata:
name: registry
description: A UDS bundle for deploying UDS Registry package
version: dev
packages:
- name: uds-registry
path: "path/to/uds-registry/package"
ref: 0.0.1
overrides:
uds-registry:
uds-registry:
values:
# List of orgs that can be accessed without authentication in the UI, but no implicit access to OCI endpoints
- path: registry.auth.publicOrgs.metadataAccess
value:
- view-only
# List of orgs that can be accessed without authentication in the UI, but still require authentication for OCI endpoints
- path: registry.auth.publicOrgs.readAccess
value:
- public
# Specify initial admin users
- path: registry.auth.access.admins
value:
- admin-user@defenseunicorns.com
```
## Support
For assistance with the UDS Registry, contact the UDS support team at hello@defenseunicorns.com or through the internal support channels.
-----
# Registry Overview
:::tip[Check it out now!]
The [UDS Registry](https://registry.defenseunicorns.com/) is live now.
:::
UDS Registry is an OCI-compliant registry specifically designed for the Department of Defense (DoD) to manage and deploy UDS packages to any mission environment. This centralized, security-focused system helps you discover, distribute, and deploy your team's mission applications onto our DoD-compliant platform [UDS Core](https://uds.defenseunicorns.com/reference/uds-core/overview/) while preserving critical security metadata throughout the software delivery lifecycle.
**UDS Registry delivers three key benefits:**
- Reduces time to deployment through streamlined package management
- Consolidates CVE & Software Bill of Materials (SBOM) data for comprehensive security & compliance visibility
- Simplifies procurement by providing clear access and dissemination of authorized packages
| Parameter | Default | Options | Description |
|-----------|---------|---------|-------------|
| `database.type` | `sqlite3` | `sqlite3`, `postgres` | Database type |
| `database.connectionString` | `file:./db/registry.sqlite?_pragma=foreign_keys(1)` | - | Database connection string |
### Security Configuration
| Parameter | Default | Description |
|-----------|---------|-------------|
| `serviceAccount.annotations` | `""` | Service account annotations |
| `podSecurityContext.runAsUser` | `65532` | User ID to run pods |
| `podSecurityContext.runAsGroup` | `65532` | Group ID to run pods |
| `podSecurityContext.fsGroup` | `65532` | Filesystem group ID |
| `containerSecurityContext.runAsUser` | `65532` | User ID for containers |
| `containerSecurityContext.runAsGroup` | `65532` | Group ID for containers |
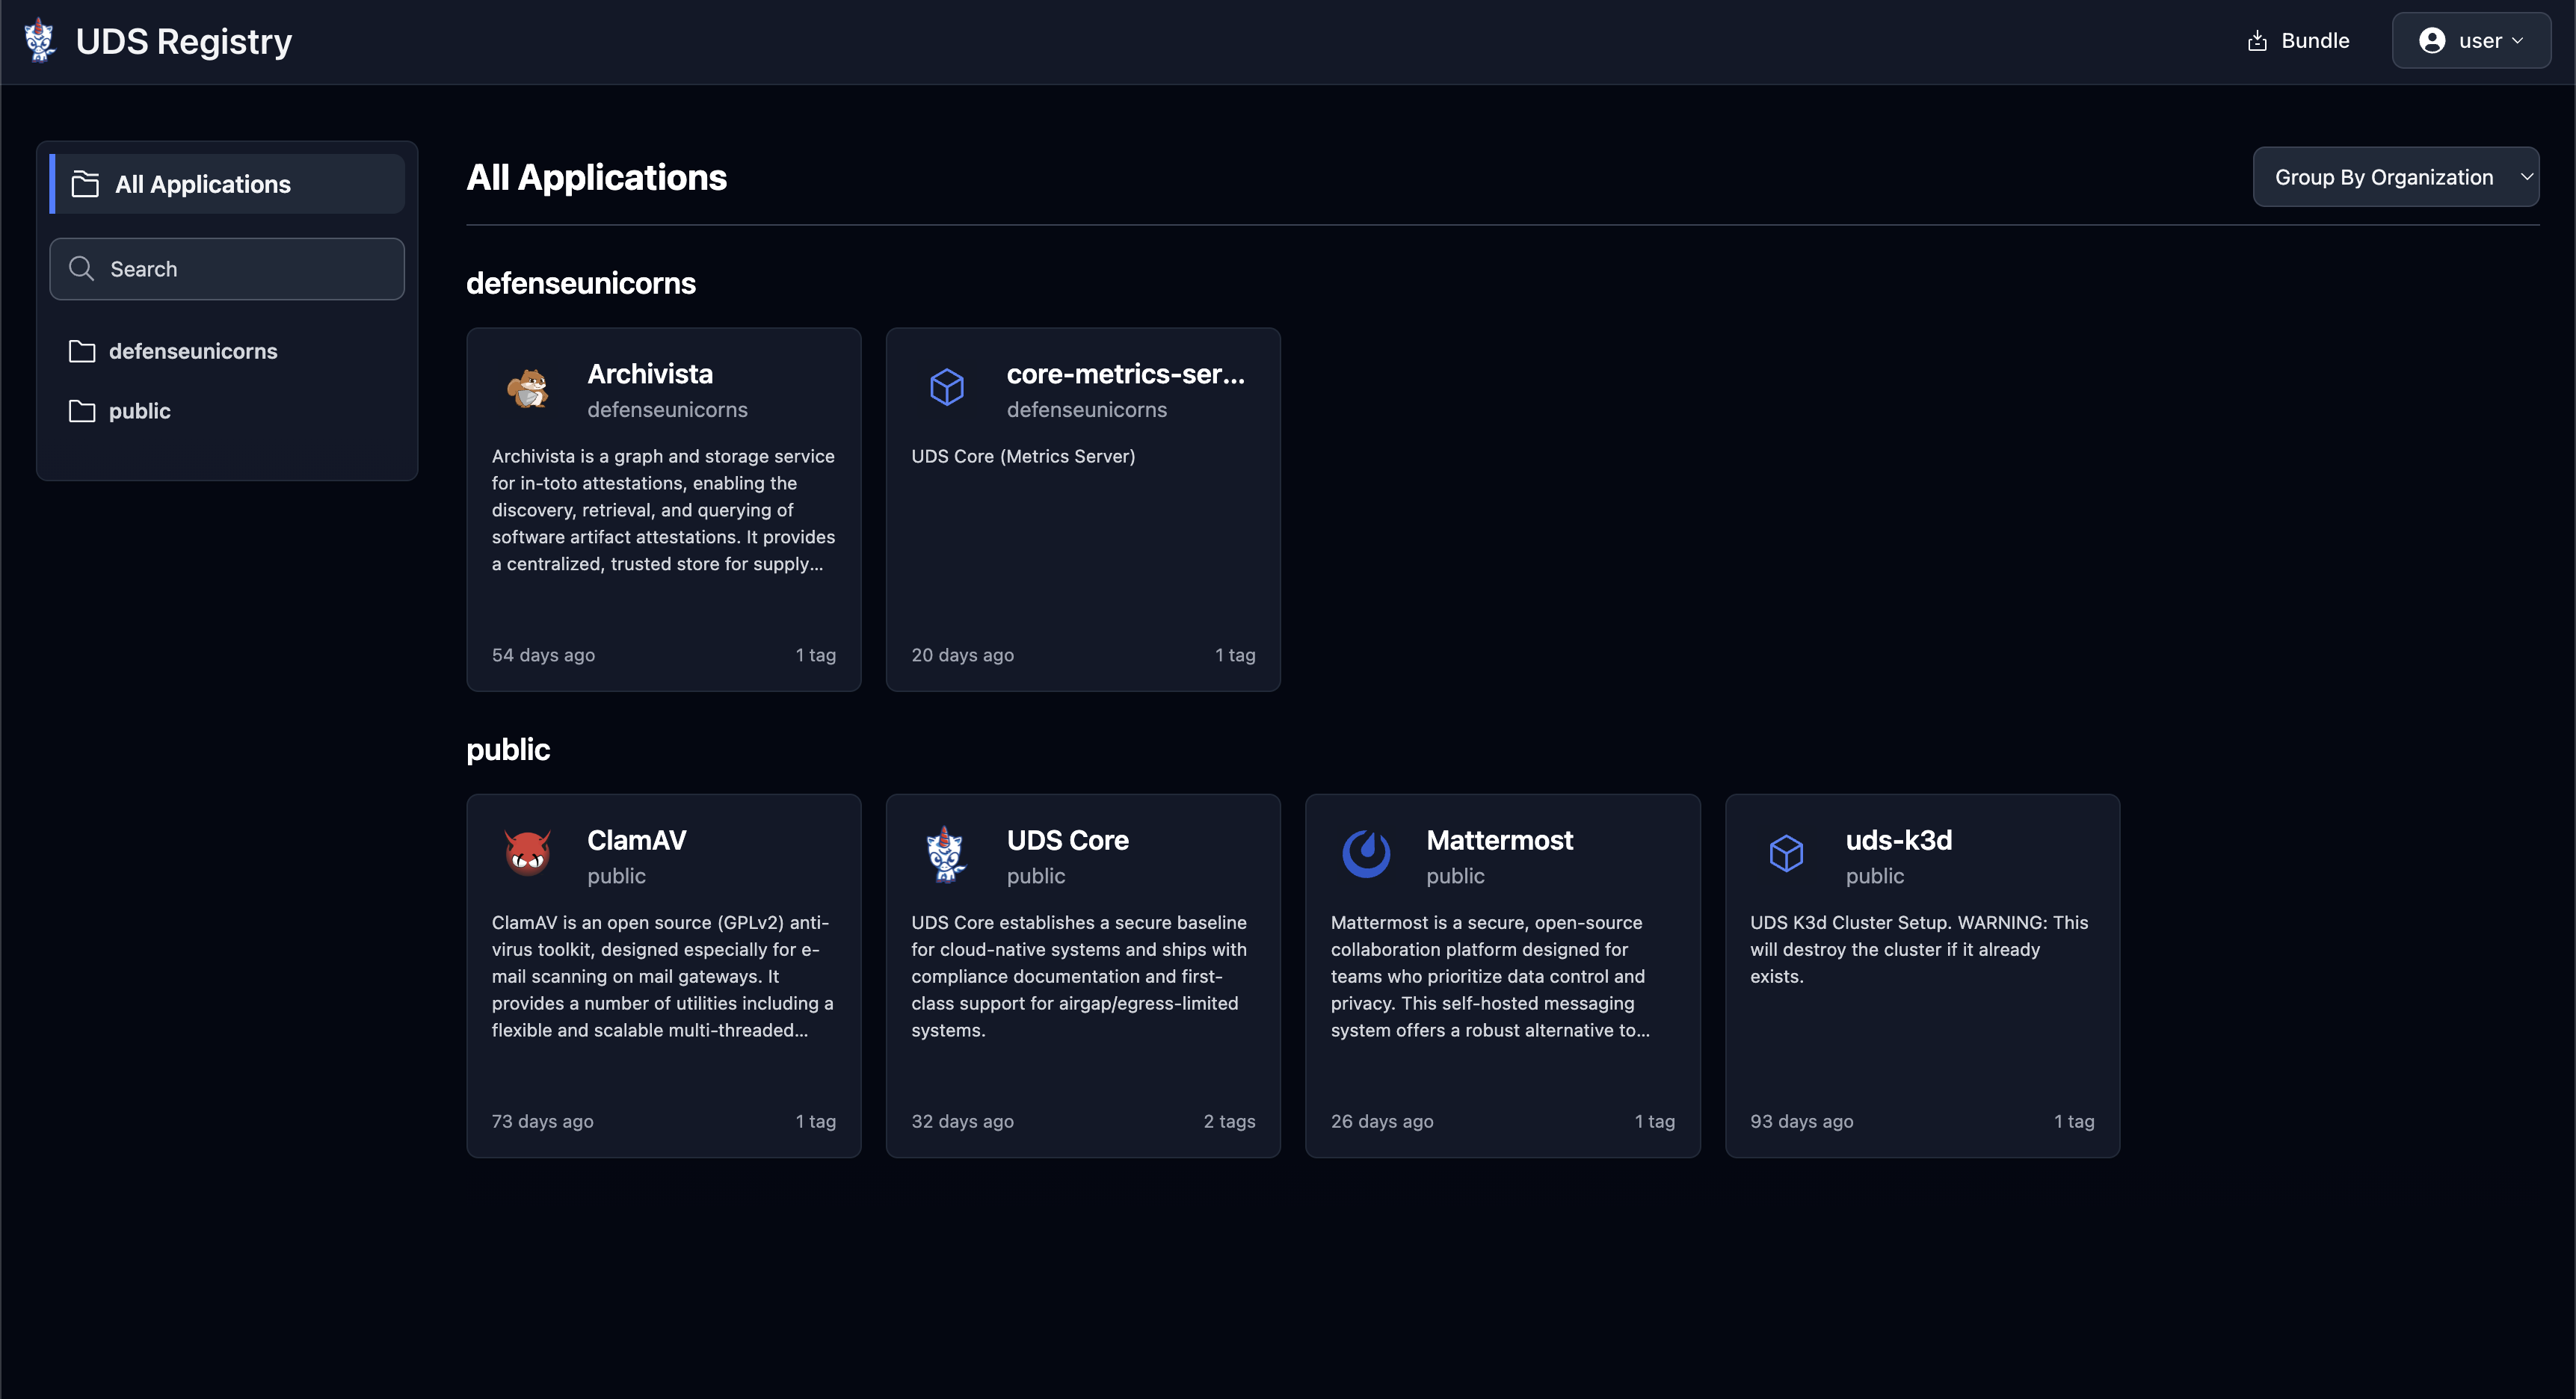
|
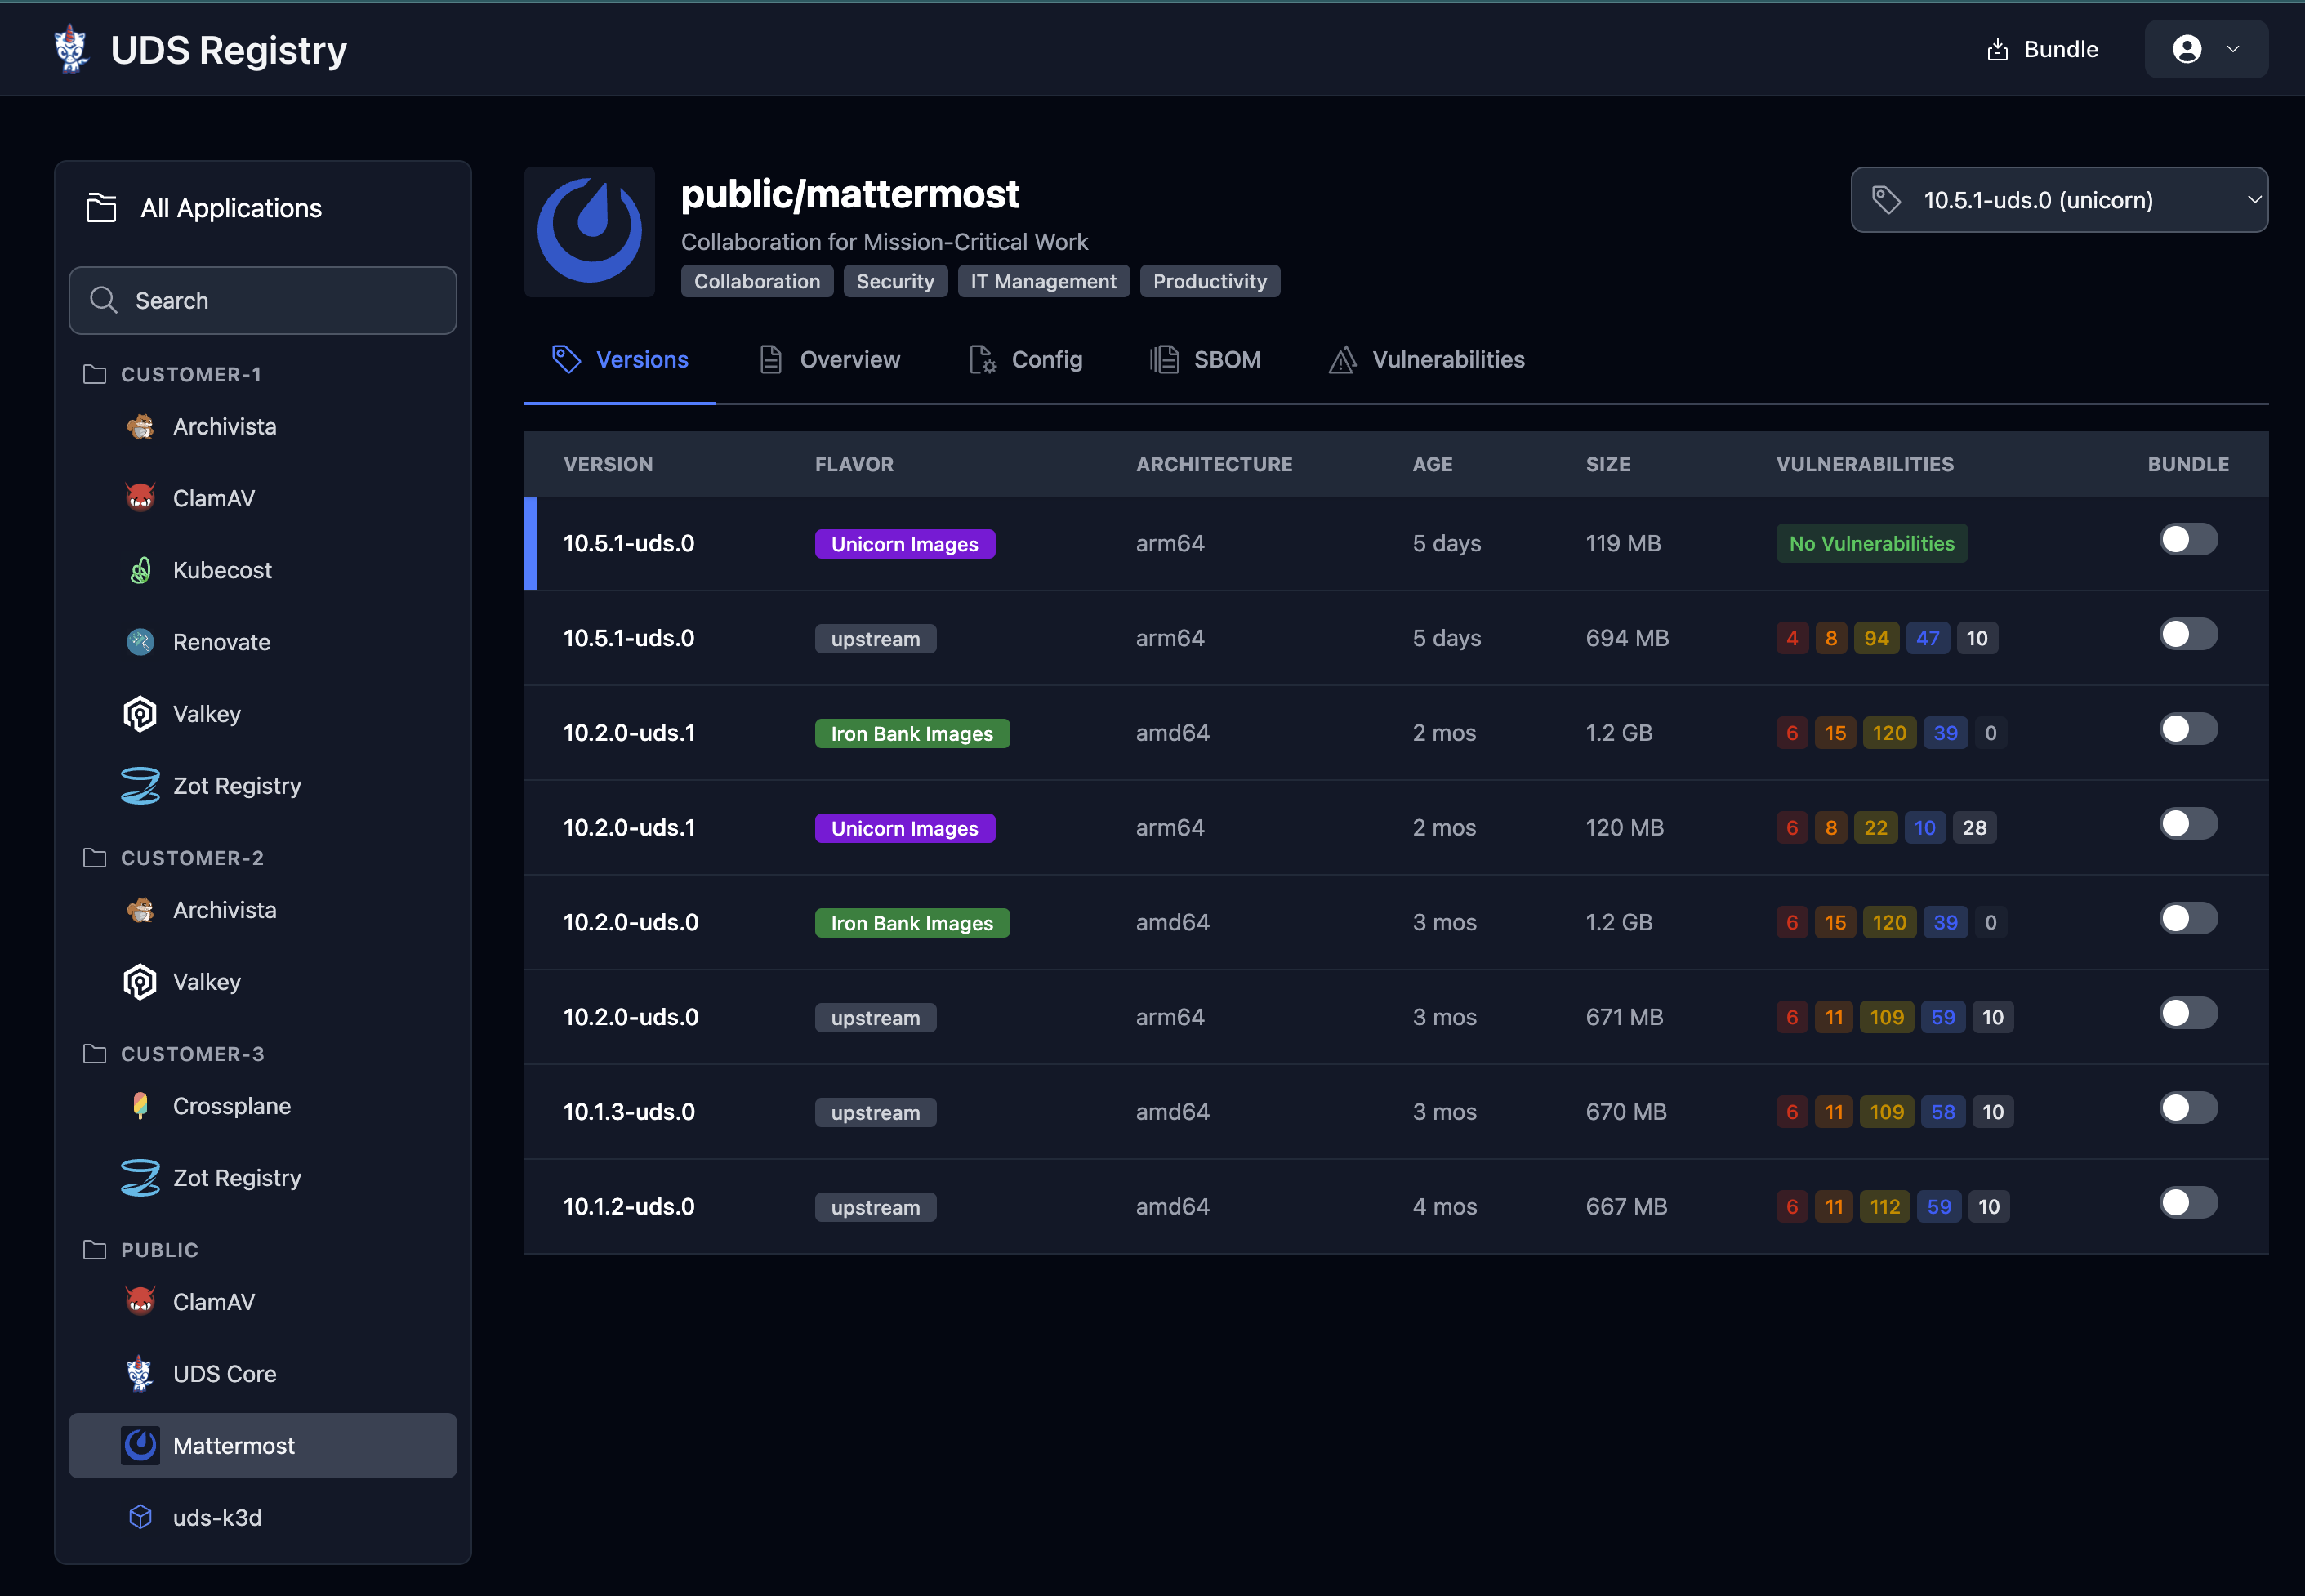
|
|
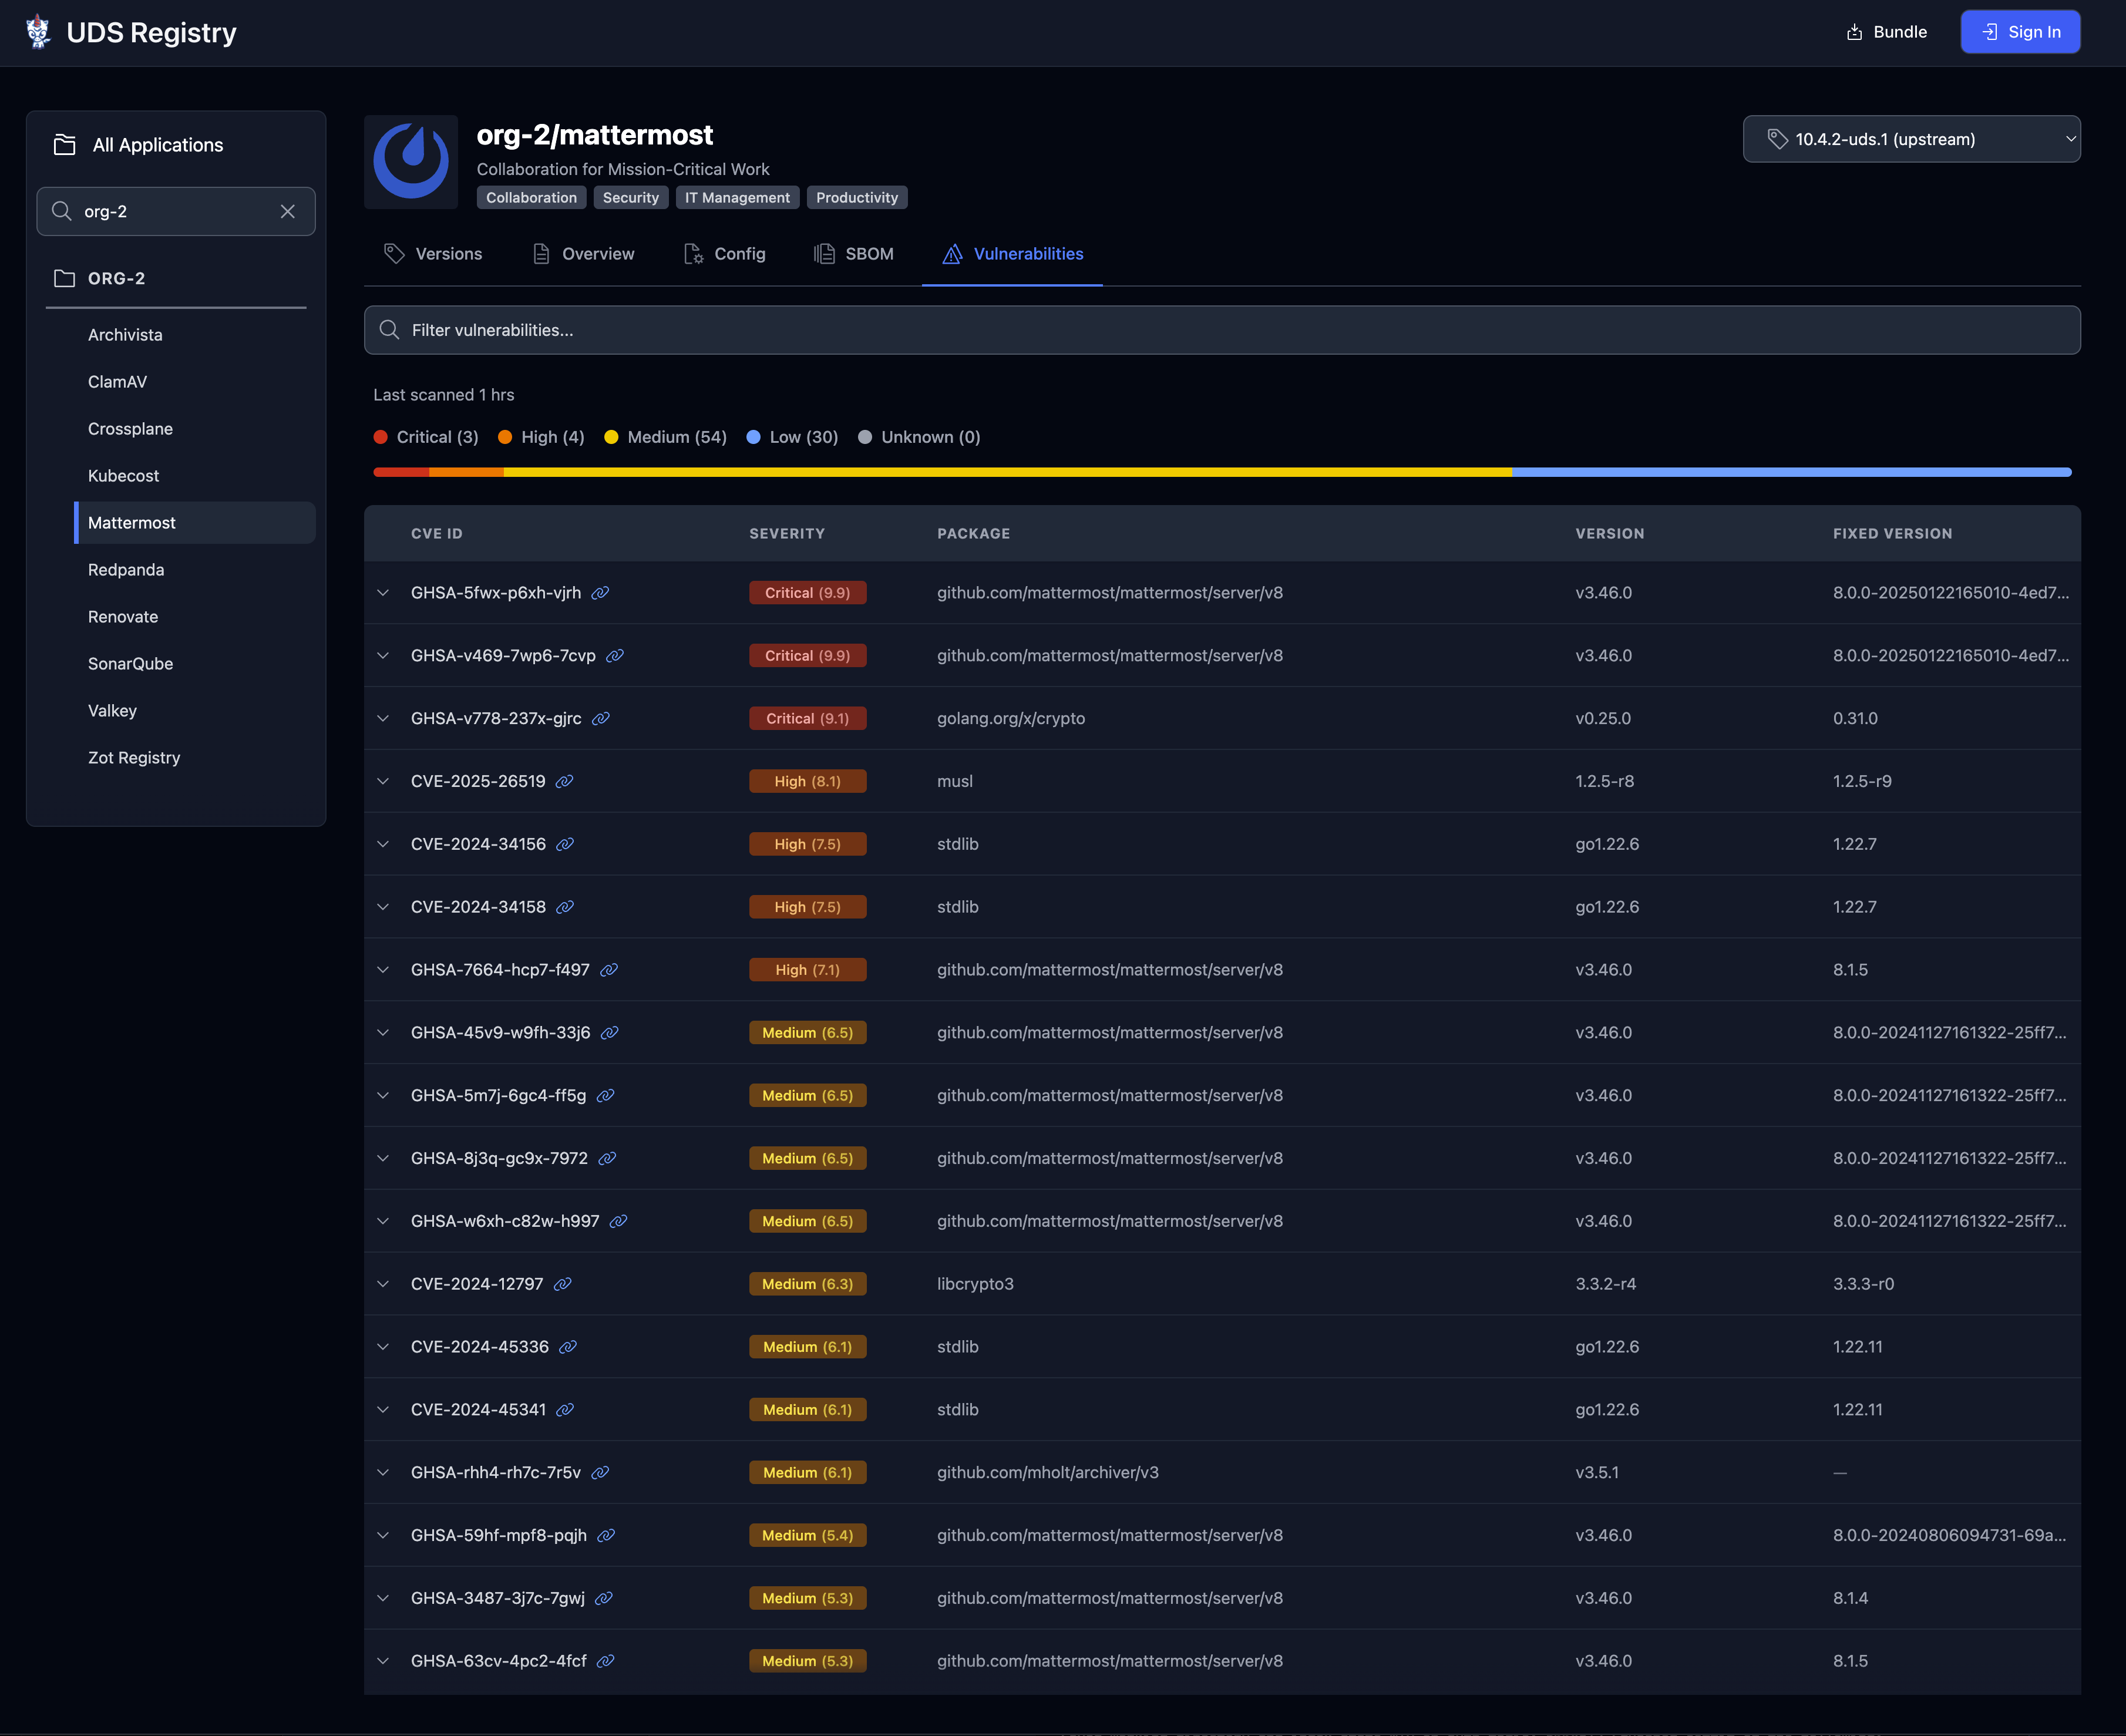
|
|
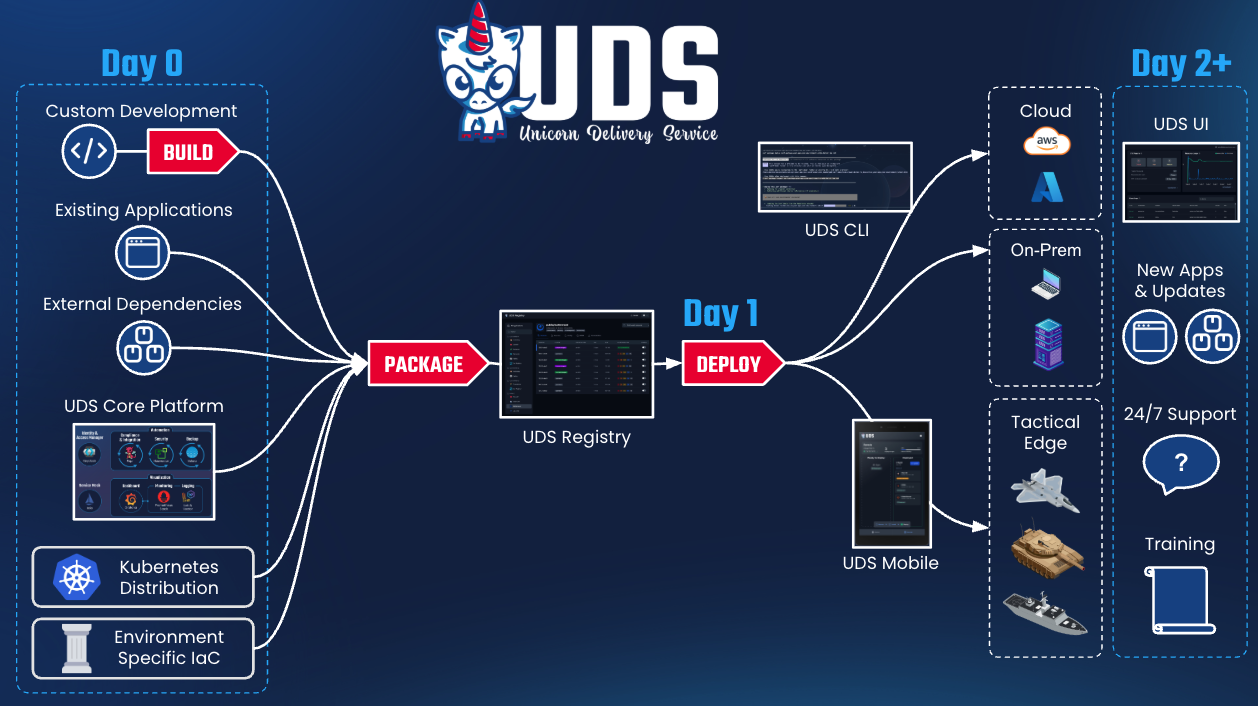
|
|
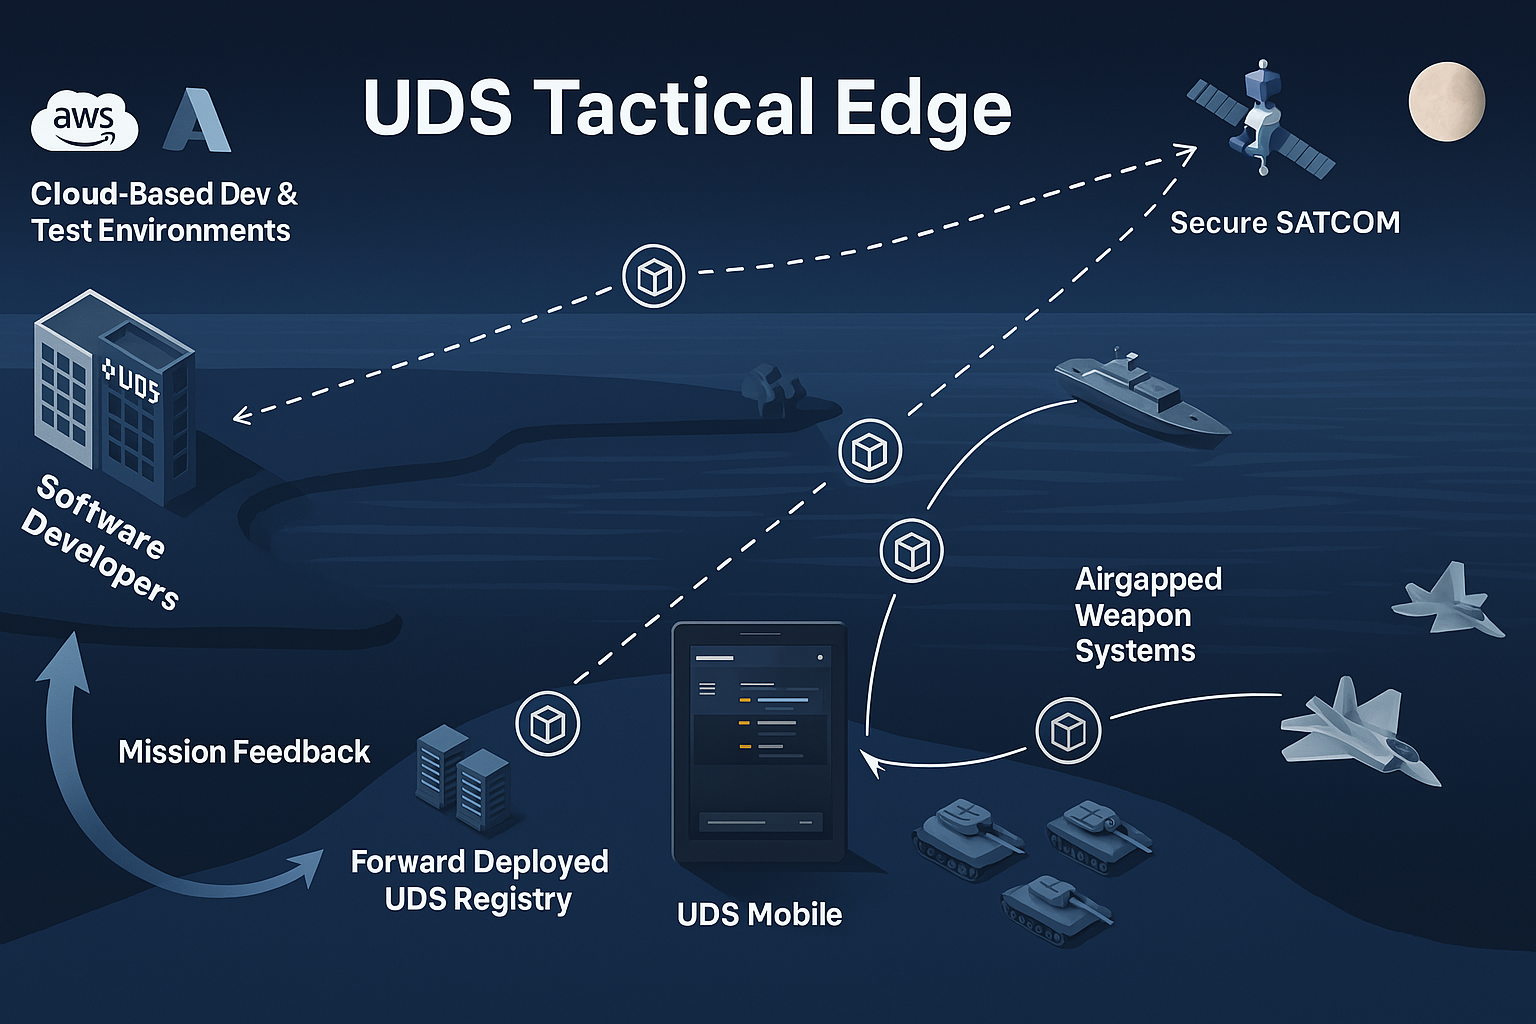
|
|
[Mission and Technical Relevance](https://uds.defenseunicorns.com/overview/uds-mission-relevance/)
[UDS Packages](https://uds.defenseunicorns.com/structure/packages/)
[UDS Security Overview](https://uds.defenseunicorns.com/security/overview/)
[Published Package Flavors](https://uds.defenseunicorns.com/reference/deployment/flavors/)
## Support For assistance with the UDS Registry, contact the UDS support team at hello@defenseunicorns.com or through the internal support channels. ----- # Supported Artifact Types ### Supported Artifacts Here is a list of the supported artifact types: - [Zarf Packages](https://docs.zarf.dev/ref/packages/) (Including [UDS Packages](/structure/packages/)) - Docker Images - OCI Images - Helm Charts - OpenTofu Modules - OpenTofu Providers - OCI Artifacts[^1] **Recommended: [Zarf Packages](https://docs.zarf.dev/ref/packages/) (Including [UDS Packages](/structure/packages/)).** While UDS Registry can store multiple OCI artifact types, Zarf packages are the preferred, first-class unit of delivery. A Zarf package bundles the application's container images, Helm charts, and manifests into a single deployable artifact, making it the most reliable way to move software across disconnected and mission environments. UDS Packages build on Zarf (a Zarf package plus UDS-specific integration) and are the recommended format for delivering applications into UDS Core, preserving the metadata and structure needed for secure, repeatable deployments. ### Supported Features UDS Registry supports publishing artifacts with standard OCI tooling. For every supported artifact type you can: - **Push** from the CLI using OCI-compliant tools - **Pull** with any OCI client - **Inspect** the artifact in the UDS Registry UI (including tags, digests, and other metadata) Some artifact types also support additional supply chain features, including SBOM and vulnerability scanning. Refer to the table below for details:
| Artifact Type | SBOM scan | Vulnerability scan |
|---|---|---|
| Zarf Packages | Supported | Supported |
| Docker Images | Coming soon | Coming soon |
| OCI Images | Coming soon | Coming soon |
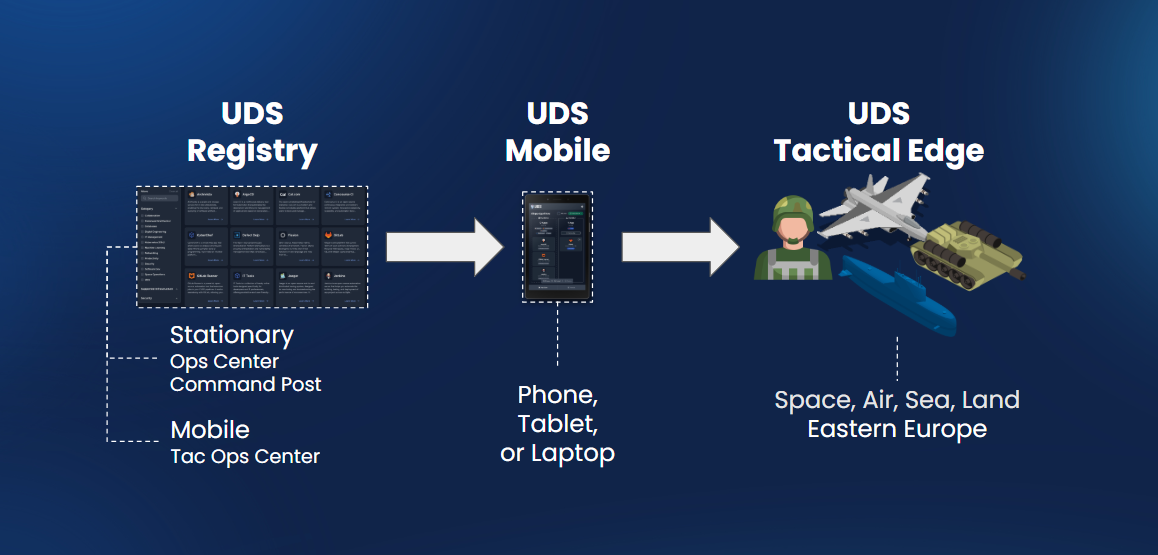 ### Is UDS Tactical Edge part of UDS?
- Yes, UDS Tactical Edge is a part of UDS. UDS Tactical Edge is a UDS capability with its own licensing.
### Can you explain what makes UDS Tactical Edge a capability of UDS?
- It is a collection of UDS clients and services that simplifies the use of UDS in resource-constrained environments.
- UDS is being configured specifically for tactical edge environments.
### Has UDS been deployed successfully in resource-constrained environments (edge)?
- Yes, Defense Unicorns has deployed UDS in resource-constrained environments. To discuss real-world applications, please contact [hello@defenseunicorns.com](mailto:hello@defenseunicorns.com) for more information.
### What additional features come with UDS Tactical Edge?
Defense Unicorns offers a variety of capabilities that can be bundled with your UDS Tactical Edge subscription. Some examples include:
- Unicorn or Ironbank Hardened Images
- Software Bill of Materials
- Compliance Artifacts (SCTM, SSP, etc.)
- UDS Registry and observability dashboards
- Infrastructure-specific support
- Hands-on training
To discuss licensing options, please contact [hello@defenseunicorns.com](mailto:hello@defenseunicorns.com) for more information.
### Does UDS Tactical Edge come with 24/7 support?
- Yes, UDS Tactical Edge includes 24/7 customer support via business email and phone number.
### Can you explain what in UDS Tactical Edge is proprietary or open source?
- UDS Tactical Edge is a paid stock-keeping unit (SKU) of products that includes the open-source UDS Core platform along with proprietary components that make application management easier while operating at the tactical edge.
### What happens if I stop paying for UDS Tactical Edge?
If you stop paying for UDS Tactical Edge:
- You would retain access to UDS Core and other open-source components.
- You would revert to the AGPLv3 license for receiving updates for those open-source components.
- You would lose operational support from Defense Unicorns.
- You would no longer receive updates for proprietary components, such as the Android application.
-----
# Tactical Edge Overview
UDS Tactical Edge brings our proven secure software delivery platform, UDS, to the most challenging operational environments. Deploy Kubernetes directly to anything from small remote devices with resource constraints to the DoD’s next-generation weapon systems and platforms.
- Limited resources needed (4GB RAM, such as a Raspberry Pi 5)
- Applications can run with or without connectivity - a fully airgapped solution
- Control deployments using a mobile app (tablets/smartphones) or CLI tools (laptops/desktops).
UDS Tactical Edge ensures your critical operations have the same secure and efficient software delivery capabilities in the field that you expect in enterprise environments.
To learn more watch this product explainer video. [**Contact us**](https://defenseunicorns.com/contactus) if you want to see how we can help your mission.
## One-to-Many Fleet Management
### Is UDS Tactical Edge part of UDS?
- Yes, UDS Tactical Edge is a part of UDS. UDS Tactical Edge is a UDS capability with its own licensing.
### Can you explain what makes UDS Tactical Edge a capability of UDS?
- It is a collection of UDS clients and services that simplifies the use of UDS in resource-constrained environments.
- UDS is being configured specifically for tactical edge environments.
### Has UDS been deployed successfully in resource-constrained environments (edge)?
- Yes, Defense Unicorns has deployed UDS in resource-constrained environments. To discuss real-world applications, please contact [hello@defenseunicorns.com](mailto:hello@defenseunicorns.com) for more information.
### What additional features come with UDS Tactical Edge?
Defense Unicorns offers a variety of capabilities that can be bundled with your UDS Tactical Edge subscription. Some examples include:
- Unicorn or Ironbank Hardened Images
- Software Bill of Materials
- Compliance Artifacts (SCTM, SSP, etc.)
- UDS Registry and observability dashboards
- Infrastructure-specific support
- Hands-on training
To discuss licensing options, please contact [hello@defenseunicorns.com](mailto:hello@defenseunicorns.com) for more information.
### Does UDS Tactical Edge come with 24/7 support?
- Yes, UDS Tactical Edge includes 24/7 customer support via business email and phone number.
### Can you explain what in UDS Tactical Edge is proprietary or open source?
- UDS Tactical Edge is a paid stock-keeping unit (SKU) of products that includes the open-source UDS Core platform along with proprietary components that make application management easier while operating at the tactical edge.
### What happens if I stop paying for UDS Tactical Edge?
If you stop paying for UDS Tactical Edge:
- You would retain access to UDS Core and other open-source components.
- You would revert to the AGPLv3 license for receiving updates for those open-source components.
- You would lose operational support from Defense Unicorns.
- You would no longer receive updates for proprietary components, such as the Android application.
-----
# Tactical Edge Overview
UDS Tactical Edge brings our proven secure software delivery platform, UDS, to the most challenging operational environments. Deploy Kubernetes directly to anything from small remote devices with resource constraints to the DoD’s next-generation weapon systems and platforms.
- Limited resources needed (4GB RAM, such as a Raspberry Pi 5)
- Applications can run with or without connectivity - a fully airgapped solution
- Control deployments using a mobile app (tablets/smartphones) or CLI tools (laptops/desktops).
UDS Tactical Edge ensures your critical operations have the same secure and efficient software delivery capabilities in the field that you expect in enterprise environments.
To learn more watch this product explainer video. [**Contact us**](https://defenseunicorns.com/contactus) if you want to see how we can help your mission.
## One-to-Many Fleet Management

|
|

|
|

|
|

|
|
For a 1:1 consultation, contact us.
-----
# Tactical Edge Technical Features
## UDS Tactical Edge Technical Features
UDS as a platform was built to be scalable and flexible to accommodate a variety of deployment scenarios. UDS Tactical Edge is the specific implementation of the UDS Core platform along with additional UDS services tailored for tactical edge deployments.
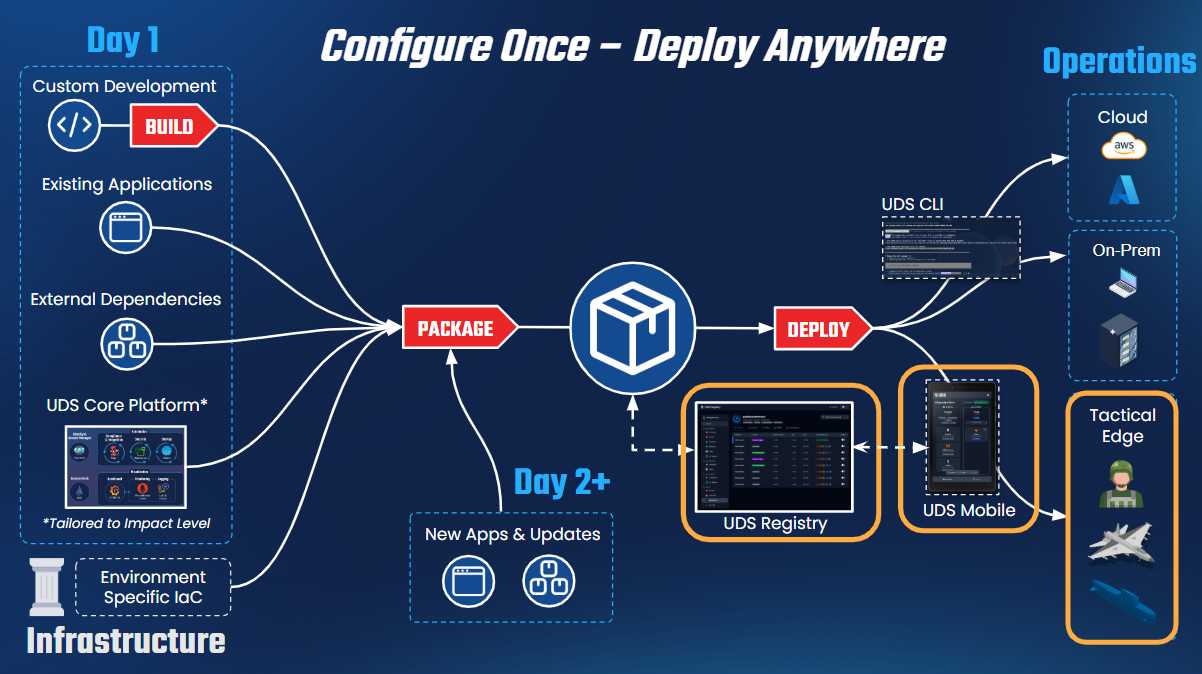 This is achieved through:
- **Functional Layer Paradigm**: UDS Core’s modular architecture allows unnecessary features to be omitted, optimizing for size, weight, and power (SWaP) constraints.
- **UDS Remote Agent**: A critical service that enables remote operation, facilitating control and monitoring of edge deployments. While primarily for UDS Edge, it can also benefit hub-spoke cloud deployments.
- **UDS Android App**: Designed to provide a mobile interface, ensuring accessibility and operational efficiency in austere environments.
While these services may not be exclusive to UDS Tactical Edge, this implementation serves as their primary use case in the near term, ensuring lightweight, efficient, and flexible deployment models tailored for tactical edge missions.
## Walkthrough Demo
## Technical Features for UDS Tactical Edge
### **1. Distributed Software and Asset Management**
- UDS enables declarative versioning of application states, ensuring consistent and reliable deployments across a distributed fleet.
- Automated or semi-automated execution allows less-experienced personnel to manage deployments, reducing system administrator workload.
- Supports smooth, incremental updates that minimize operational disruptions while maintaining software integrity across disconnected and contested environments.
### **2. Integrate Once, Deploy Anywhere**
- Operator-based architecture allows applications to dynamically adapt to their environment.
- Automates infrastructure configuration, including:
- Domain name management via UDS Package custom resources.
- Single sign-on (SSO) integration.
- Network policy automation.
- Metrics monitoring and logging.
- Ensures seamless application portability across cloud, on-premise, and edge environments.
### **3. Interface Built for Use in Combat Operations**
- Designed for high-stakes environments where user focus on the mission is critical to survival.
- Simplifies complex deployments, making software updates and management intuitive.
- Actively incorporates real user feedback to surface critical information while removing unnecessary distractions.
### **4. Airgapped Mission Applications Where You Need It**
- UDS manages software updates via declarative Open Container Initiative (OCI) artifacts.
- These artifacts include:
- Application binaries.
- Defined end-state configurations.
- Compliance artifacts for security validation.
- Ensures that UDS-deployed applications are self-contained, portable, and built on open standards, enabling seamless transport and deployment anywhere the mission requires.
With these features, UDS Tactical Edge provides a battlefield-ready platform that ensures operational efficiency, security, and adaptability for modern warfighting environments.
This is achieved through:
- **Functional Layer Paradigm**: UDS Core’s modular architecture allows unnecessary features to be omitted, optimizing for size, weight, and power (SWaP) constraints.
- **UDS Remote Agent**: A critical service that enables remote operation, facilitating control and monitoring of edge deployments. While primarily for UDS Edge, it can also benefit hub-spoke cloud deployments.
- **UDS Android App**: Designed to provide a mobile interface, ensuring accessibility and operational efficiency in austere environments.
While these services may not be exclusive to UDS Tactical Edge, this implementation serves as their primary use case in the near term, ensuring lightweight, efficient, and flexible deployment models tailored for tactical edge missions.
## Walkthrough Demo
## Technical Features for UDS Tactical Edge
### **1. Distributed Software and Asset Management**
- UDS enables declarative versioning of application states, ensuring consistent and reliable deployments across a distributed fleet.
- Automated or semi-automated execution allows less-experienced personnel to manage deployments, reducing system administrator workload.
- Supports smooth, incremental updates that minimize operational disruptions while maintaining software integrity across disconnected and contested environments.
### **2. Integrate Once, Deploy Anywhere**
- Operator-based architecture allows applications to dynamically adapt to their environment.
- Automates infrastructure configuration, including:
- Domain name management via UDS Package custom resources.
- Single sign-on (SSO) integration.
- Network policy automation.
- Metrics monitoring and logging.
- Ensures seamless application portability across cloud, on-premise, and edge environments.
### **3. Interface Built for Use in Combat Operations**
- Designed for high-stakes environments where user focus on the mission is critical to survival.
- Simplifies complex deployments, making software updates and management intuitive.
- Actively incorporates real user feedback to surface critical information while removing unnecessary distractions.
### **4. Airgapped Mission Applications Where You Need It**
- UDS manages software updates via declarative Open Container Initiative (OCI) artifacts.
- These artifacts include:
- Application binaries.
- Defined end-state configurations.
- Compliance artifacts for security validation.
- Ensures that UDS-deployed applications are self-contained, portable, and built on open standards, enabling seamless transport and deployment anywhere the mission requires.
With these features, UDS Tactical Edge provides a battlefield-ready platform that ensures operational efficiency, security, and adaptability for modern warfighting environments.
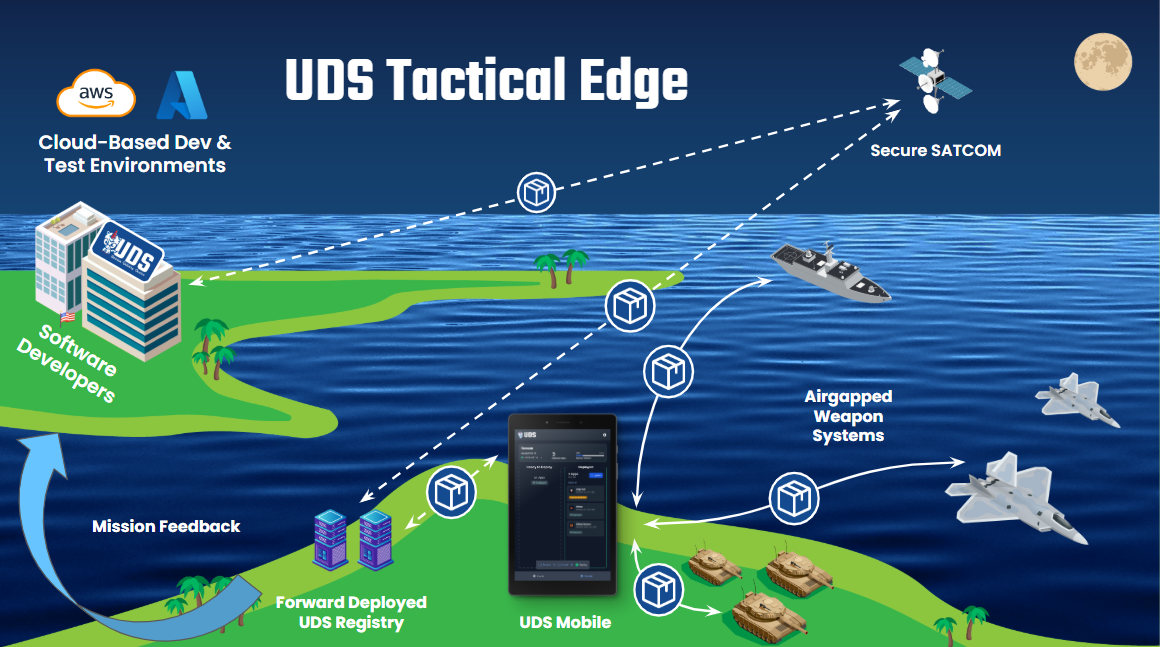 -----
# Adding UDS Configuration to a Zarf Package
To consider `podinfo` as a fully integrated [UDS Package](https://uds.defenseunicorns.com/structure/packages/), the `Package` Custom Resource for the UDS Operator must be included as part of the Zarf Package for `podinfo`. In this section, we will cover adding the `podinfo-package.yaml` to the sample UDS Bundle that we created in the [first](/tutorials/deploy-with-uds-core) tutorial.
### Prerequisites
This guide assumes that you created the UDS `Package` Custom Resource in the [previous](/tutorials/create-uds-package) tutorial.
### Adding Package Manifest to Podinfo
Within the `zarf.yaml` file that exists in the `package` directory, modify the `podinfo` component to reference the manifest created in the previous tutorial:
```yaml
kind: ZarfPackageConfig
metadata:
name: podinfo
version: 0.0.1
components:
- name: podinfo
required: true
charts:
- name: podinfo
version: 6.10.1
namespace: podinfo
url: https://github.com/stefanprodan/podinfo.git
gitPath: charts/podinfo
# Add this new manifests section with our Package CR
manifests:
- name: podinfo-uds-config
namespace: podinfo
files:
- podinfo-package.yaml
images:
- ghcr.io/stefanprodan/podinfo:6.10.1
actions:
onDeploy:
after:
- wait:
cluster:
kind: deployment
name: podinfo
namespace: podinfo
condition: available
```
Re-run `zarf package create --confirm` and `uds create --confirm` commands to generate new artifacts that now include the `Package` Custom Resource for `podinfo`. From there, the bundle can be re-deployed (`uds deploy uds-bundle-podinfo-bundle-*-0.0.1.tar.zst --confirm`) and `podinfo` will be automatically integrated with UDS Core.
#### Next Steps
(Optional) This tutorial deployed podinfo in Istio Sidecar mode - the default deployment method for applications in UDS Core. UDS Core releases v0.40.0 and later added support for Istio Ambient Mesh. To walkthrough migrating the podinfo application to Istio Ambient Mesh using the UDS Operator, continue to the next tutorial.
-----
# Integrating an Application with UDS Core
## Background
When UDS Core is deployed into a Kubernetes Cluster, an [operator](https://kubernetes.io/docs/concepts/extend-kubernetes/operator/) is deployed. An operator allows users to extend the functionality of their Kubernetes clusters via [Custom Resource Definitions](https://kubernetes.io/docs/concepts/extend-kubernetes/api-extension/custom-resources/) and custom controllers. This operator, henceforth known as the UDS Operator, looks for `Package` Custom Resources to be created. When a user creates a `Package` resource, the UDS Operator processes the request and performs the necessary operations to create the package per the [specification](/reference/configuration/custom-resources/packages-v1alpha1-cr/) given.
Read more about the UDS Operator [here](https://uds.defenseunicorns.com/reference/configuration/uds-operator/).
### Prerequisites
In this section, we will configure Single Sign On (SSO) for a sample user to access the `podinfo` application. This requires that your Keycloak instance has existing users and groups defined. This configuration has been automated via the `uds` cli.
In the root of the `package` directory, create a new file called `tasks.yaml` and include the lines below:
```yaml
includes:
- common-setup: https://raw.githubusercontent.com/defenseunicorns/uds-common/v1.24.0/tasks/setup.yaml
```
### Integrate Podinfo with UDS Core
You can think of the UDS Operator as the "glue" between your application and the services that are provided by UDS Core. It is a [Kubernetes Operator](https://kubernetes.io/docs/concepts/extend-kubernetes/operator/) that has working knowledge of UDS Core services in the cluster and takes care of integrating your app with those services for you. To register your application with the UDS Operator, you need to create a `Package` Kubernetes Custom Resource. Within the specification of the `Package` resource, you can specify different parameters that dictate how the UDS Operator should integrate your app per its unique requirements. The sections below cover creating a `Package` resource for `podinfo` and integrating `podinfo` with several UDS Core services.
:::note
The `Package` Custom Kubernetes Resource is different from a [UDS Package](https://uds.defenseunicorns.com/structure/packages/), which is a collection of the Zarf Package for your application and the Kubernetes `Package` Custom Resource.
:::
:::note
All resources created by the UDS Operator for `podinfo` will have a `uds/package=podinfo` label applied to it.
:::
#### Create a Package Resource for Podinfo
Below is a baseline definition of a `Package` Custom Resource for the `podinfo` application. As you progress through this demo, you will add values for `network`, `sso`, and `monitor`. These fields instruct the UDS Operator on how to configure networking, SSO, and monitoring for the `podinfo` application.
```yaml
apiVersion: uds.dev/v1alpha1
kind: Package
metadata:
name: podinfo
namespace: podinfo
spec:
network:
# Expose rules generate Istio VirtualServices and related network policies
expose: {}
```
Copy this YAML into a code editor and save the file as `podinfo-package.yaml`.
#### Secure Podinfo with Istio and Network Policies
UDS Core deploys [Istio](https://istio.io/), a powerful networking component that allows cluster administrators to end-to-end encrypt all cluster traffic, set explicit rules for traffic routing, add load balancing, and much more. Building on the existing `Package` definition, add the following configuration under `spec.network.expose` field:
```yaml
apiVersion: uds.dev/v1alpha1
kind: Package
metadata:
name: podinfo
namespace: podinfo
spec:
network:
# Expose rules generate Istio VirtualServices and related network policies
expose:
- service: podinfo
selector:
app.kubernetes.io/name: podinfo
gateway: tenant
host: podinfo
port: 9898
```
This change will allow us to interact with `podinfo` without having to use `kubectl port-forward`.
Save your changes and apply the file:
```bash
kubectl apply -f podinfo-package.yaml
```
View the package resource:
```bash
❯ kubectl get package -n podinfo
NAME STATUS SSO CLIENTS ENDPOINTS MONITORS NETWORK POLICIES AUTHORIZATION POLICIES AGE
podinfo Ready [] ["podinfo.uds.dev"] [] 5 2 4s
```
View the pods. Notice how the podinfo pod has an additional container as a result of the UDS Operator configuring istio:
```bash
❯ kubectl get pods -n podinfo
NAME READY STATUS RESTARTS AGE
podinfo-5cbbf59f6d-bqhsk 2/2 Running 0 2m
```
Observe the Istio VirtualService that the UDS Operator created:
```bash
❯ kubectl get virtualservice -n podinfo
NAME GATEWAYS HOSTS AGE
podinfo-tenant-podinfo-9898-podinfo ["istio-tenant-gateway/tenant-gateway"] ["podinfo.uds.dev"] 60s
```
You will also notice that the UDS Operator automatically generated a set of Kubernetes `NetworkPolicies` that restrict access to your application to only required services:
```bash
❯ kubectl get networkpolicy -n podinfo
NAME POD-SELECTOR AGE
allow-podinfo-egress-dns-lookup-via-coredns
-----
# Adding UDS Configuration to a Zarf Package
To consider `podinfo` as a fully integrated [UDS Package](https://uds.defenseunicorns.com/structure/packages/), the `Package` Custom Resource for the UDS Operator must be included as part of the Zarf Package for `podinfo`. In this section, we will cover adding the `podinfo-package.yaml` to the sample UDS Bundle that we created in the [first](/tutorials/deploy-with-uds-core) tutorial.
### Prerequisites
This guide assumes that you created the UDS `Package` Custom Resource in the [previous](/tutorials/create-uds-package) tutorial.
### Adding Package Manifest to Podinfo
Within the `zarf.yaml` file that exists in the `package` directory, modify the `podinfo` component to reference the manifest created in the previous tutorial:
```yaml
kind: ZarfPackageConfig
metadata:
name: podinfo
version: 0.0.1
components:
- name: podinfo
required: true
charts:
- name: podinfo
version: 6.10.1
namespace: podinfo
url: https://github.com/stefanprodan/podinfo.git
gitPath: charts/podinfo
# Add this new manifests section with our Package CR
manifests:
- name: podinfo-uds-config
namespace: podinfo
files:
- podinfo-package.yaml
images:
- ghcr.io/stefanprodan/podinfo:6.10.1
actions:
onDeploy:
after:
- wait:
cluster:
kind: deployment
name: podinfo
namespace: podinfo
condition: available
```
Re-run `zarf package create --confirm` and `uds create --confirm` commands to generate new artifacts that now include the `Package` Custom Resource for `podinfo`. From there, the bundle can be re-deployed (`uds deploy uds-bundle-podinfo-bundle-*-0.0.1.tar.zst --confirm`) and `podinfo` will be automatically integrated with UDS Core.
#### Next Steps
(Optional) This tutorial deployed podinfo in Istio Sidecar mode - the default deployment method for applications in UDS Core. UDS Core releases v0.40.0 and later added support for Istio Ambient Mesh. To walkthrough migrating the podinfo application to Istio Ambient Mesh using the UDS Operator, continue to the next tutorial.
-----
# Integrating an Application with UDS Core
## Background
When UDS Core is deployed into a Kubernetes Cluster, an [operator](https://kubernetes.io/docs/concepts/extend-kubernetes/operator/) is deployed. An operator allows users to extend the functionality of their Kubernetes clusters via [Custom Resource Definitions](https://kubernetes.io/docs/concepts/extend-kubernetes/api-extension/custom-resources/) and custom controllers. This operator, henceforth known as the UDS Operator, looks for `Package` Custom Resources to be created. When a user creates a `Package` resource, the UDS Operator processes the request and performs the necessary operations to create the package per the [specification](/reference/configuration/custom-resources/packages-v1alpha1-cr/) given.
Read more about the UDS Operator [here](https://uds.defenseunicorns.com/reference/configuration/uds-operator/).
### Prerequisites
In this section, we will configure Single Sign On (SSO) for a sample user to access the `podinfo` application. This requires that your Keycloak instance has existing users and groups defined. This configuration has been automated via the `uds` cli.
In the root of the `package` directory, create a new file called `tasks.yaml` and include the lines below:
```yaml
includes:
- common-setup: https://raw.githubusercontent.com/defenseunicorns/uds-common/v1.24.0/tasks/setup.yaml
```
### Integrate Podinfo with UDS Core
You can think of the UDS Operator as the "glue" between your application and the services that are provided by UDS Core. It is a [Kubernetes Operator](https://kubernetes.io/docs/concepts/extend-kubernetes/operator/) that has working knowledge of UDS Core services in the cluster and takes care of integrating your app with those services for you. To register your application with the UDS Operator, you need to create a `Package` Kubernetes Custom Resource. Within the specification of the `Package` resource, you can specify different parameters that dictate how the UDS Operator should integrate your app per its unique requirements. The sections below cover creating a `Package` resource for `podinfo` and integrating `podinfo` with several UDS Core services.
:::note
The `Package` Custom Kubernetes Resource is different from a [UDS Package](https://uds.defenseunicorns.com/structure/packages/), which is a collection of the Zarf Package for your application and the Kubernetes `Package` Custom Resource.
:::
:::note
All resources created by the UDS Operator for `podinfo` will have a `uds/package=podinfo` label applied to it.
:::
#### Create a Package Resource for Podinfo
Below is a baseline definition of a `Package` Custom Resource for the `podinfo` application. As you progress through this demo, you will add values for `network`, `sso`, and `monitor`. These fields instruct the UDS Operator on how to configure networking, SSO, and monitoring for the `podinfo` application.
```yaml
apiVersion: uds.dev/v1alpha1
kind: Package
metadata:
name: podinfo
namespace: podinfo
spec:
network:
# Expose rules generate Istio VirtualServices and related network policies
expose: {}
```
Copy this YAML into a code editor and save the file as `podinfo-package.yaml`.
#### Secure Podinfo with Istio and Network Policies
UDS Core deploys [Istio](https://istio.io/), a powerful networking component that allows cluster administrators to end-to-end encrypt all cluster traffic, set explicit rules for traffic routing, add load balancing, and much more. Building on the existing `Package` definition, add the following configuration under `spec.network.expose` field:
```yaml
apiVersion: uds.dev/v1alpha1
kind: Package
metadata:
name: podinfo
namespace: podinfo
spec:
network:
# Expose rules generate Istio VirtualServices and related network policies
expose:
- service: podinfo
selector:
app.kubernetes.io/name: podinfo
gateway: tenant
host: podinfo
port: 9898
```
This change will allow us to interact with `podinfo` without having to use `kubectl port-forward`.
Save your changes and apply the file:
```bash
kubectl apply -f podinfo-package.yaml
```
View the package resource:
```bash
❯ kubectl get package -n podinfo
NAME STATUS SSO CLIENTS ENDPOINTS MONITORS NETWORK POLICIES AUTHORIZATION POLICIES AGE
podinfo Ready [] ["podinfo.uds.dev"] [] 5 2 4s
```
View the pods. Notice how the podinfo pod has an additional container as a result of the UDS Operator configuring istio:
```bash
❯ kubectl get pods -n podinfo
NAME READY STATUS RESTARTS AGE
podinfo-5cbbf59f6d-bqhsk 2/2 Running 0 2m
```
Observe the Istio VirtualService that the UDS Operator created:
```bash
❯ kubectl get virtualservice -n podinfo
NAME GATEWAYS HOSTS AGE
podinfo-tenant-podinfo-9898-podinfo ["istio-tenant-gateway/tenant-gateway"] ["podinfo.uds.dev"] 60s
```
You will also notice that the UDS Operator automatically generated a set of Kubernetes `NetworkPolicies` that restrict access to your application to only required services:
```bash
❯ kubectl get networkpolicy -n podinfo
NAME POD-SELECTOR AGE
allow-podinfo-egress-dns-lookup-via-coredns